Product How-To Library
How Sales Funda® works
Sales Funda® is the connected business operations software product developed by Dial N Search Pvt. Ltd. This walkthrough shows the connected operational journey across enquiry, quotation, purchase, delivery, installation, AMC, and tickets. Pick a topic, open a how-to guide, and follow the exact screens your team uses.
How to use this help center
Sales Funda® is designed to connect your entire operating team. You do not need to read all 20 topics at once — start with the area you manage, or search for the screen you are stuck on.
- 1. Pick a topicTopics are grouped by what you do: sell, buy, deliver and service, insight, admin. Search if you already know the screen.
- 2. Open a how-to guideClick any question. Detailed steps and screenshots load only when opened, so the page stays fast.
- 3. Follow on-screen stepsClear, numbered steps guide you directly through the exact screens in Sales Funda®.
Dashboard
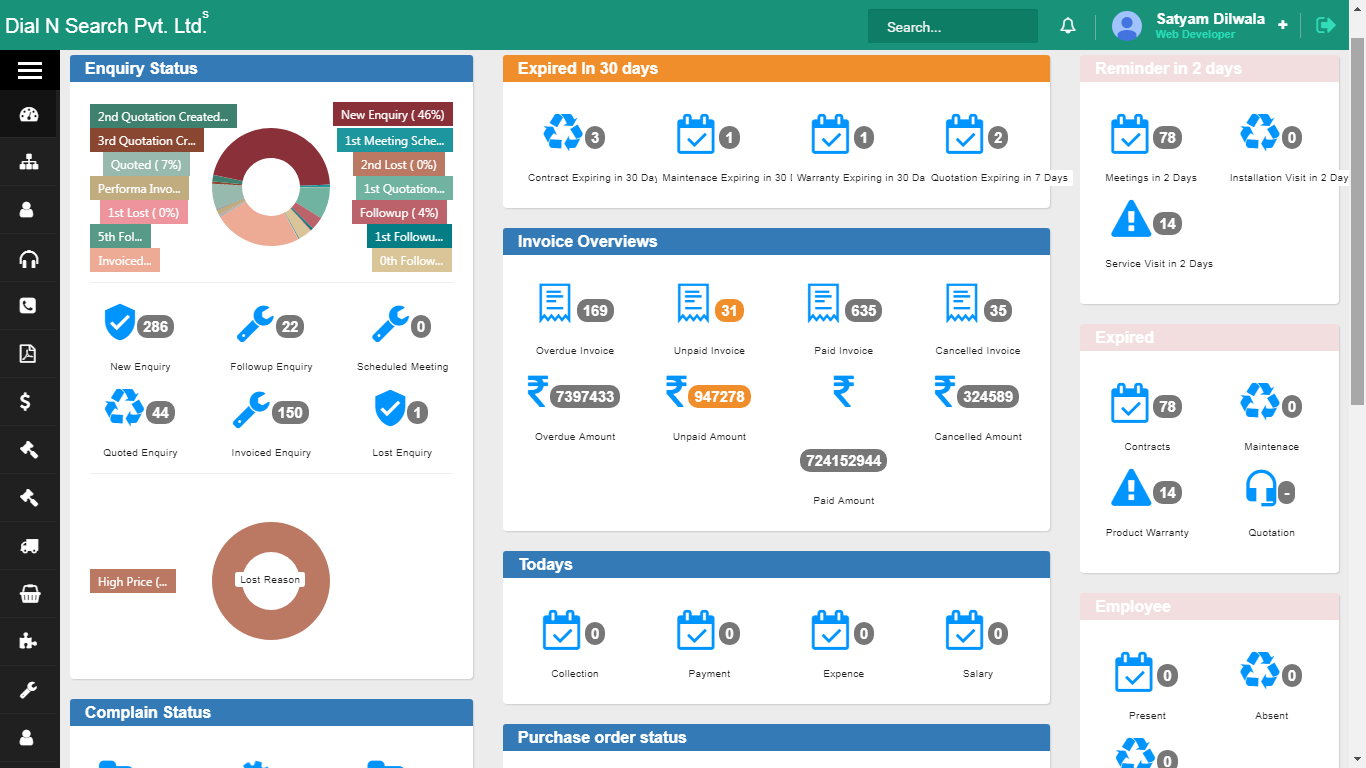
Your home screen after login. It is not a report you print. It is the morning picture: enquiry status, reminders, overdue invoices, stock, purchases and open complaints in one place.
Who uses it. The owner or branch manager, before calling the team. Sales looks at enquiries. Accounts looks at overdue invoices. Service looks at complaint count.
Example. An AC dealer in Pune opens Dashboard at 9:30 am, sees three overdue invoices and two pending complaints, and decides who to call first. Nothing here creates a document. It only shows what is already moving in Sales Funda®.
- How to read the Dashboard
-
See the day’s open work in one place: enquiries, reminders, overdue invoices, stock, purchases and complaints.
The Dashboard is the first screen after you log in to Sales Funda®. It does not create a quotation or a ticket. It shows what is already moving, so the owner or branch manager can decide who to call before opening five menus. Sales looks at enquiry status. Accounts looks at overdue invoices. Service looks at complaint count.
On the Dashboard:
- Log in to Sales Funda®.
- Click Dashboard.
- Read the tiles: enquiry status, upcoming reminders, invoice overview, overdue reminders, stock, purchase overview, complaint status and comment count.
Dashboard home: summary tiles for the work already in the system.
![Dashboard]()
Tip. If overdue invoices and complaint count are both high, collect money and send a service engineer before you chase new enquiries. Nothing on this screen creates a document.
Organisations
Every company you sell to or buy from is an organisation. Add it first. Quotations, invoices, challans, projects and tickets hang off this one record, so the same hotel or dealer is not typed again as a new name.
Who uses it. Sales adds the lead. Accounts bills the same company. Service finds it when a complaint comes in.
Example. A Nashik electrical distributor adds “Hotel Sagar, Aurangabad” once, with GST and the purchase manager’s mobile. Later the quotation, delivery challan and AMC all point to that organisation. Nature of the lead (Hot, Cold, Mature, Not Interested) tells the team how warm the account is.
- How to add a new organisation
-
Add the company you sell to or buy from, once, so quotations, challans and tickets can hang off the same record.
In Sales Funda® the organisation is the company, not the person. If “Hotel Sagar, Aurangabad” is not here, you cannot quote, deliver or raise a ticket against it. Sales adds the lead. Accounts later bills the same company. Service finds it when a complaint comes in. Do not create a second record called “Sagar Hotel” for the same party.
Short video: creating an organisation.
On the organisation screen:
- Click Organization → New Organization.
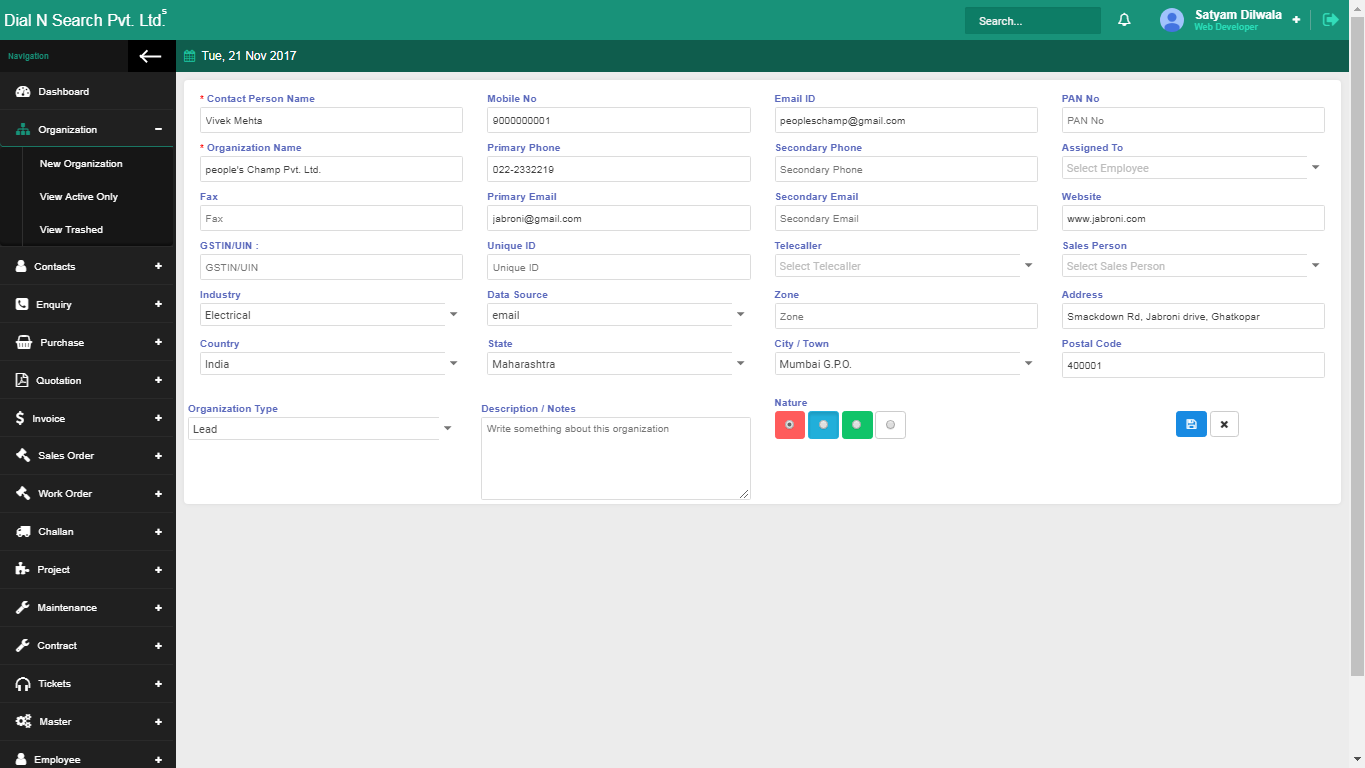
- Fill company name, contact person, mobile number, primary email, address and the other fields you need.
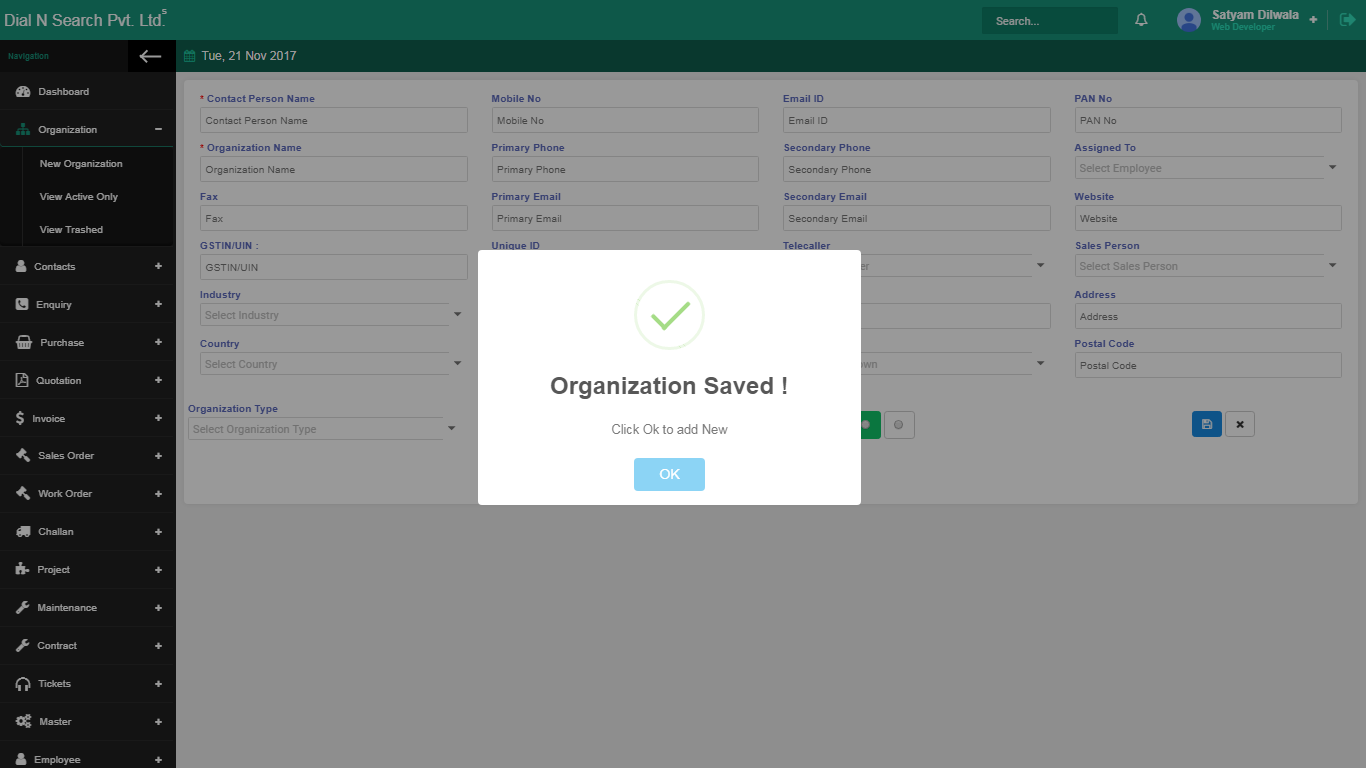
- Set Nature of the lead (see below), then click Save.
New organisation form: company, contact, mobile, email and address.
![Add new organization]()
Nature of the lead tells the team how warm the account is. It is not a GST field. Use it so the Dashboard and lists show the right colour:
- Hot (red) — the lead is keen to buy.
- Cold (blue) — conversion looks unlikely for now.
- Mature (green) — the lead has become a customer.
- Not Interested (black) — they do not want to buy.
Nature colours on the organisation record: Hot, Cold, Mature, Not Interested.
![Add new organization 2]()
Tip. After Save, open View Active Only to find this company and create a quotation from the three-dot menu. You do not retype the company name.
- How to view active organisations
-
Open the live company list, then quote, message, transfer or inspect one organisation without leaving its record.
View Active Only is the working list of organisations that are still in play. Sales uses it to find a company and raise a quotation from that record, so the quote is already linked. Accounts and service later open the same company to see invoices, tickets and comments. Inactive or trashed companies are not on this list.
To open the list:
- Click Organization → View Active Only.
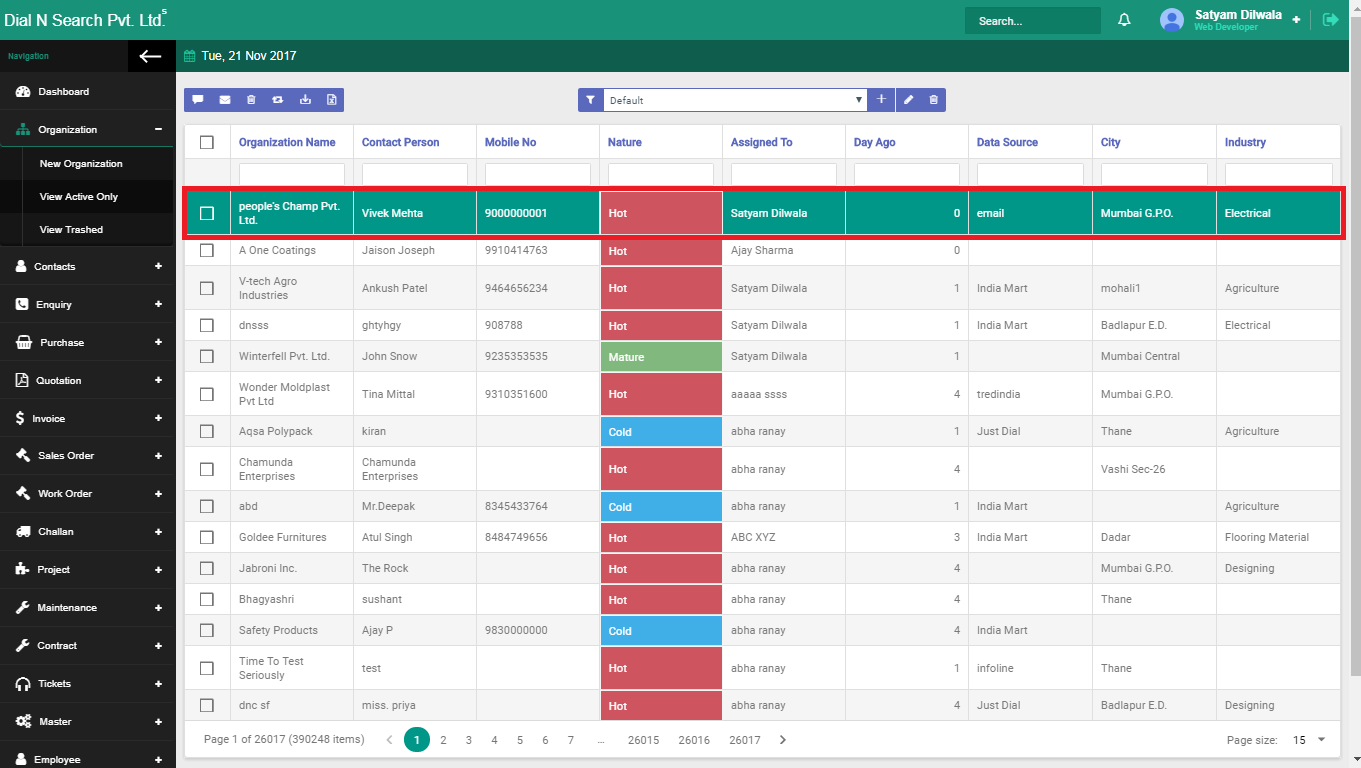
- Find the company in the list (red highlight in the screenshot).
- Click the organisation name to open its detail, or tick the row to SMS, email, trash, transfer or export it.
View Active Only: the live organisation list. Click a company name to open it.
![View active only 1]()
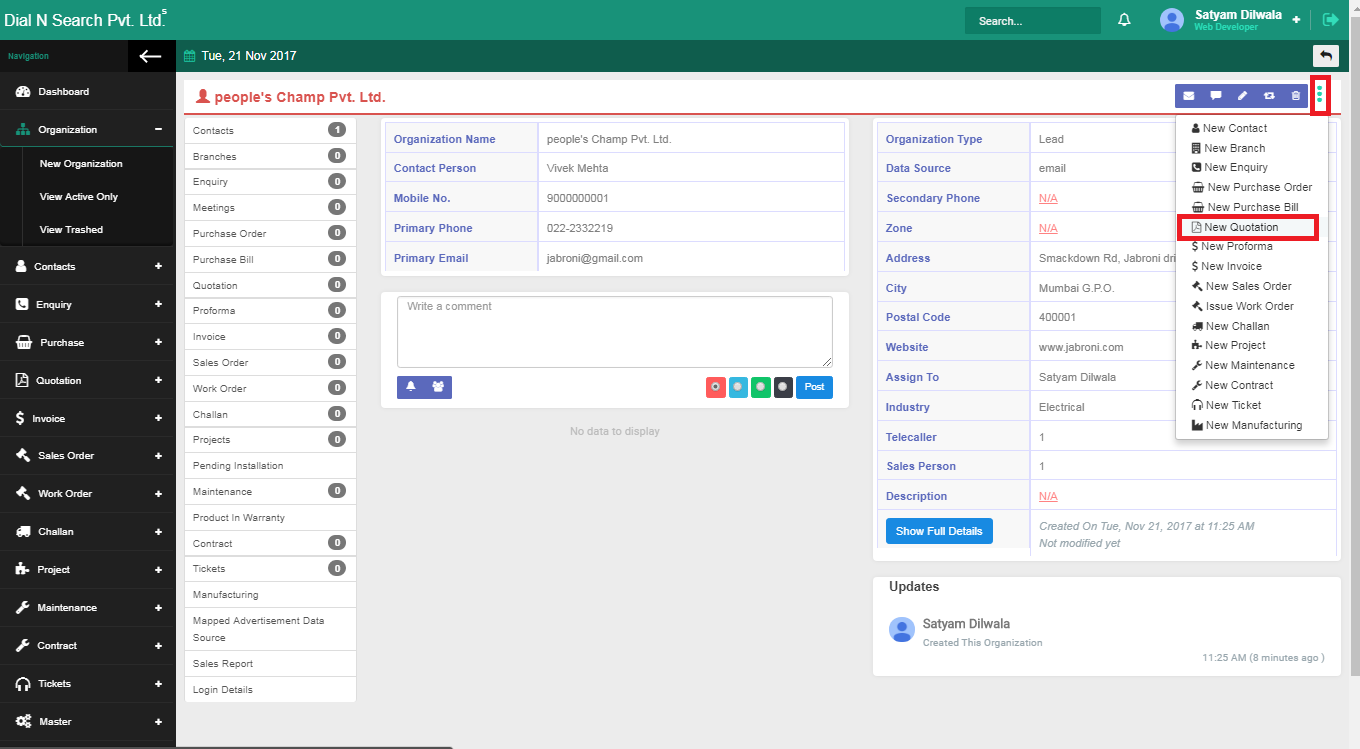
Create a quotation from that organisation so the company name is already filled.
You do not start a quotation from a blank screen and type the hotel name again. Open the organisation, then New Quotation from the three-dot menu. The quote sits on that company’s history and can later become a proforma or tax invoice.
On the organisation detail:
- Click the organisation name in View Active Only.
- Click the three dots at the top-right (red highlight) → New Quotation.
Organisation detail: three-dot menu with New Quotation.
![View active only 2 Quot]()
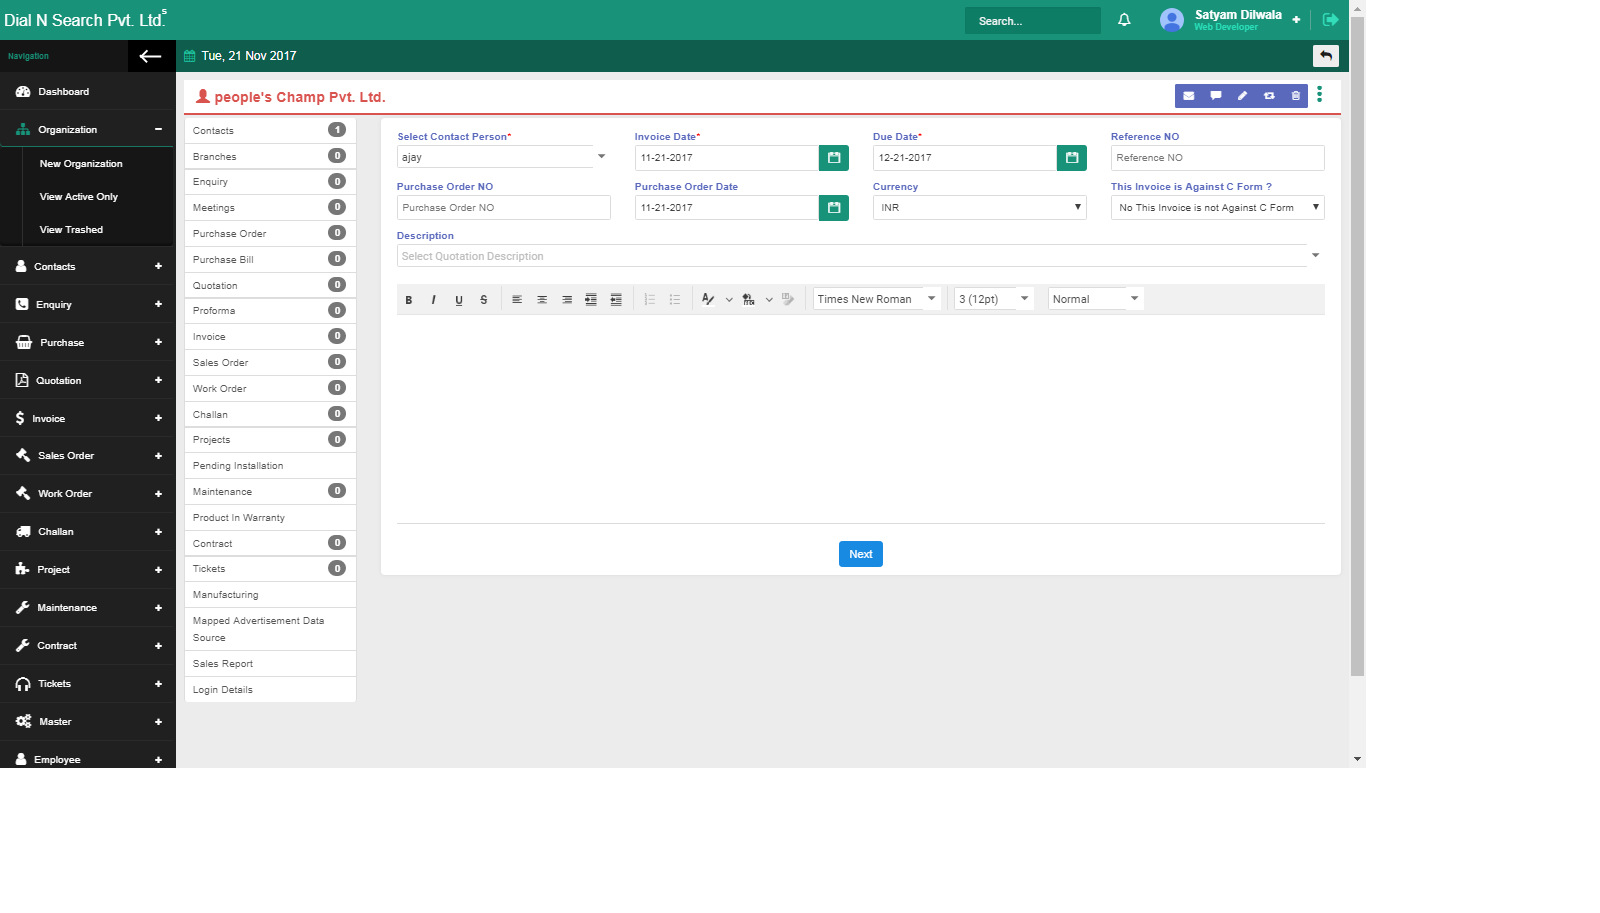
On the quotation header:
- Select Contact person — who at the company will receive this quote.
- Set Quotation date and Valid till — the date after which this price is no longer offered.
- Enter a description if needed, then click Next.
Quotation header: contact, dates and description before you add lines.
![Convert to Proforma Invoice against Quotation 1]()
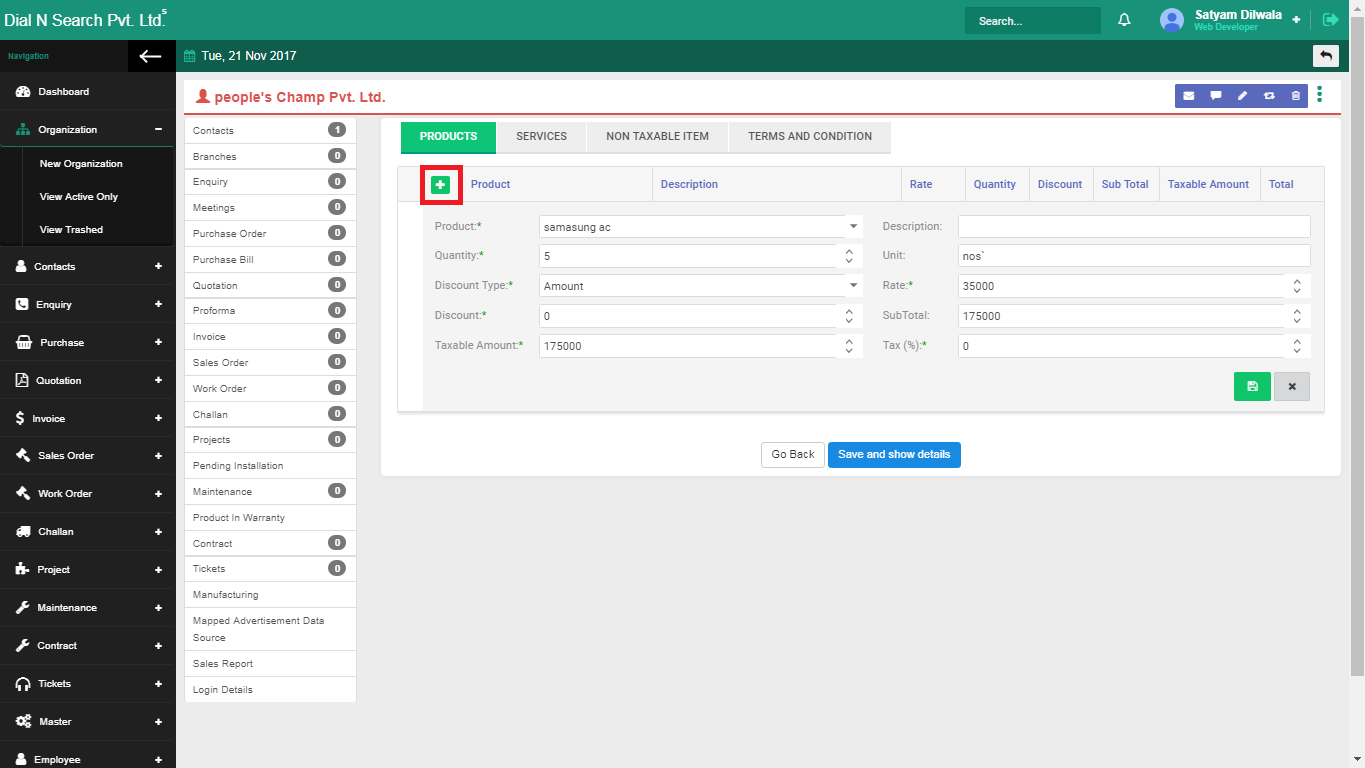
On the product or service lines:
- If this quote is for a product, open the Product tab, click the + icon, enter the product lines, then click the Save icon.
- If this quote is for a service, open the Service tab and enter those lines instead.
- Open Terms & Conditions, enter them, and save.
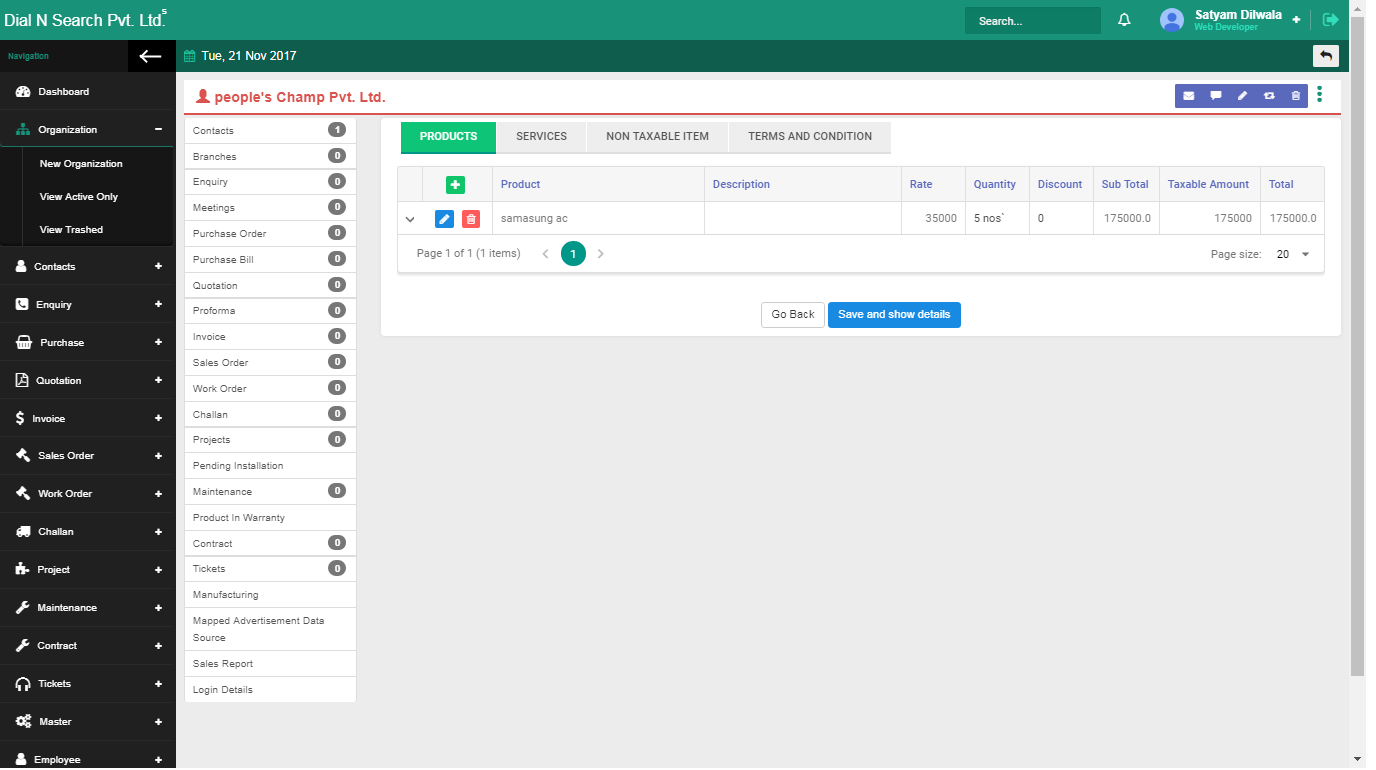
- Click Save and show details.
Quotation lines: add products with +, then terms, then Save and show details.
![View active only 5 Quot]()
![View active only 7 Quot]()
![View active only 8 Quot]()
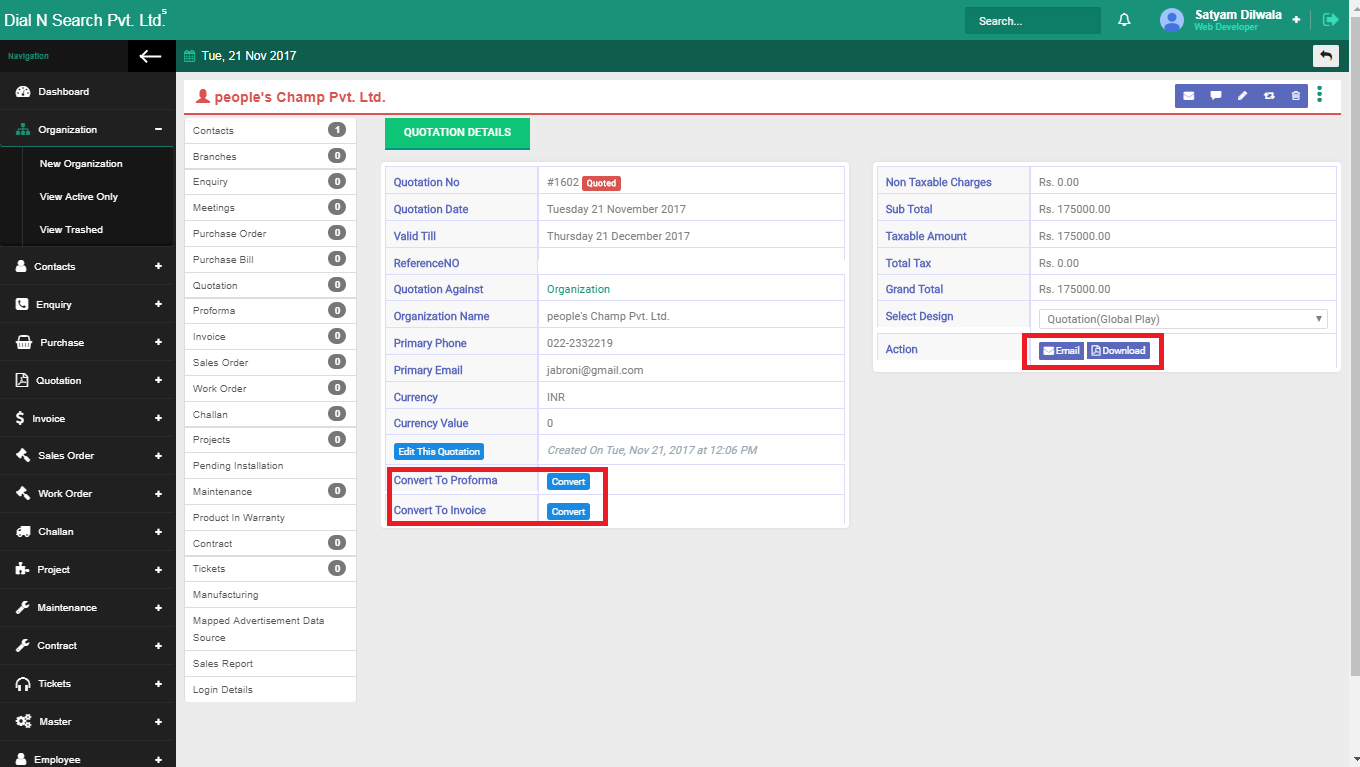
After the quotation is saved, from the same record you can:
- Edit this Quotation — change lines or dates before the customer accepts.
- Email — send the quotation to the organisation’s primary email.
- Download — save a copy.
- Convert to Proforma — turn this quote into a proforma invoice.
- Convert to Invoice — turn this quote into a tax invoice.
Tip. Convert only after the customer has agreed the price. Editing after convert is a different document.
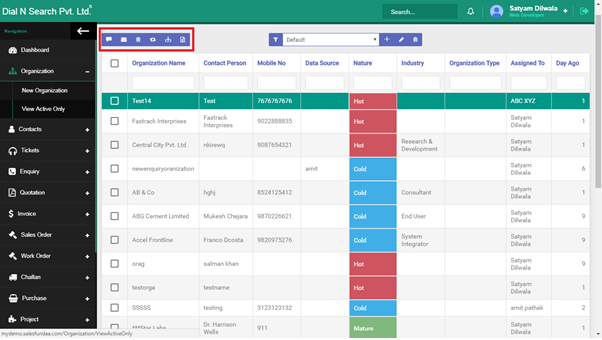
Act on one or more organisations from the list: SMS, email, trash, transfer, import or export.
Tick the company (or several) on View Active Only, then use the toolbar. This is bulk work: a reminder SMS, a campaign email, handing the account to another employee, or taking a backup to Excel. Trash removes the company from the active list.
List toolbar: Send message, Send email, Move to trash, Transfer ownership, Import, Export.
![View active only 10 Quot]()
With the organisation selected:
- Send Message — click Send message on selection, write the SMS, click Send.
- Send Email — click Send Email on selection, choose the campaign, click Send, then Yes.
- Move to trash — click Move selected to Trash, then Yes.
- Transfer ownership — click Transfer selected Ownership, choose the employee, click Transfer, then Yes.
- Import — bring organisation rows in from an Excel sheet.
- Export — click Export selected to Excel for the ticked rows.
Open one organisation’s full history: tickets, enquiries, meetings, quotations and invoices.
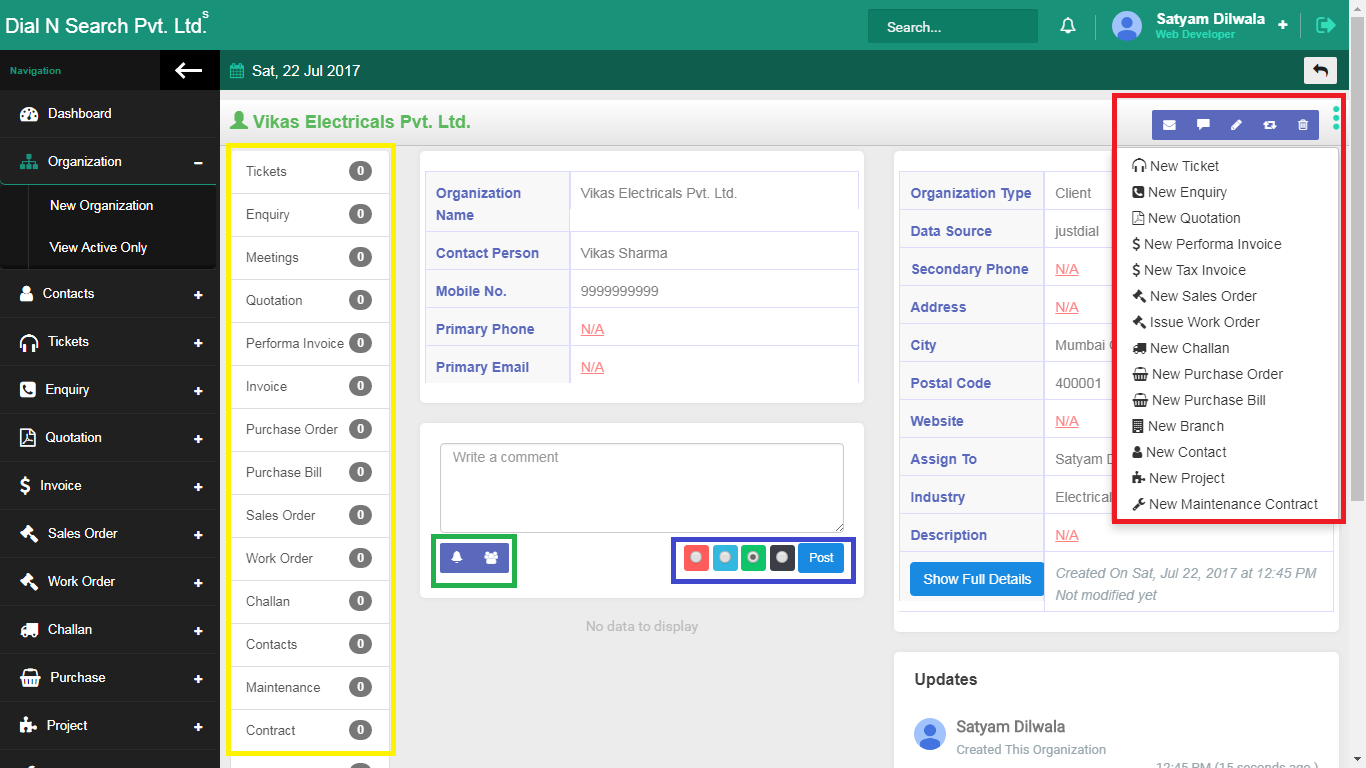
Click the company name. The detail screen is the file for that customer. Yellow highlights show what has already happened. The three-dot menu (red) starts the next document. Comments, reminders and meetings sit on the same page so the next person who opens Hotel Sagar sees the last note.
Organisation detail: history (yellow), three-dot actions (red), comments, bell reminder, meeting icon, nature buttons (blue).
![View active only 3 dots hlts]()
On the organisation detail:
- Read tickets, enquiries, meetings, quotations and invoices in the history area (yellow).
- Use the three dots (red) to create a ticket, new enquiry, new quotation, new proforma invoice, or the other actions shown.
- Type a comment and click Post.
- Click the bell to set a reminder for this organisation.
- Click the icon next to the bell (green box) to schedule a meeting.
- Change Nature (Hot / Cold / Mature / Not Interested) with the buttons in the blue box, then click Post.
Contacts
People at those organisations: names, mobile numbers and email. The organisation is the company. The contact is the person you actually call or mail.
Who uses it. Sales stores the decision-maker. Service stores the site supervisor. Quotations pick a contact person so the PDF goes to the right inbox.
Example. Hotel Sagar may have a purchase manager for quotes and a maintenance in-charge for tickets. Add both under the same organisation. Start from the company, then New Contact from the three-dot menu.
- How to add a contact
-
Add the person you actually call or email, under the company they work for.
The organisation is Hotel Sagar. The contact is the purchase manager or the site supervisor. Quotations pick a contact person so the PDF goes to the right inbox. Tickets need a name and mobile when the engineer reaches site. Add the person from the company’s three-dot menu so they stay linked. Do not create a contact with no organisation.
On the organisation:
- Open the organisation.
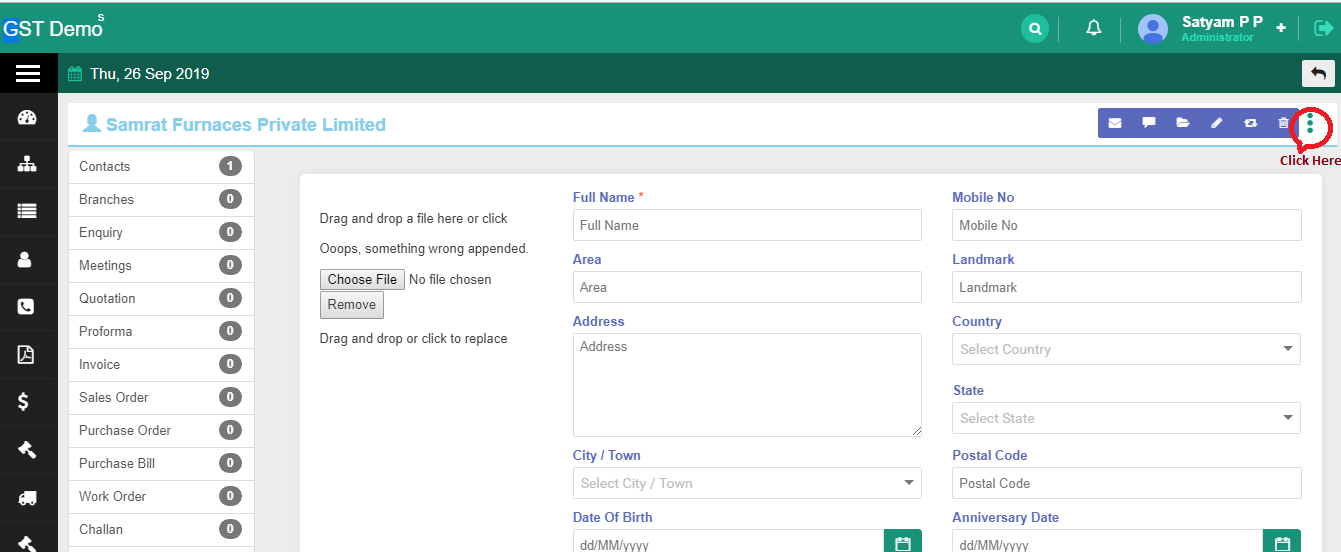
- Click the three-dot menu at the top right → New Contact.
- Fill name, mobile, email and the other fields on the form, then click Save.
New contact form: person details under the selected organisation.
![AddNewContact]()
Tip. One company can have several contacts. Add the purchase manager for quotes and the maintenance in-charge for tickets, both under the same organisation.
- How to view the contact list
-
See every person already saved, so you can find a mobile number without opening each company one by one.
The contact list is the phone book. Sales uses it to find who to call. Service uses it when a complaint comes in and they need the site person. People you added from an organisation appear here.
To open the list:
- Click Contacts → Contact List.
- Find the person by name or organisation.
Enquiry
An enquiry is interest before money. Someone asked for a product or a service. Capture it against the organisation so it does not live only in WhatsApp. Product enquiries and service enquiries are listed separately so the right team can work them.
Who uses it. Counter staff and sales. The owner later sees enquiry status on the Dashboard.
Example. A walk-in at your Pune showroom asks for eight 1.5-ton split ACs for a clinic. Log the enquiry on that clinic’s organisation. When they are serious, convert the conversation into a quotation from the same company. Do not skip the organisation.
- How to add an enquiry
-
Capture what a customer asked for — a product or a service — so it stays on their record before you quote or bill.
An enquiry is the start of the sales journey in Sales Funda®. When a customer calls or walks in, log it against their organisation so it does not live only in WhatsApp. The owner sees enquiry status on the Dashboard. Later you can turn the same enquiry into a quotation or a proforma without retyping the company. A clinic walk-in who wants eight split ACs is an enquiry today; the quote comes from this record tomorrow.
Short video: adding an enquiry.
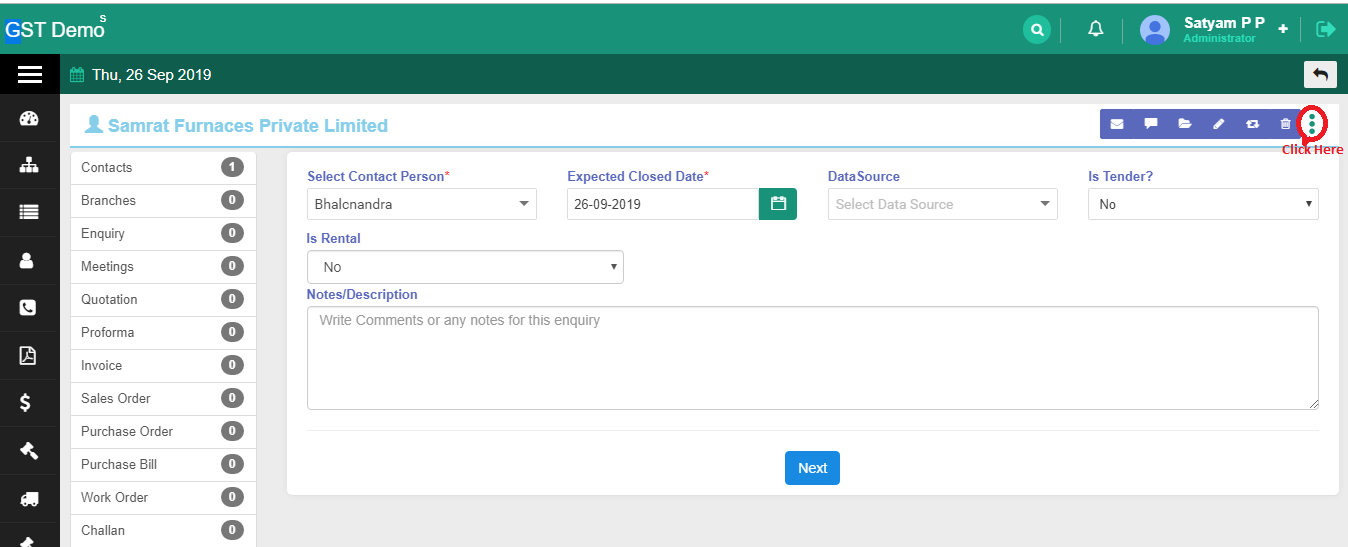
On the organisation:
- Open the organisation.
- Click the three-dot menu at the top right → New Enquiry.
- Fill the enquiry header as shown, then click Next.
New enquiry header: organisation already selected; fill the remaining fields and click Next.
![AddEnq]()
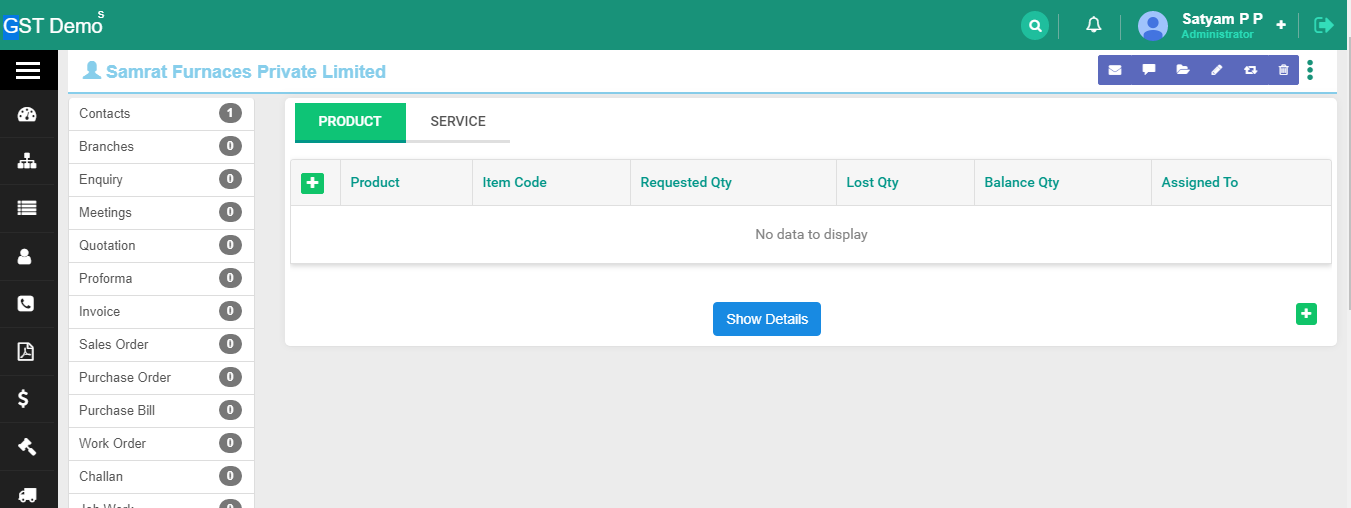
On the product or service lines:
- If they asked for a product, enter those lines (what they asked for, quantity).
- If they asked for a service, enter the service lines instead.
- Click Save.
Enquiry lines: product or service details for what the customer asked for.
![EnquiryProduct]()
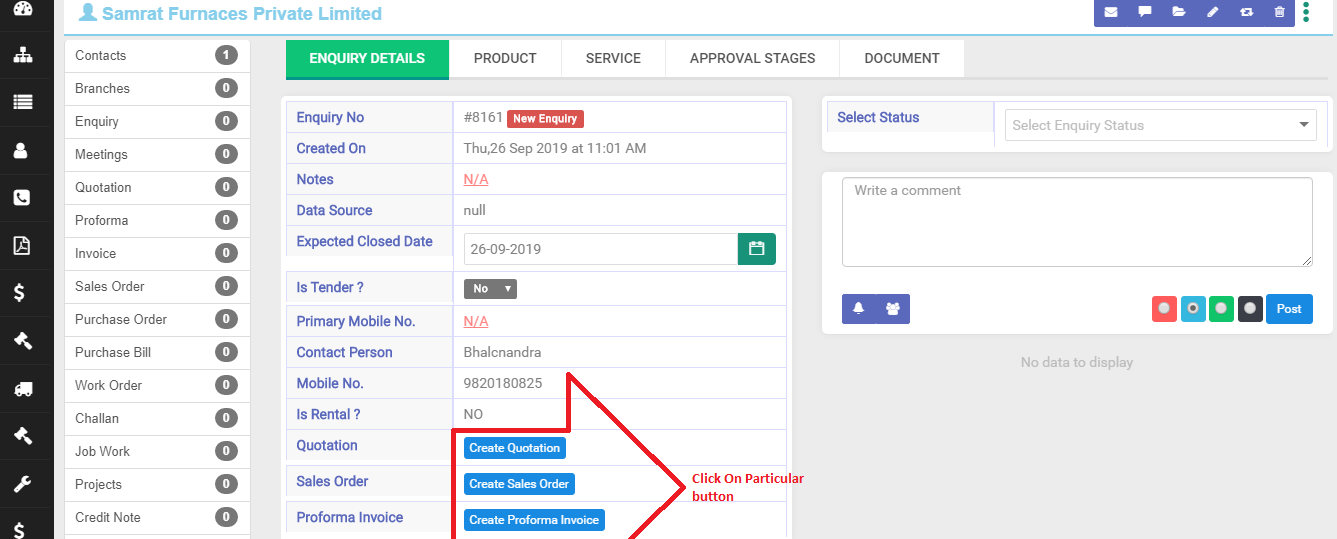
After save, on the enquiry detail you can:
- Post comments and set Nature to Hot, Cold, Mature or Not Interested.
- Create a quotation against this enquiry.
- Create a proforma invoice against this enquiry.
Enquiry detail: comments, nature, and convert to quotation or proforma.
![EnquryDetail]()
Tip. You can convert this enquiry into a quotation from the same record. Do not start a blank quote and retype the company.
- How to view the enquiry list
-
See all enquiries and their status in one list, then open one for the full story.
This is the working pile for sales: who asked, whether it is still open, and which organisation it belongs to. The Dashboard enquiry tile counts from here. Open a row when you are ready to comment, change nature, or convert to a quotation.
To open the list:
- Click Enquiry → Enquiry List.
- Click an enquiry to open the detailed view.
- How to view service enquiries
-
See only enquiries for a service, so the service team is not scrolling through product leads.
A service enquiry is “someone asked for work” — installation, repair, AMC — not a box to sell. It still sits on the organisation. Use this list when the service desk should follow up, then open a row to quote or convert like any other enquiry.
To open the list:
- Click Enquiry → Service Enquiry.
- Click an enquiry to open the detailed view.
- How to view product enquiries
-
See only enquiries for a product, so sales can chase hardware leads without mixing in service jobs.
A product enquiry is “someone asked for goods” — ACs, parts, a model. It is still not a quotation. Use this list for the sales counter, then open a row to add comments or convert to a quote when they are ready.
To open the list:
- Click Enquiry → Products Enquiry.
- Click an enquiry to open the detailed view.
Purchase
Buying from a vendor, not selling to a customer. Raise a purchase order (what you asked the supplier for), then convert it to a purchase bill when the bill arrives. Both lists stay here so stores and accounts are looking at the same order.
Who uses it. Purchase and accounts. Sales does not create these from a quotation screen.
Example. You quoted 20 indoor units to a hotel, stock is short, so you raise a PO on the OEM against that vendor organisation, then convert the PO to a purchase bill when the tax invoice comes. This tab is PO and purchase bill. It is not a goods-receipt (GRN) screen.
- How to create a purchase order
-
Ask a vendor to supply goods or services, on their organisation record, before their tax invoice arrives.
A purchase order is buying, not a delivery challan. Raise it on the vendor organisation (the OEM), not on Hotel Sagar. When you quoted 20 indoor units and stock is short, the PO is what you asked the supplier for. Convert it to a purchase bill when their invoice arrives, so stores and accounts are not working from two Excel files. There is no goods-receipt (GRN) how-to in this library.
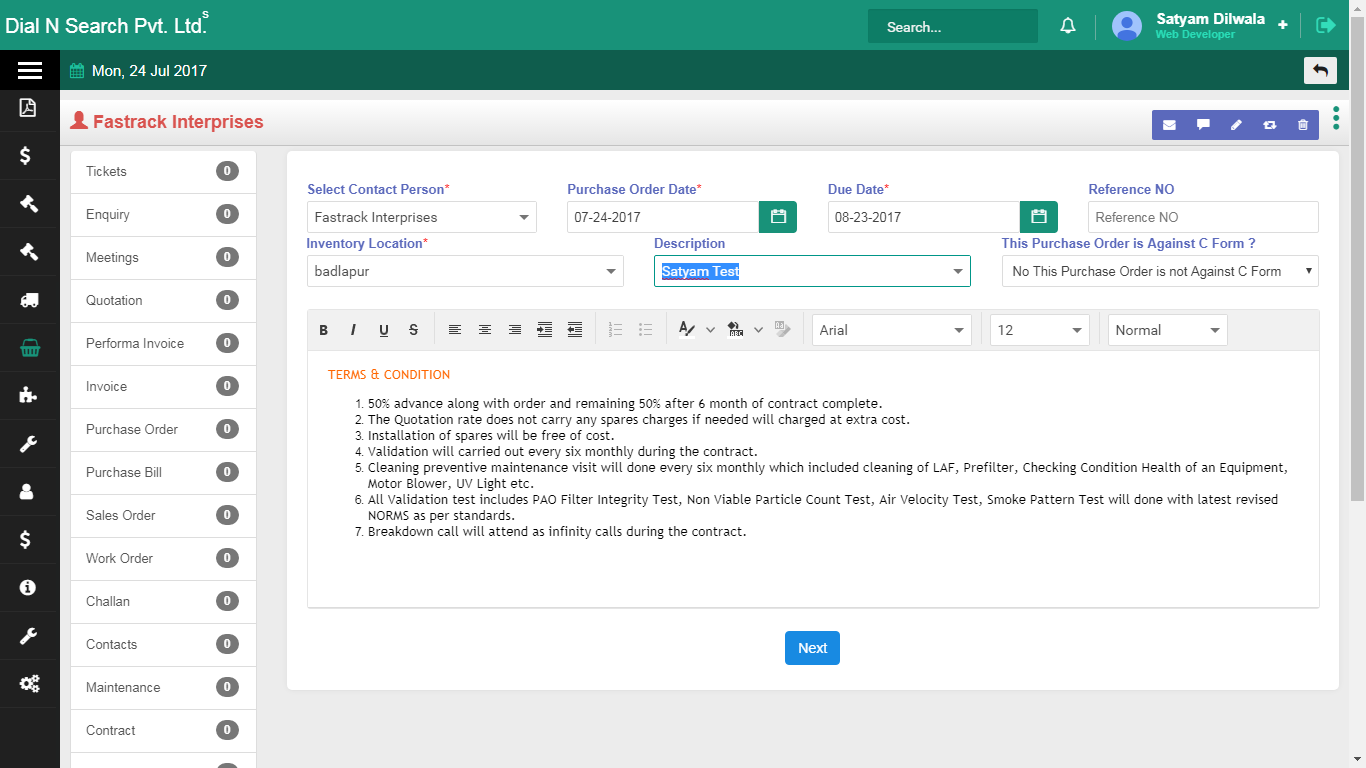
On the vendor organisation:
- Open the organisation you buy from.
- Click the three-dot menu at the top right → New Purchase Order.
- Fill the header, then click Next.
New purchase order header: vendor already selected; fill details and click Next.
![PO]()
On the lines:
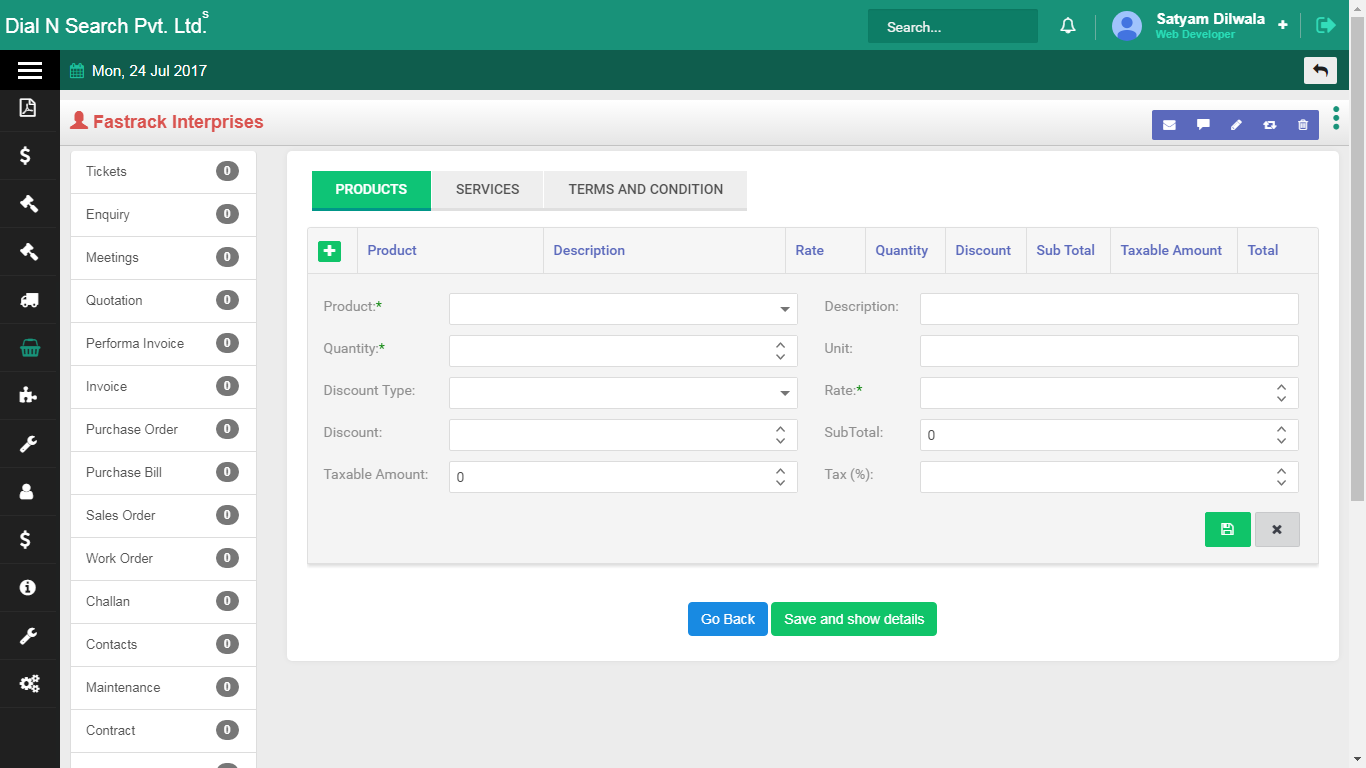
- Click +, enter product details, then click Save.
- Update Services and terms & conditions on their tabs.
- Click Save and show details.
Purchase order product lines: add with +, then terms, then Save and show details.
![Purorder prod]()
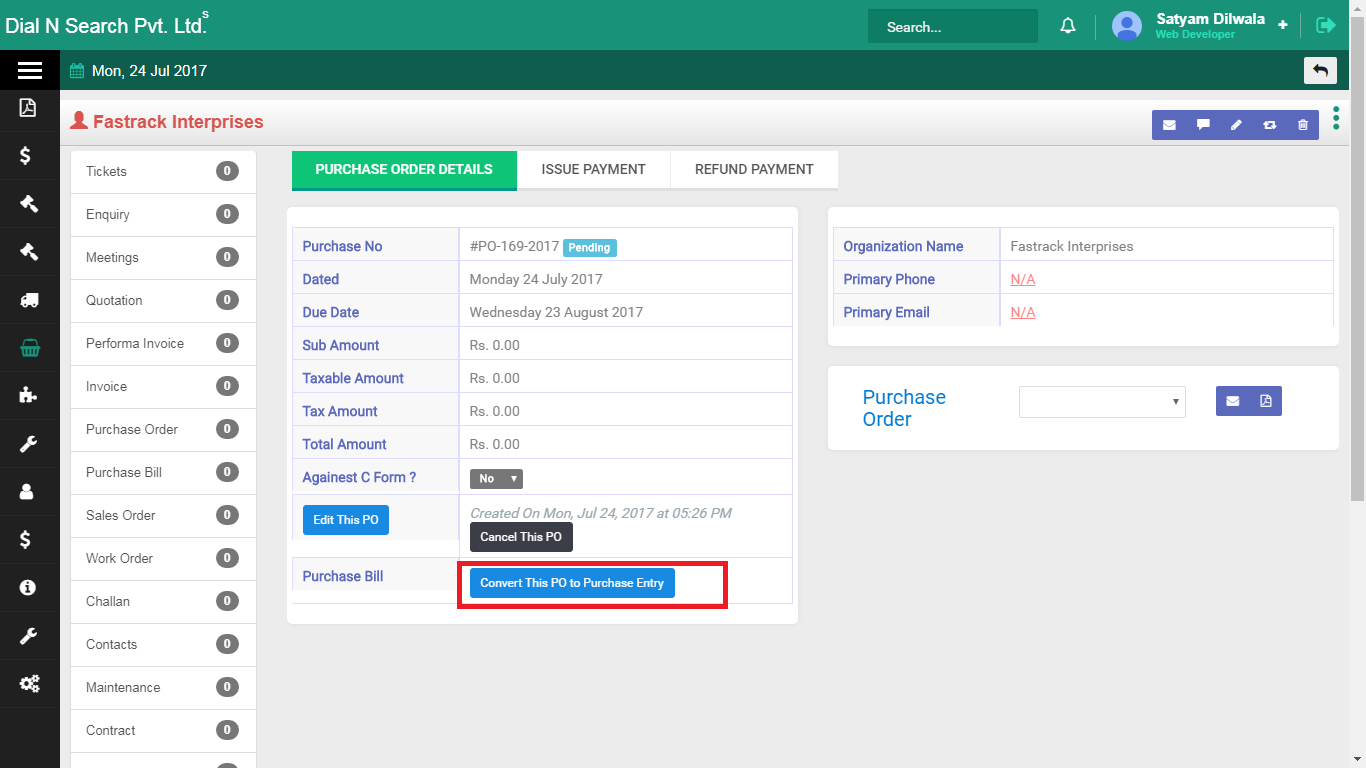
Saved purchase order: Convert this PO to Purchase Entry (red) turns it into a purchase bill.
![Convert PO to Pur Bill]()
Tip. Click Convert this PO to Purchase Entry when the vendor’s invoice arrives. That is the purchase bill. This tab does not include a GRN screen.
- How to view purchase orders
-
Find purchase orders you have already raised, then open one to convert, edit, cancel or download.
Purchase and accounts use this list to see what was asked of vendors. Open the organisation name on a row for the full PO. Convert to purchase entry when the vendor bill arrives. This is not the delivery challan list.
To open the list:
- Click Purchase → Purchase Order List.
- Click the organisation name to open that purchase order.
Purchase order list: open a row to convert, edit, cancel or download.
![POlist]()
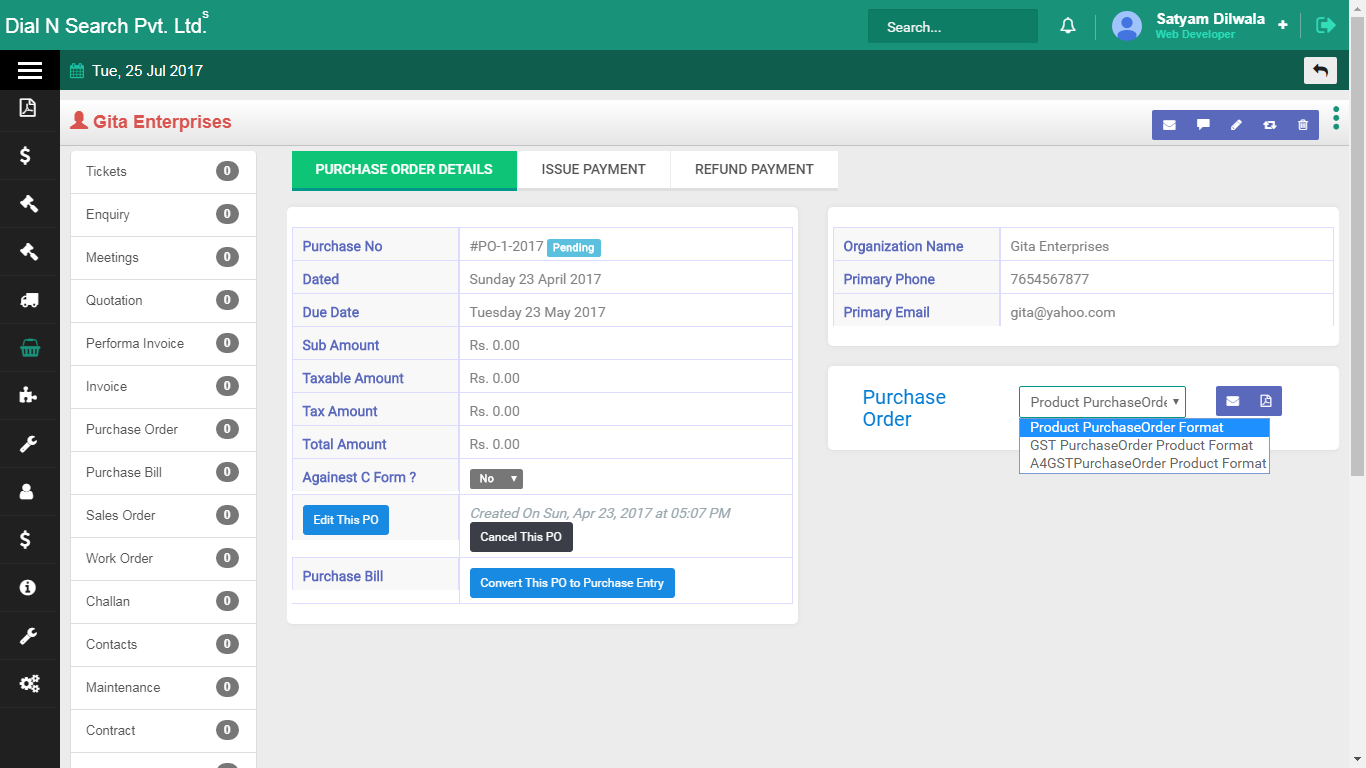
From the open purchase order you can:
- Convert this purchase order to purchase entry.
- Edit this purchase order.
- Cancel this purchase order.
- Download the purchase order.
- How to create a purchase bill
-
Record the vendor’s bill when it arrives, so accounts has a purchase bill on that supplier.
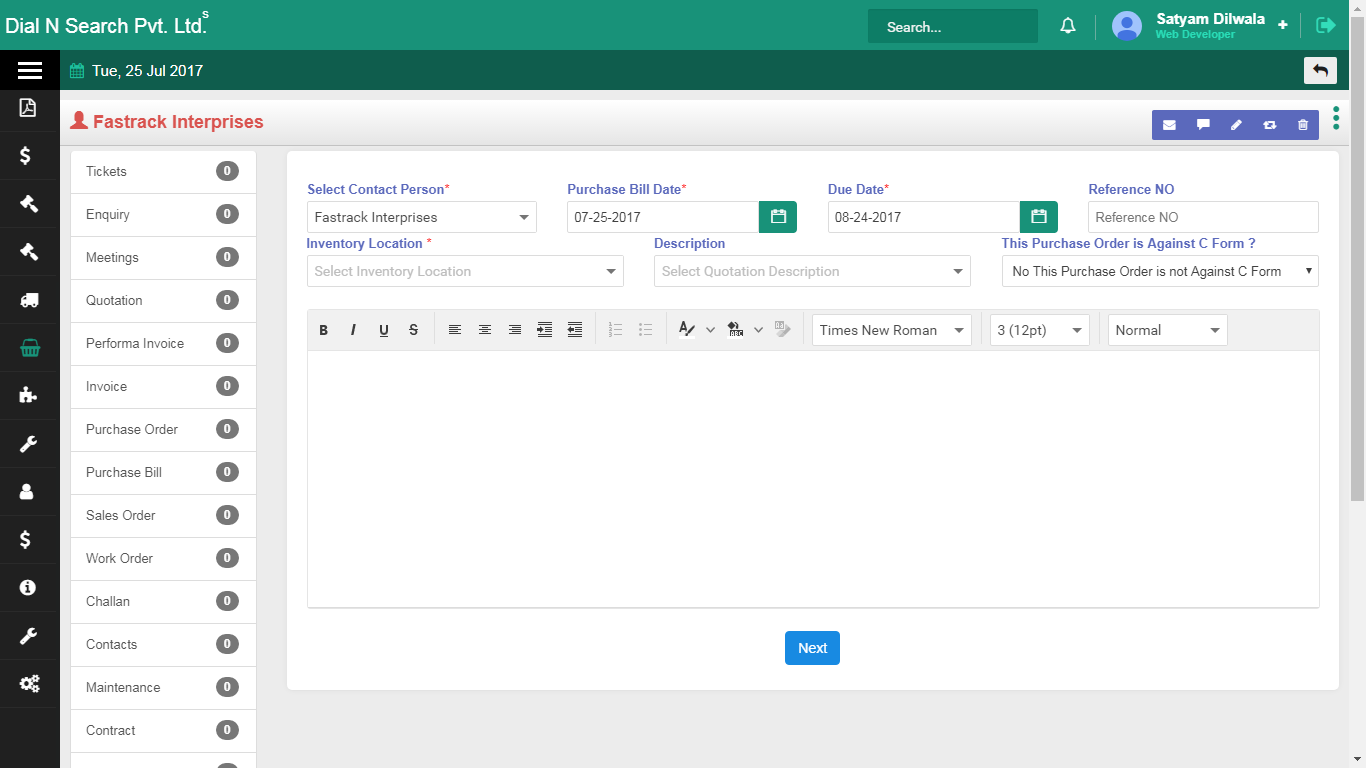
A purchase bill is what you owe the vendor. Prefer converting from the PO so lines match what you ordered. Creating from Purchase → New Purchase Bill is for a bill that did not start as a PO. This is not a GRN and not a customer tax invoice.
To create a purchase bill:
- Click Purchase → New Purchase Bill.
- Select the vendor organisation.
- Fill the header as shown, then click Next.
- Add product details, then Save. Update services and terms on their tabs.
- Click Save and show details.
New purchase bill: pick the vendor organisation.
![Pbill]()
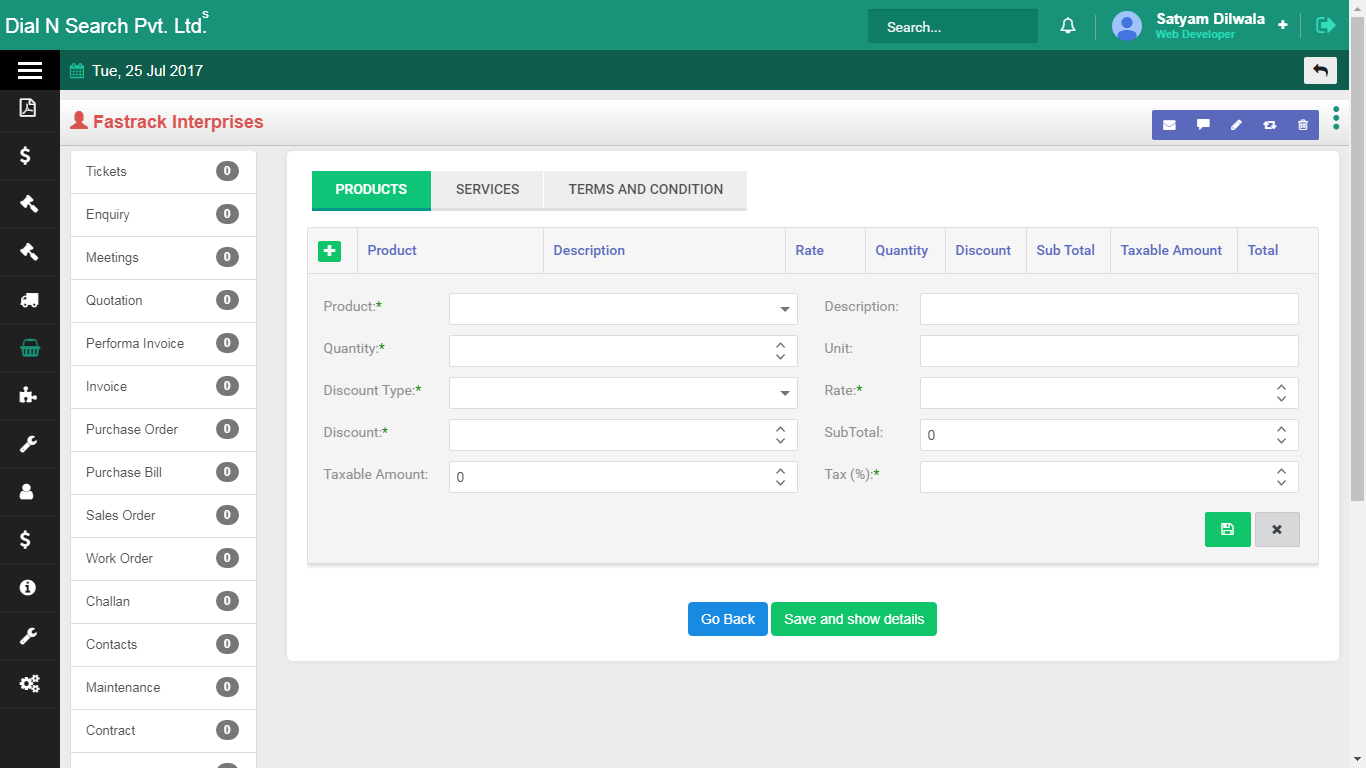
Purchase bill lines: products, services and terms, then Save and show details.
![Pbill2]()
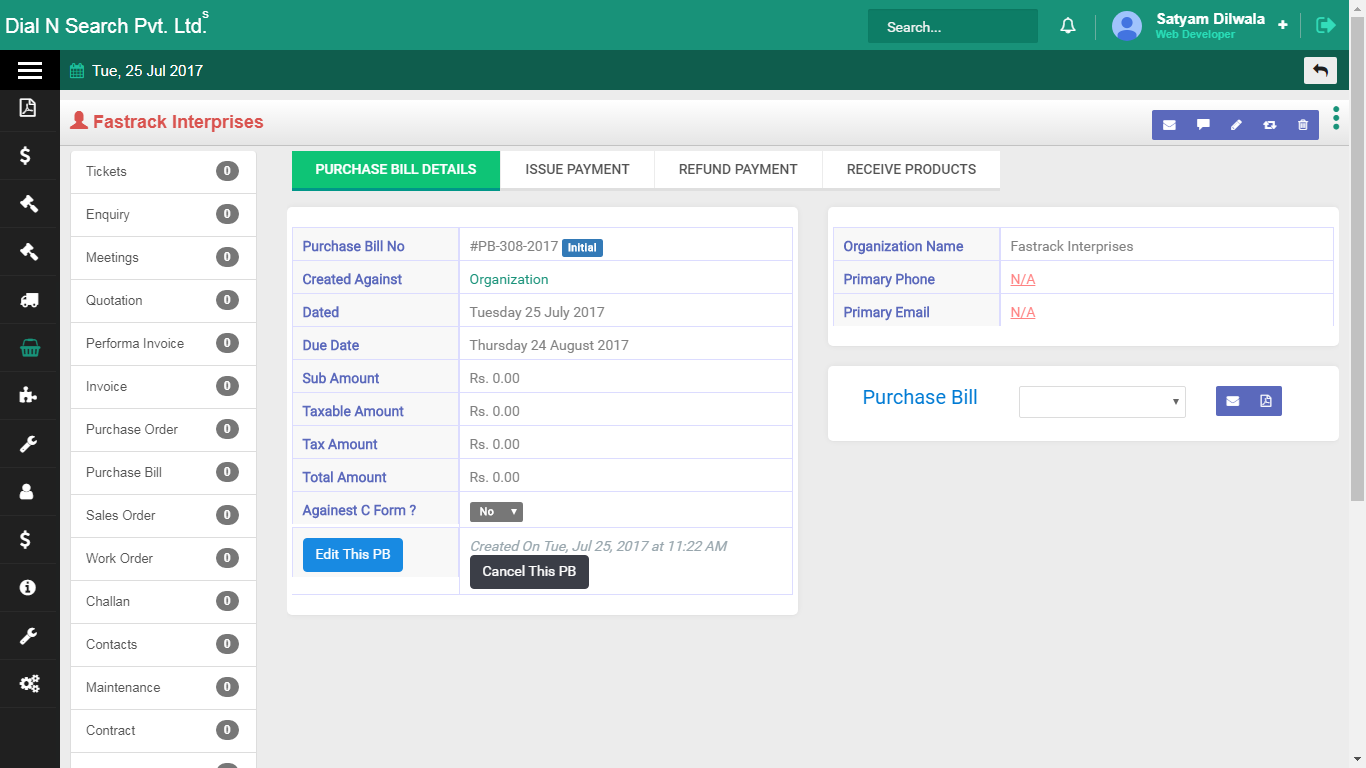
Saved purchase bill: the vendor invoice is on the organisation record.
![Pbill3]()
Tip. If a PO already exists, convert it with Convert this PO to Purchase Entry instead of typing a blank bill.
- How to view purchase bills
-
Find purchase bills already entered, then open one to edit, cancel or download.
Accounts uses this list to see what vendors have billed. Open the organisation name on a row. The menu in the product is Purchase Order bill. This is still a purchase bill, not a customer tax invoice.
To open the list:
- Click Purchase → Purchase Order bill.
- Click the organisation name to open that purchase bill.
Purchase bill: edit, cancel or download from the open document.
![Pbill3]()
From the open purchase bill you can:
- Edit this purchase bill.
- Cancel this purchase bill.
- Download the purchase bill.
Quotations
What you offered the customer: products or services, rates, and terms. Create it from the organisation, email or download it, then convert it to a proforma or tax invoice when they accept. The quote is the commercial offer. It is not yet a bill.
Who uses it. Sales prepares it. The owner checks value and validity date. Accounts takes over after convert.
Example. For Hotel Sagar you quote 8 cassette ACs, valid 15 days, with installation as a service line. If they say yes, convert to proforma for advance, or to tax invoice when you bill. If a product name is missing in the dropdown, add it under Masters first.
- How to create a quotation
-
Put a price, validity date and terms on what the customer asked for, so you can email an offer you can stand behind.
The quotation is the commercial offer in Sales Funda®. It is not yet a bill. Create it from the organisation (or from an enquiry) so the company name is already on the record. Sales prepares it. The owner checks value and Valid till. When the customer accepts, convert the same quote to a proforma (advance) or a tax invoice (billing). If a product name is missing in the dropdown, add it under Masters first.
Short video: creating a quotation.
On the organisation:
- Open the organisation.
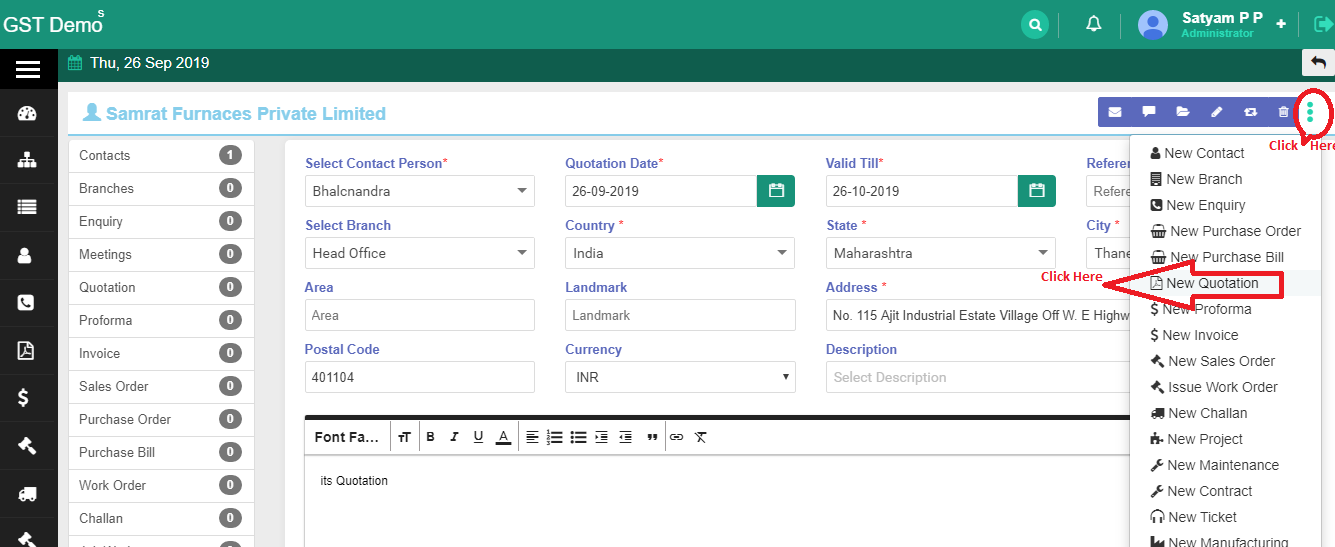
- Click the three-dot menu at the top right → New Quotation.
- Fill contact, dates and description as shown, then click Next.
If you need a reusable quotation description first: Master → Quotation description → New → add subject and description → Save.
New quotation header: contact, dates and description before you add lines.
![New Quotation]()
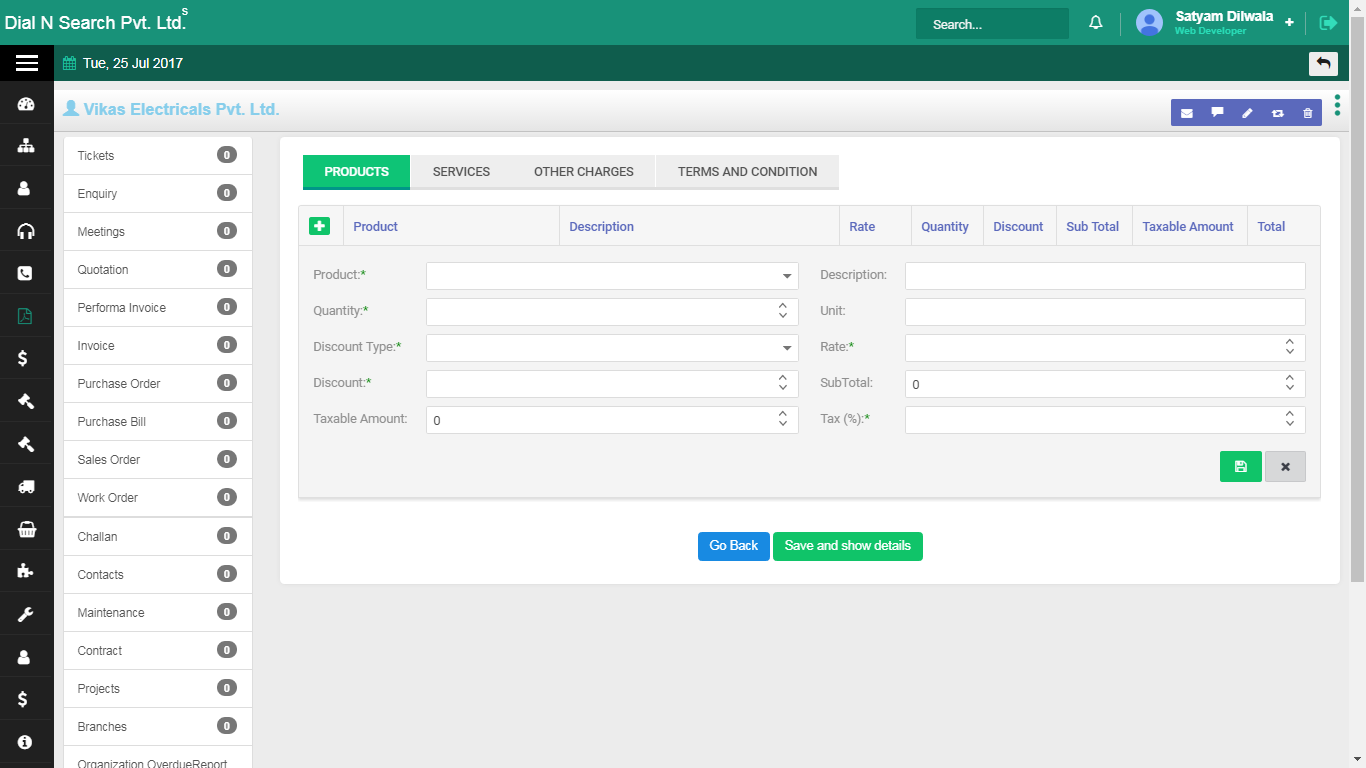
On the quotation lines:
- Add product lines with the + icon, then save the line.
- If this quote is for a service, open the Services tab and fill those lines.
- Update other charges and terms and conditions on their tabs.
- Click Save and show details.
Quotation product lines: add items with +, then terms, then Save and show details.
![Quotation1]()
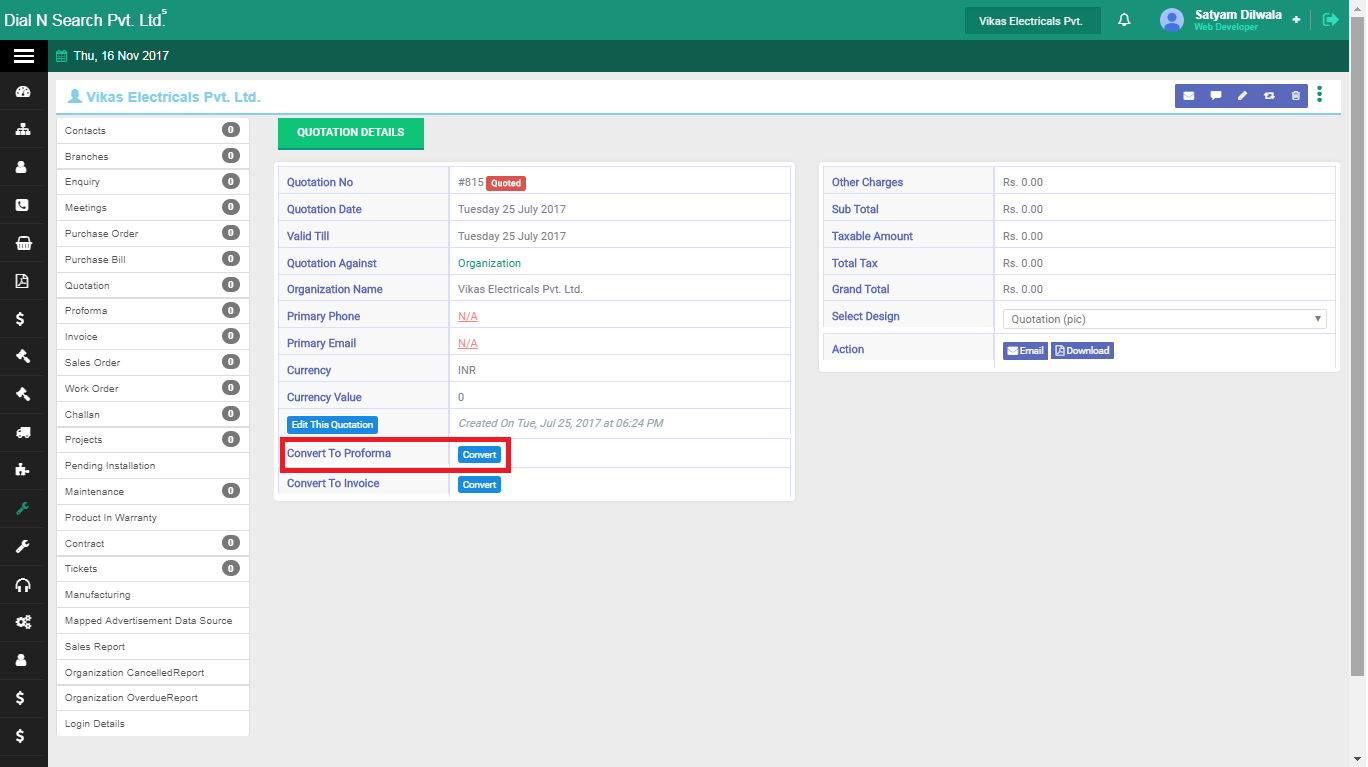
Saved quotation: convert to proforma or tax invoice from this screen.
![Convert to proforma invoice from quotation]()
Turn this quotation into a proforma when you need an advance before dispatch.
Convert from the quotation so lines and the company carry forward. A proforma is still not a tax invoice. Use it when the hotel agrees and you want 40% before you buy or dispatch. Convert to Invoice when you actually bill.
On the saved quotation:
- Click Convert against Convert to Proforma (red highlight) for a proforma.
- Or click Convert against Convert to Invoice for a tax invoice.
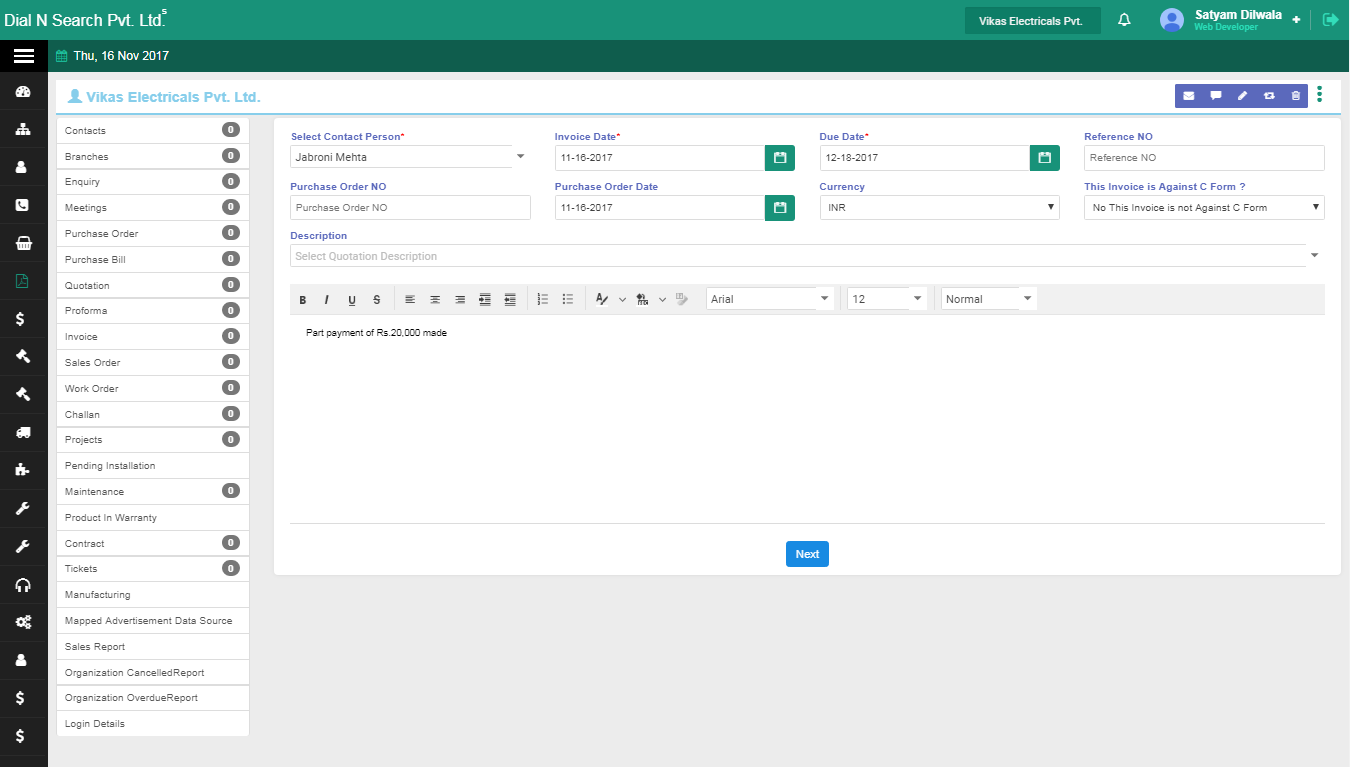
On the proforma header:
- Select Contact person, invoice date, due date and purchase order date.
- Enter a description if needed, then click Next.
Proforma header after convert: contact, invoice date, due date, PO date.
![Proforma invoice1]()
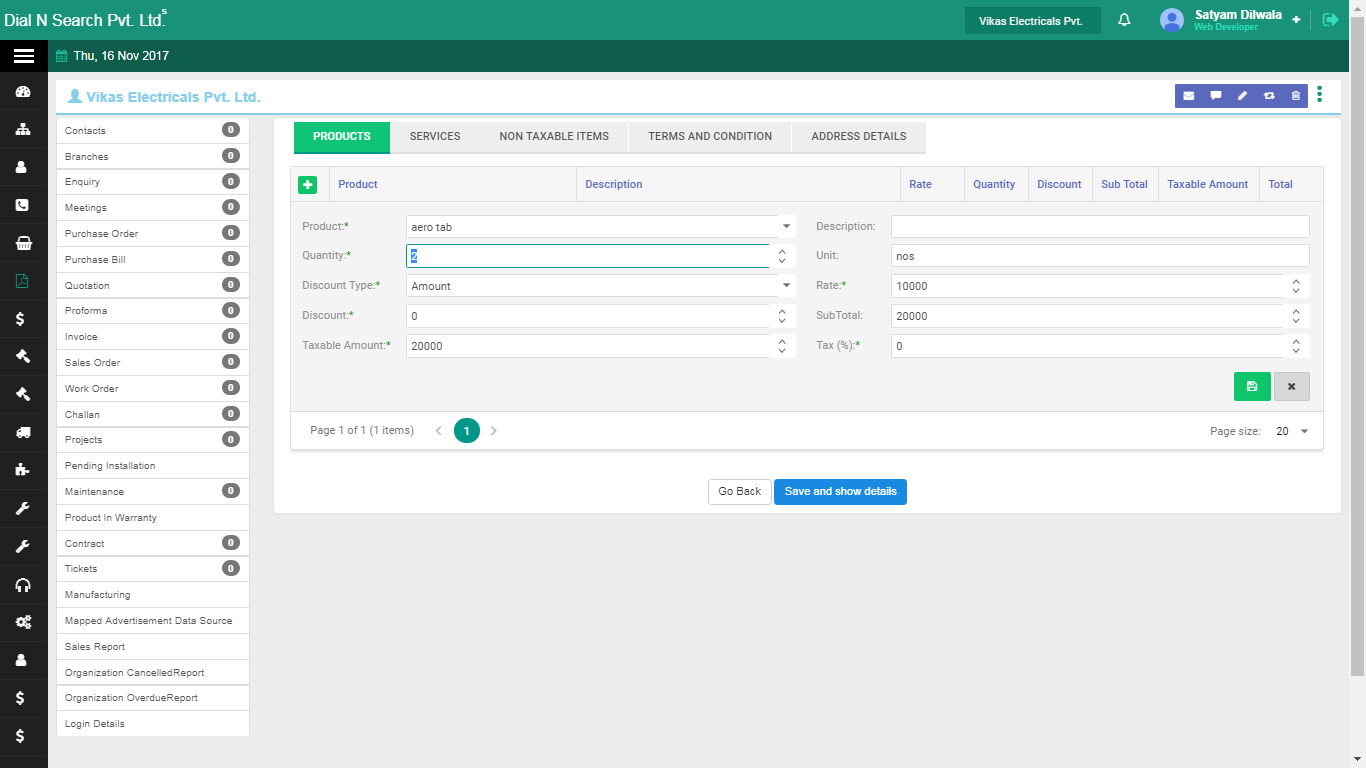
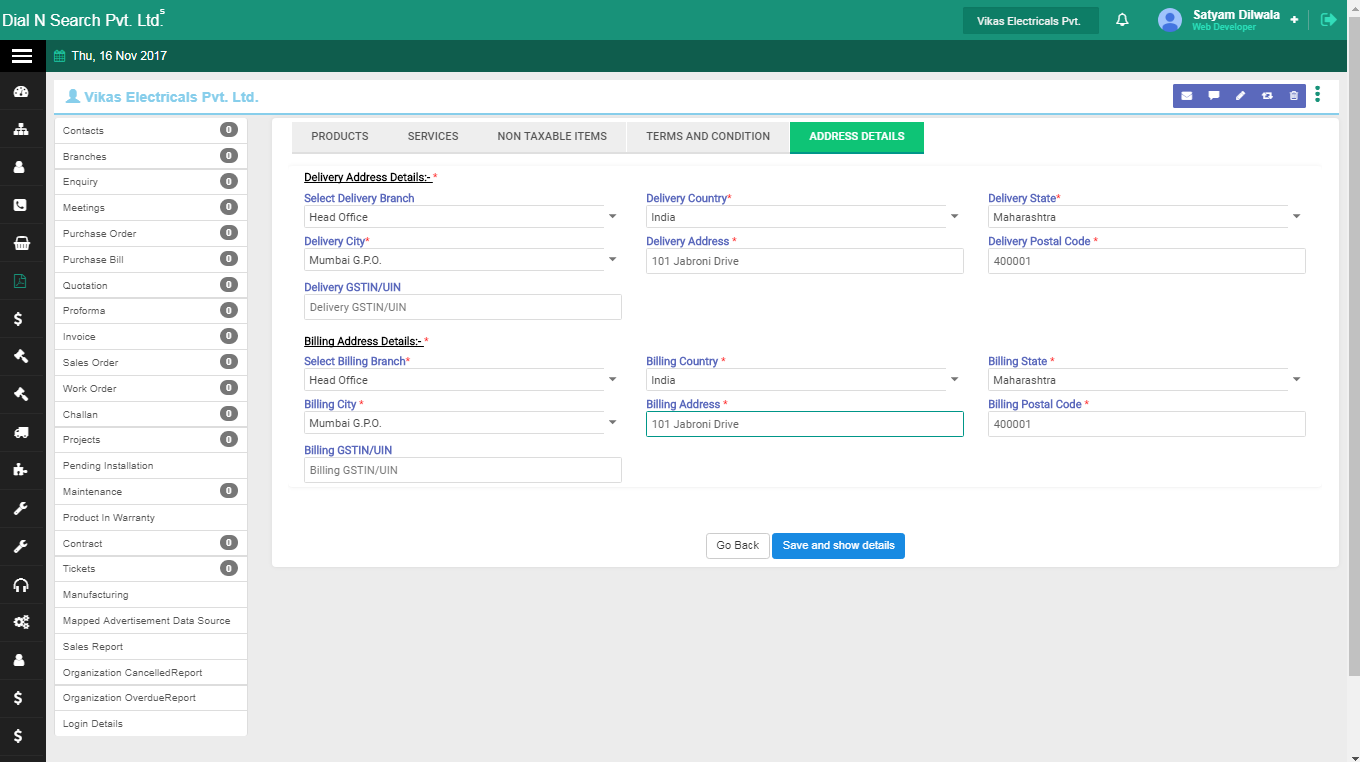
On the proforma lines:
- Under Products, click +, enter the product details, then click the Save icon.
- Open the Address Details tab, update the address, then click Save and show details.
Proforma product lines: add with +, then address, then Save and show details.
![Proforma invoice 2]()
Proforma saved: the offer is now an advance document on the same organisation.
![Proforma invoice 3]()
![Proforma invoice 4]()
Tip. Convert only after the customer has agreed the price. You can also create a blank proforma from the organisation’s three-dot menu if you did not start from a quotation.
- How to view quotations
-
Find every quotation you have sent, then open one to edit, email, download or convert.
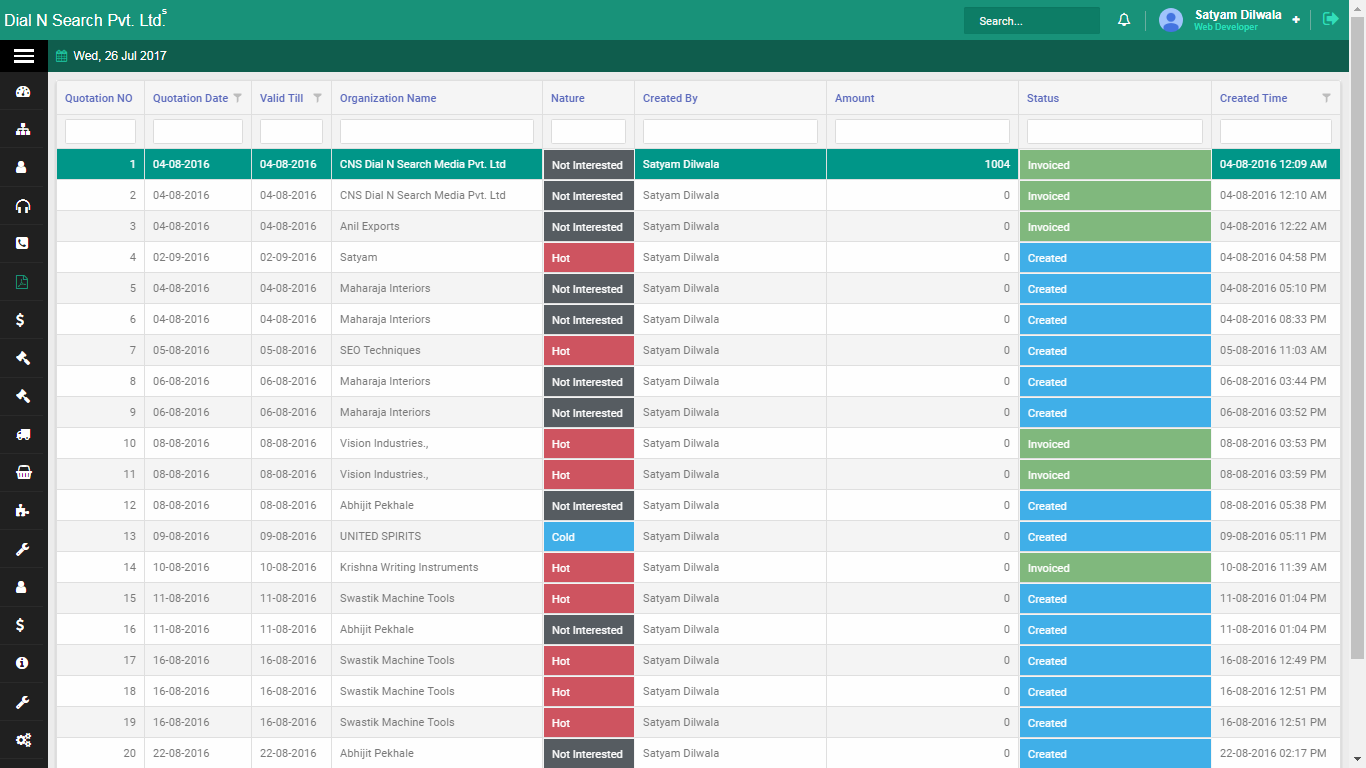
The quotation list is the sales pipeline after “someone asked”. Open a row when the customer calls back, when Valid till is near, or when you are ready to convert to proforma or invoice. Do not search WhatsApp for last week’s rate.
To open the list:
- Click Quotation → Quotation List.
- Click any quotation to open the detailed view.
Quotation list: all offers, ready to open for convert, email or download.
![Qlist]()
Invoices
Proforma first if you need an advance before dispatch. Tax invoice when you actually bill. Both lists live here so accounts can search, print and follow up without opening every quotation.
Who uses it. Accounts and the owner. Sales usually converts from the quotation rather than typing a blank invoice.
Example. The hotel agrees. You send a proforma for 40% advance. After the challan goes out, you raise the tax invoice. Overdue invoices also show on the Dashboard, so this list is what that reminder is counting.
- How to create a proforma invoice
-
Raise a proforma from the organisation when you need an advance before you dispatch or buy stock.
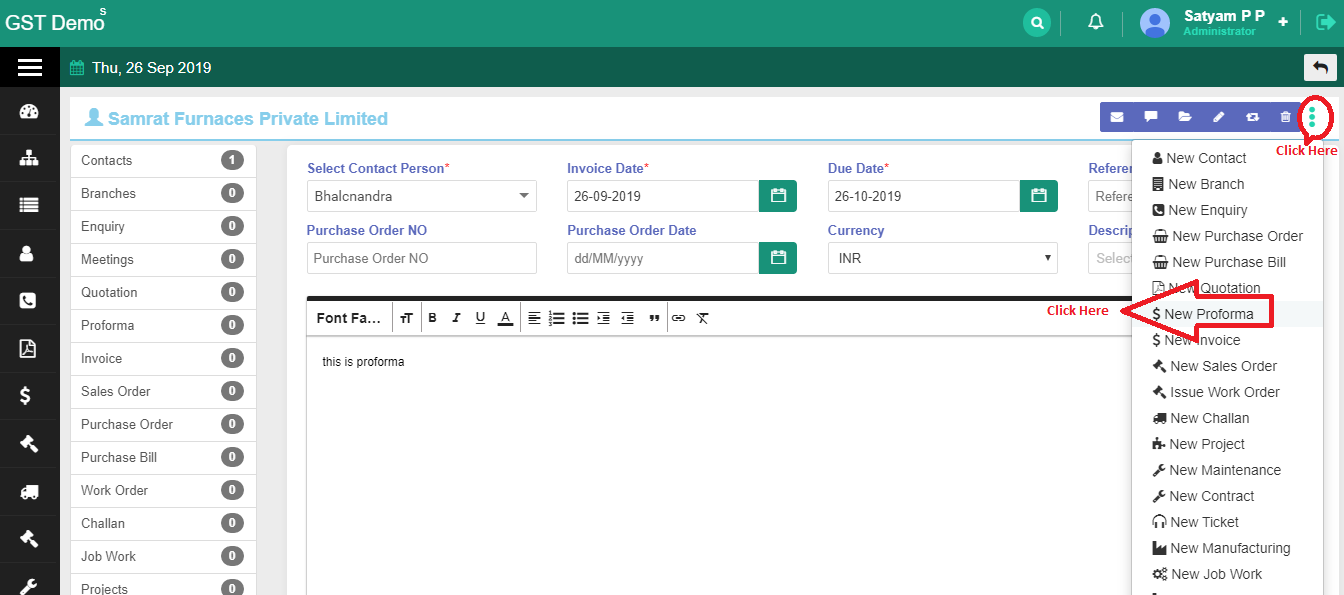
A proforma is a request for money, not the GST tax invoice. Use it after the customer agrees, before the challan goes out. You can also convert from a quotation (see How to create a quotation). Creating from the three-dot menu is for when there is no quote to convert, or you want a fresh proforma on that company.
Short video: creating a proforma invoice.
On the organisation:
- Open the organisation.
- Click the three-dot menu at the top right → New Performa.
Organisation menu: New Performa starts a blank proforma on that company.
![PerformaInvoice]()
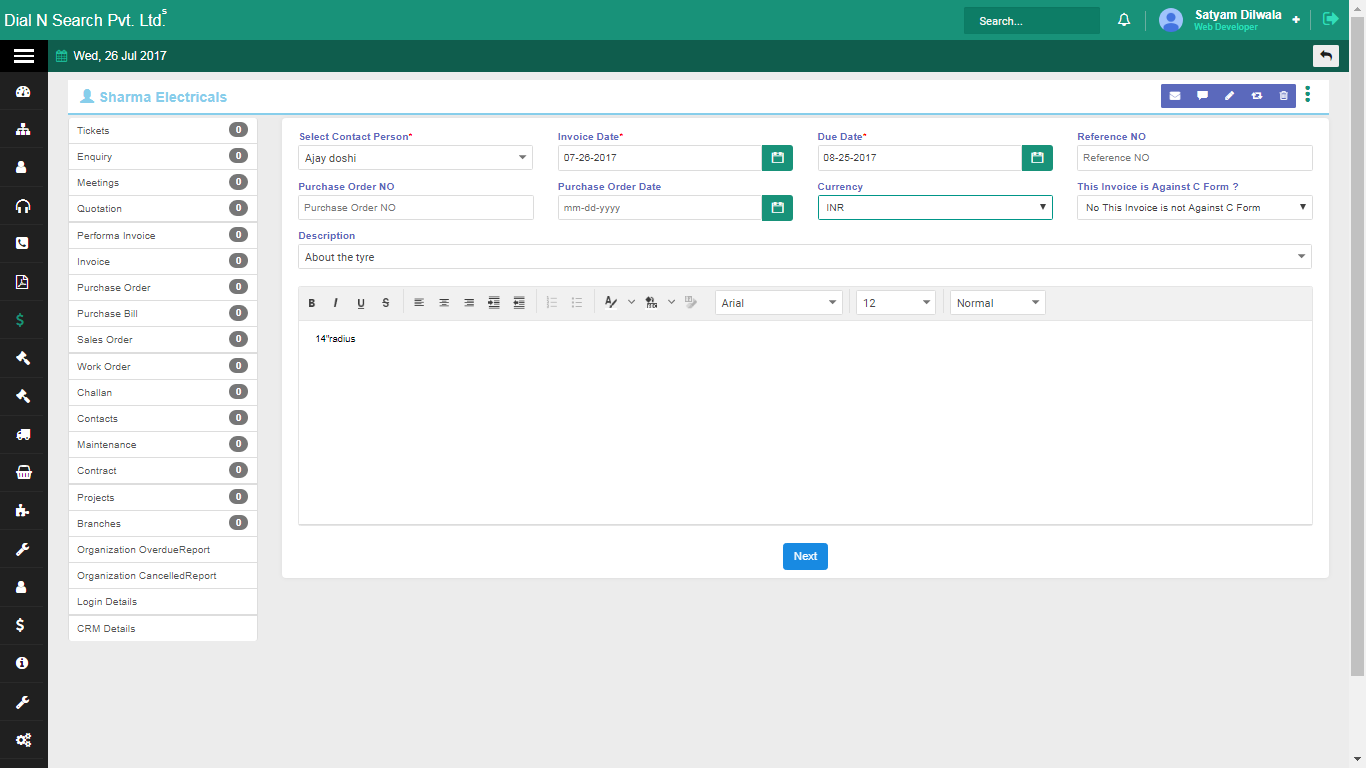
On the proforma header:
- Fill the invoice details as shown, then click Next.
Proforma header: dates and invoice fields before product lines.
![New pinvoice1]()
On the lines:
- Open the Products tab, click +, fill the fields as shown, then click Save.
- Update services, other charges, terms & conditions and address details on their tabs.
- Click Save and show details.
Proforma lines: products, then services, charges, terms and address.
![New pinvoice3]()
Saved proforma: the advance document is on the organisation record.
![New pinvoice4]()
Tip. Prefer converting from a quotation when one exists, so rates do not get retyped. The menu label in the product is New Performa.
- How to view proforma invoices
-
Find every proforma you have raised, then open one to print, follow up or continue billing.
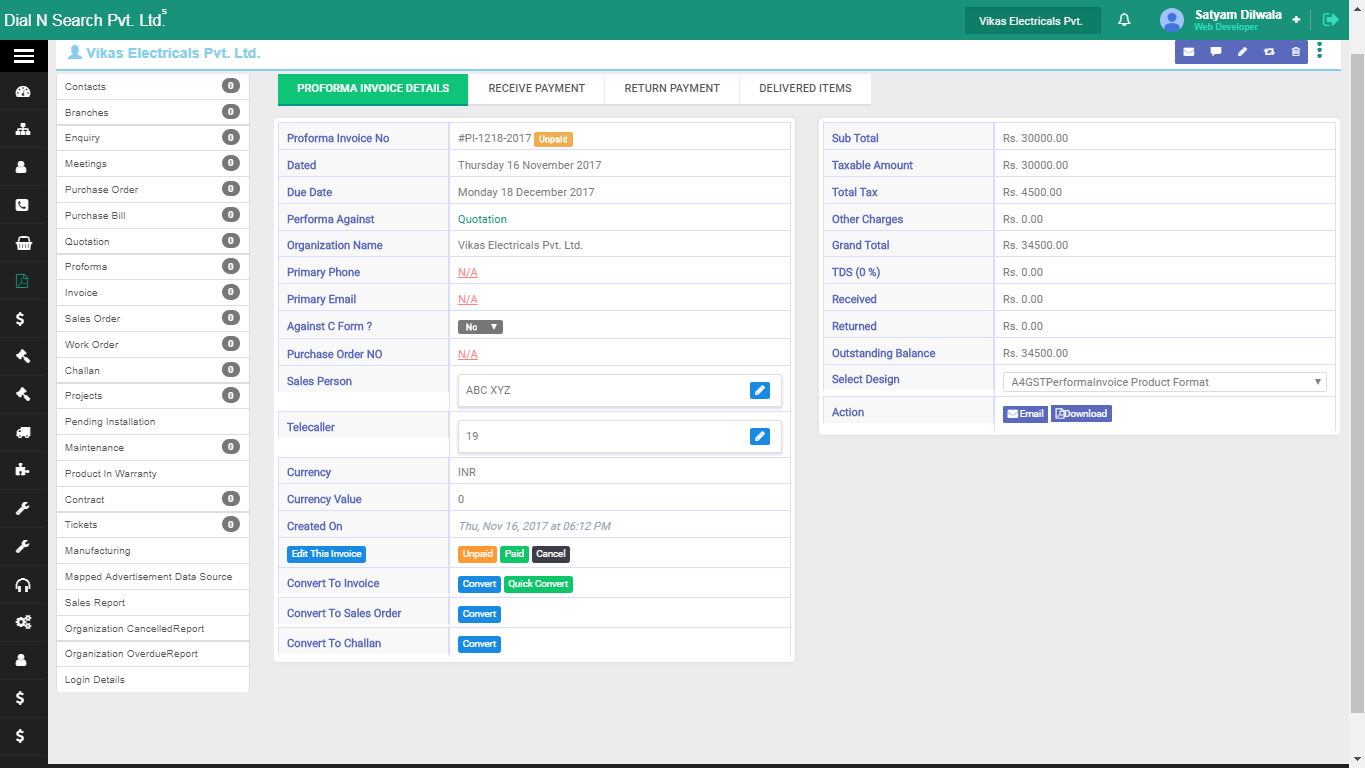
Accounts uses this list to see who was asked for advance and who has not paid. Open the organisation name on a row for the full document. Overdue follow-up still belongs with tax invoices on the Dashboard; this list is the advance paper trail.
To open the list:
- Click Invoice → Proforma Invoice List.
- Click the organisation name to open the detailed view.
Proforma invoice list: advance documents by organisation.
![Invoice list]()
- How to create a tax invoice
-
Raise the tax invoice when you actually bill the customer — after they accepted, and usually after or with delivery.
The tax invoice is the GST bill. Prefer converting from a quotation so rates match what you offered. Creating from the organisation’s New Invoice is for a direct bill on that company. Accounts follows overdue invoices from the Dashboard; those tiles count this document, not the quotation.
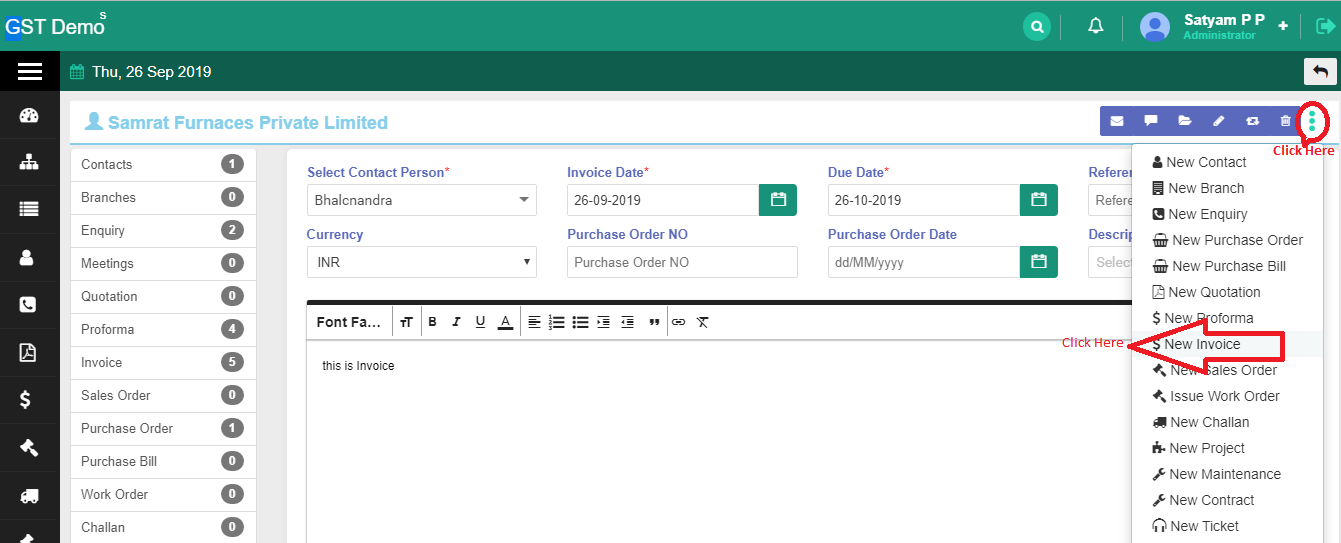
On the organisation:
- Open the organisation.
- Click the three-dot menu at the top right → New Invoice.
Organisation menu: New Invoice starts a tax invoice on that company.
![TaxInv]()
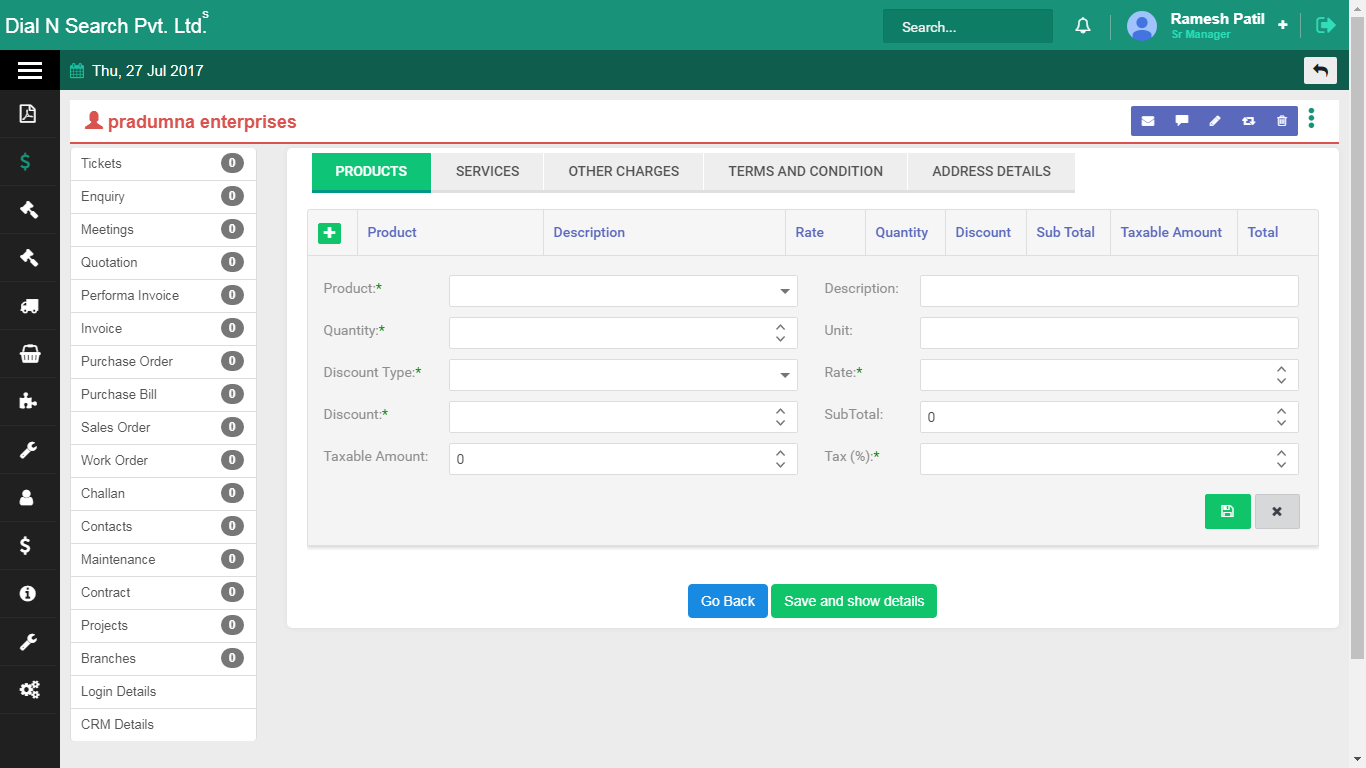
On the invoice lines:
- Click +, open the Products tab, fill the fields as shown, then click Save.
- Update services, other charges, terms & conditions and address details on their tabs.
- Click Save and show details.
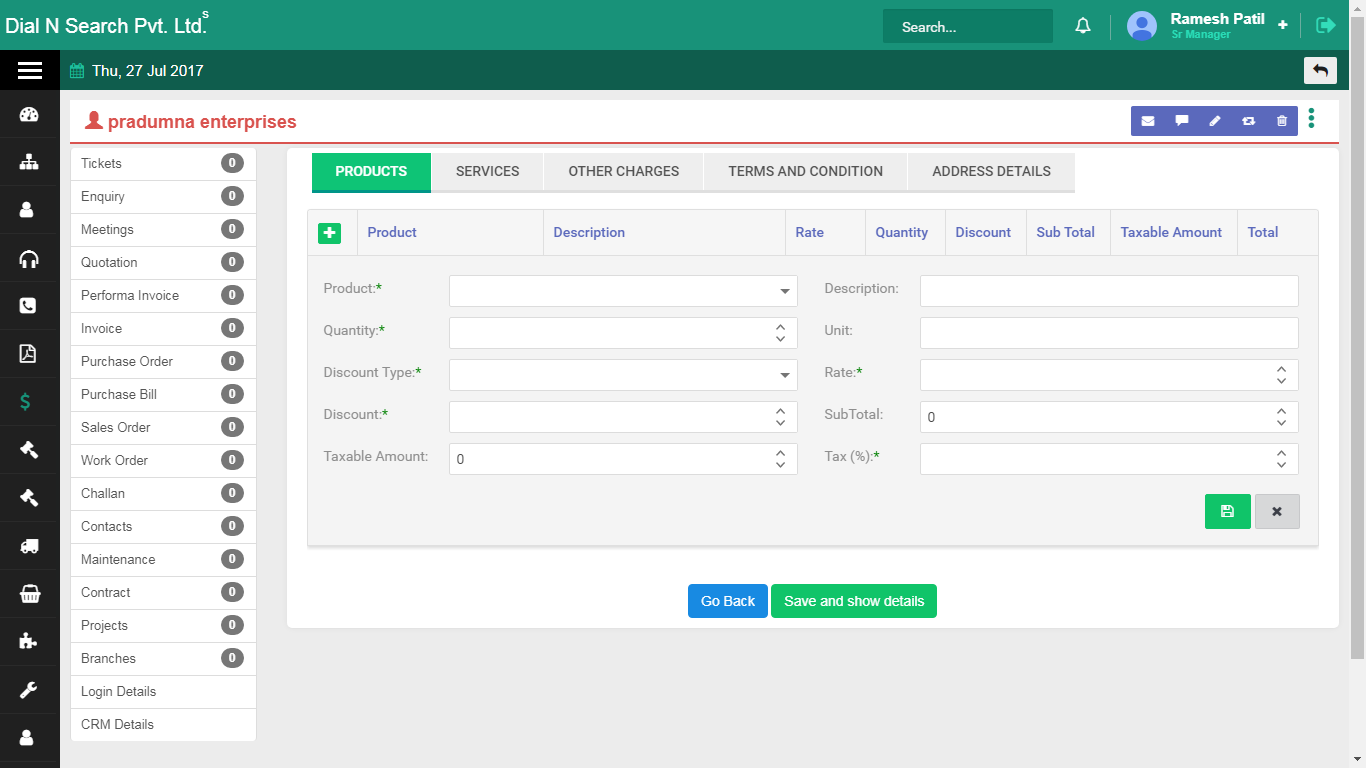
Tax invoice lines: products, then services, charges, terms and address.
![New tax invoice1]()
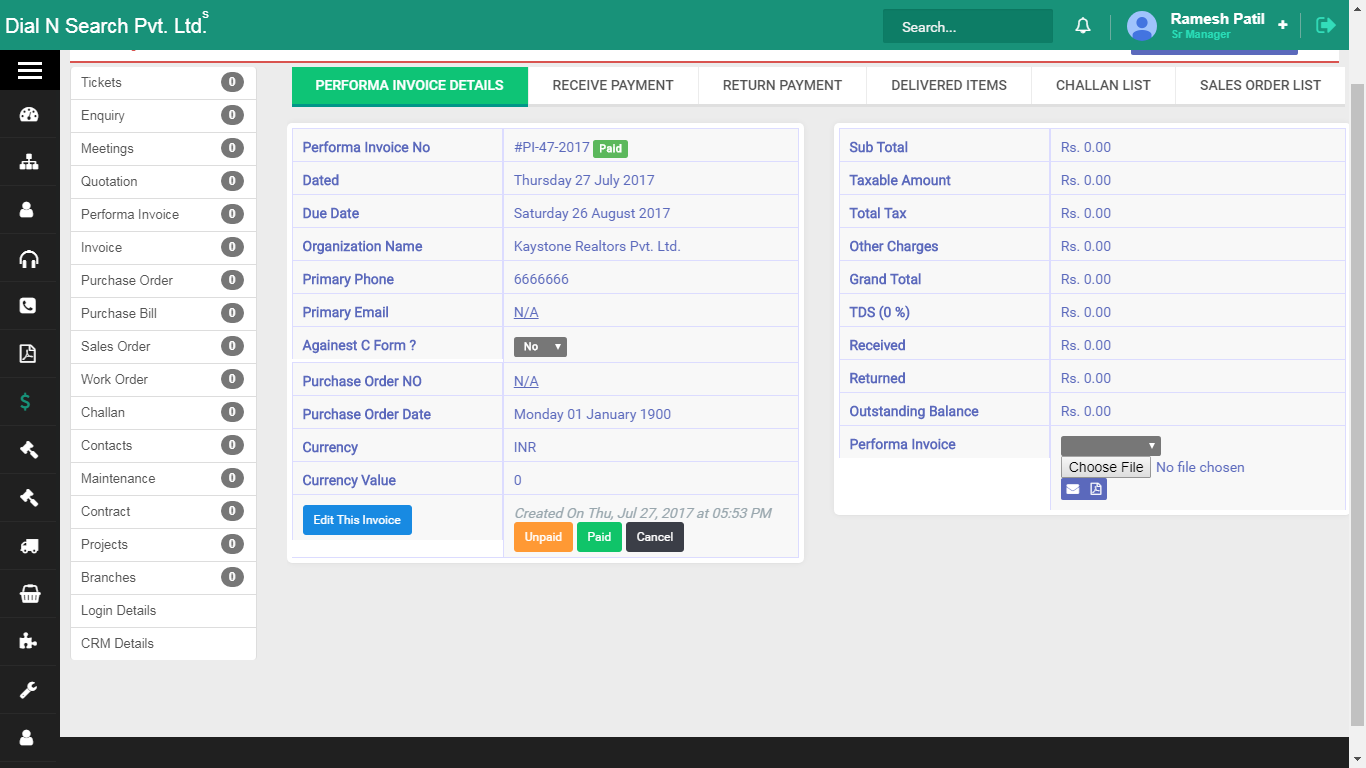
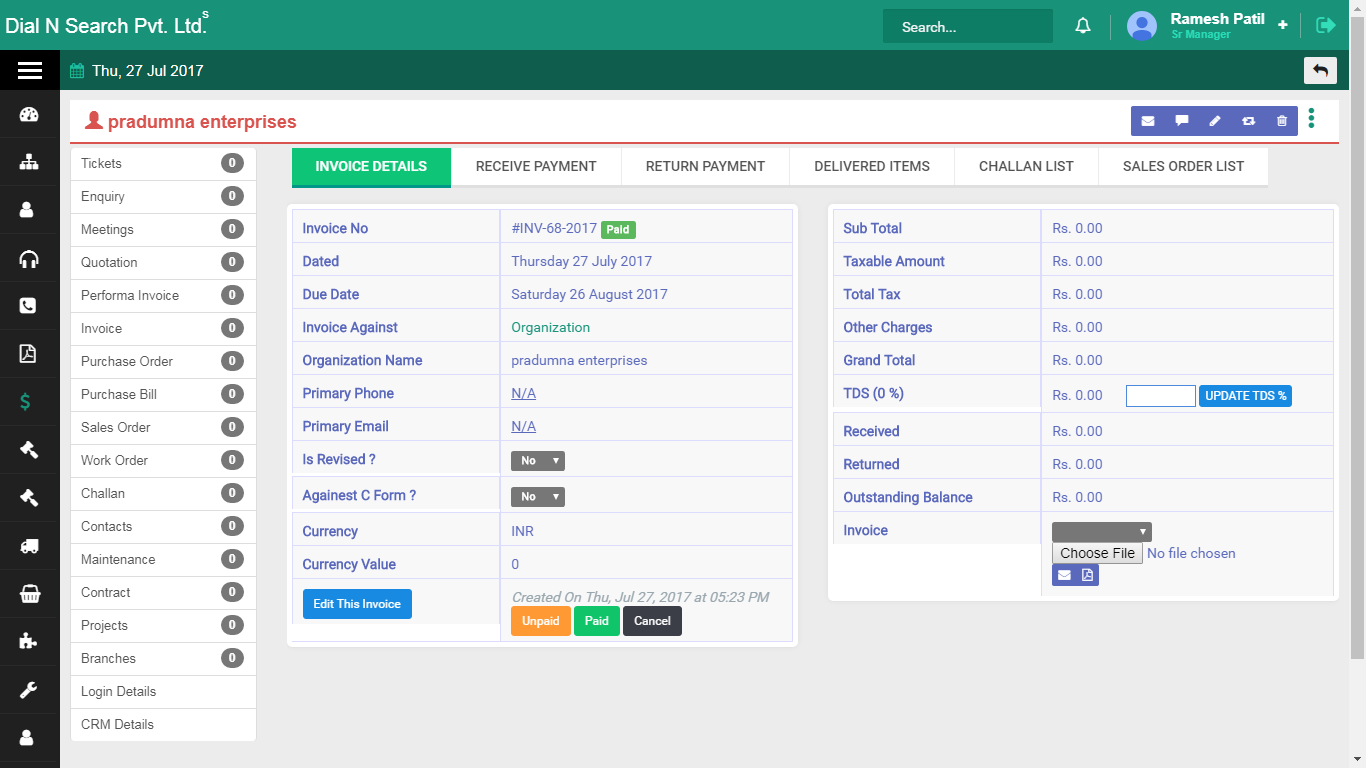
Saved tax invoice: the bill is on the organisation record.
![New tax invoice2]()
Tip. If a quotation already exists, convert from that quotation instead of typing a blank invoice.
- How to view tax invoices
-
Find every tax invoice, then open one to print, collect or check what was billed.
This is the accounts working list. The Dashboard overdue tile counts from here. Open the organisation name on a row for the full invoice. Use it after delivery when you need to follow up payment, not to create a new quote.
To open the list:
- Click Invoice → Tax Invoice List.
- Click the organisation name to open the detailed view.
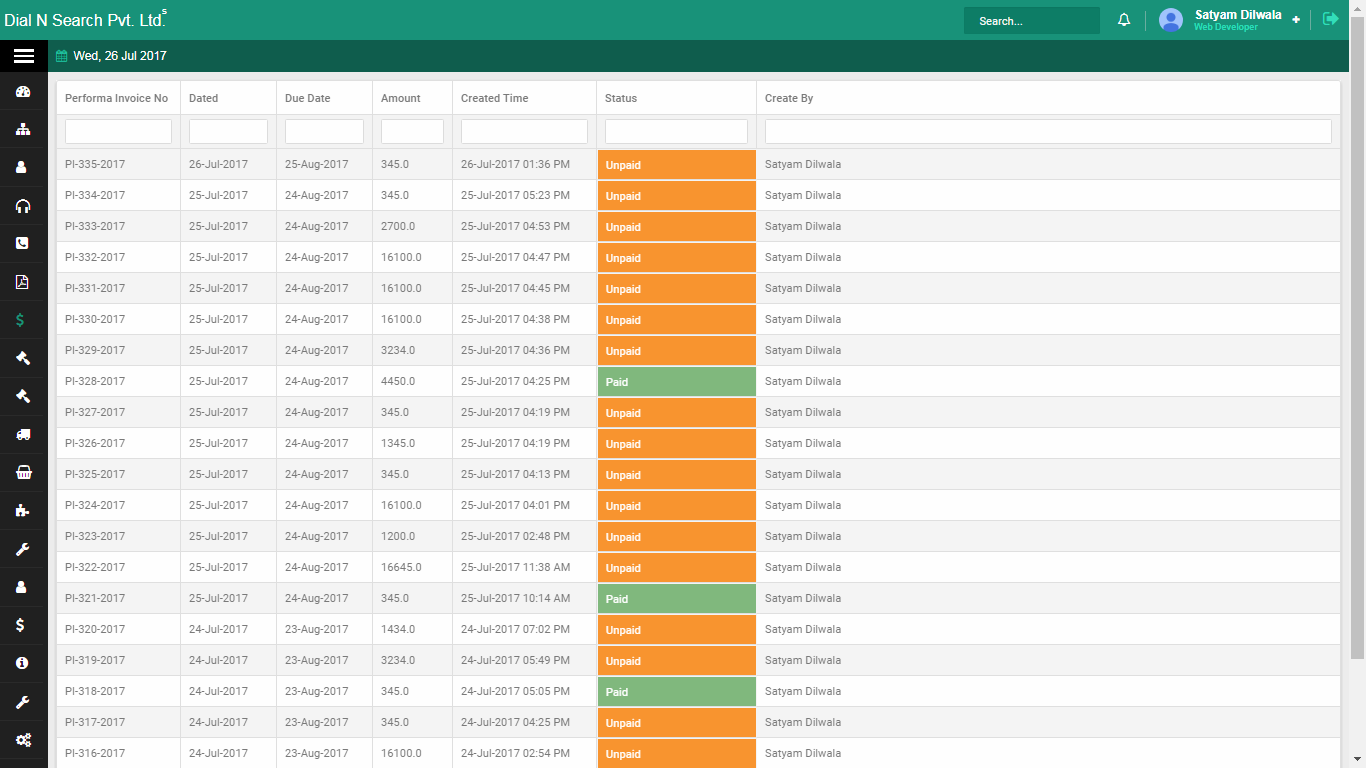
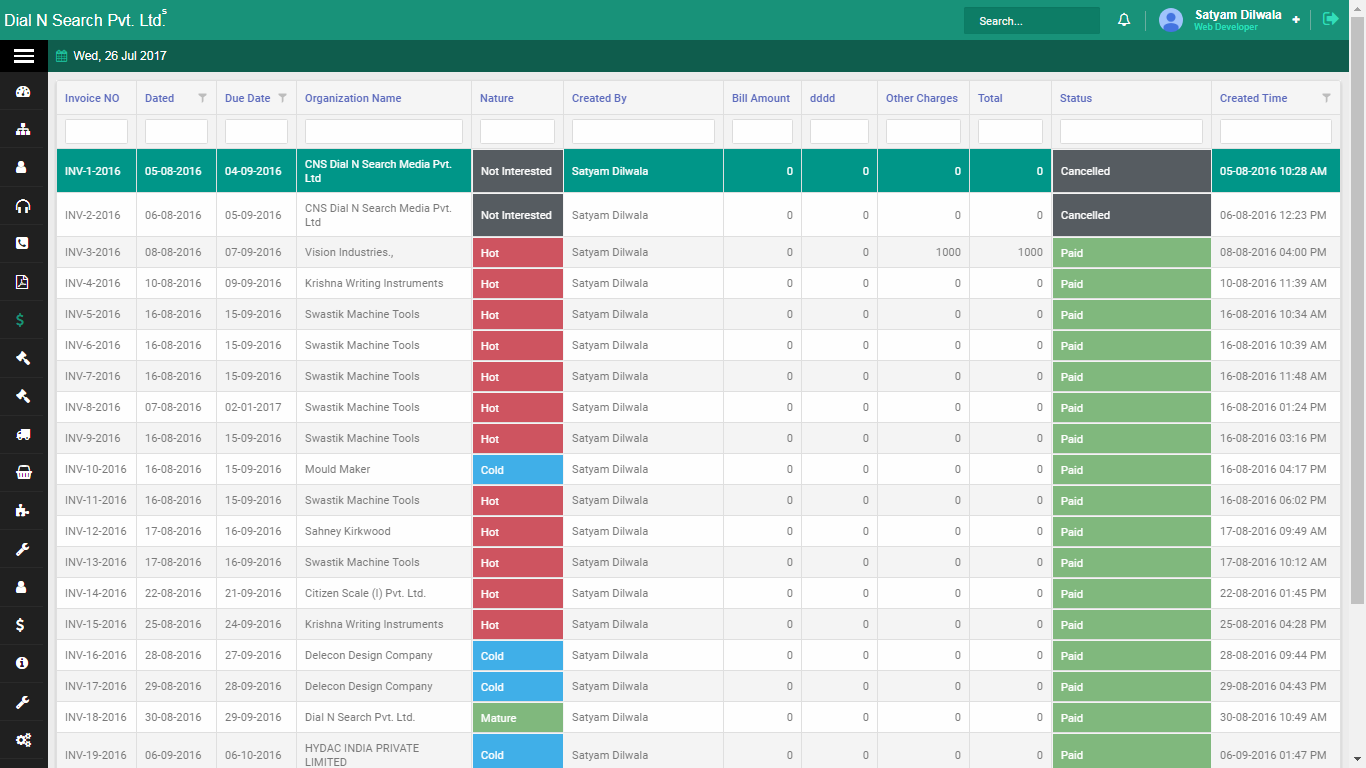
Tax invoice list: billed documents by organisation.
![Tax invoice list]()
Sales orders
Confirmed work after the customer accepted the offer. A sales order is not a quotation and not an invoice. It is the internal “we will supply this” record: products, terms, status.
Who uses it. Sales and operations, to see what is committed versus what is only quoted.
Example. Hotel Sagar accepted the cassette-AC quote. You create a sales order so stores know the quantity is committed, then you purchase short stock and later make the delivery challan against the same organisation.
- How to create a sales order
-
Record confirmed supply after the customer accepted — what you will deliver, not a quote and not yet a bill.
A sales order is the internal “we will supply this” record. Sales and operations use it to see committed quantity versus what is only quoted. After Hotel Sagar accepts the cassette-AC quote, create the sales order so stores know the quantity is committed. Then you purchase short stock and later make the delivery challan against the same organisation.
Short video: creating a sales order.
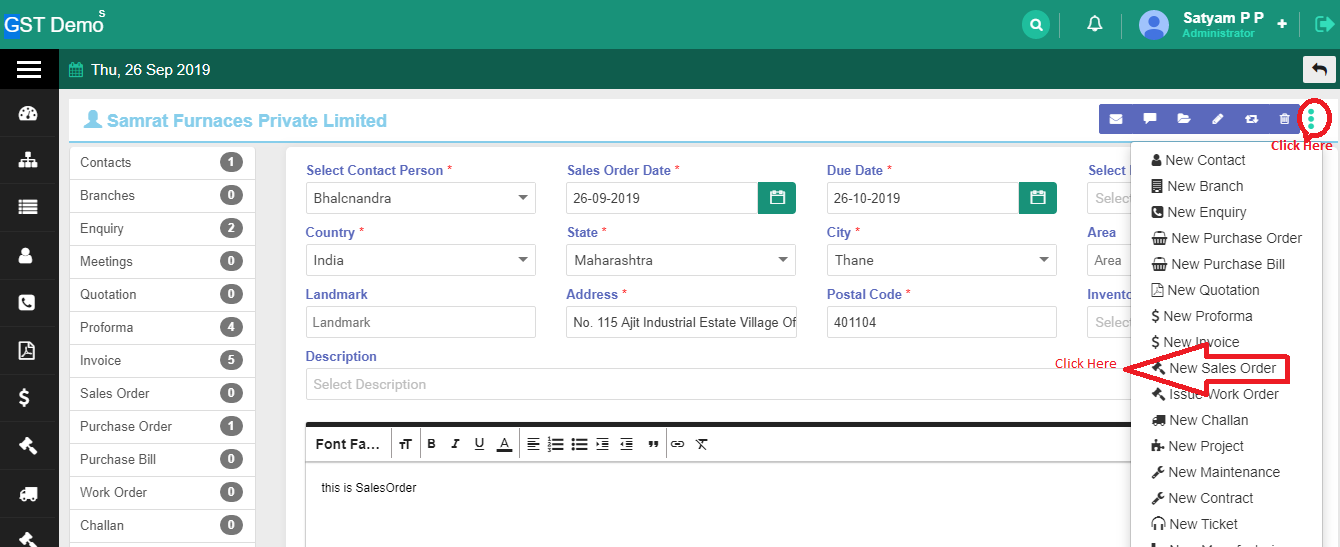
On the organisation:
- Open the organisation.
- Click the three-dot menu at the top right → New Sales Order.
New sales order header: contact and order fields before product lines.
![SalesOrder]()
On the header and lines:
- Fill the contact details as shown, then click Next.
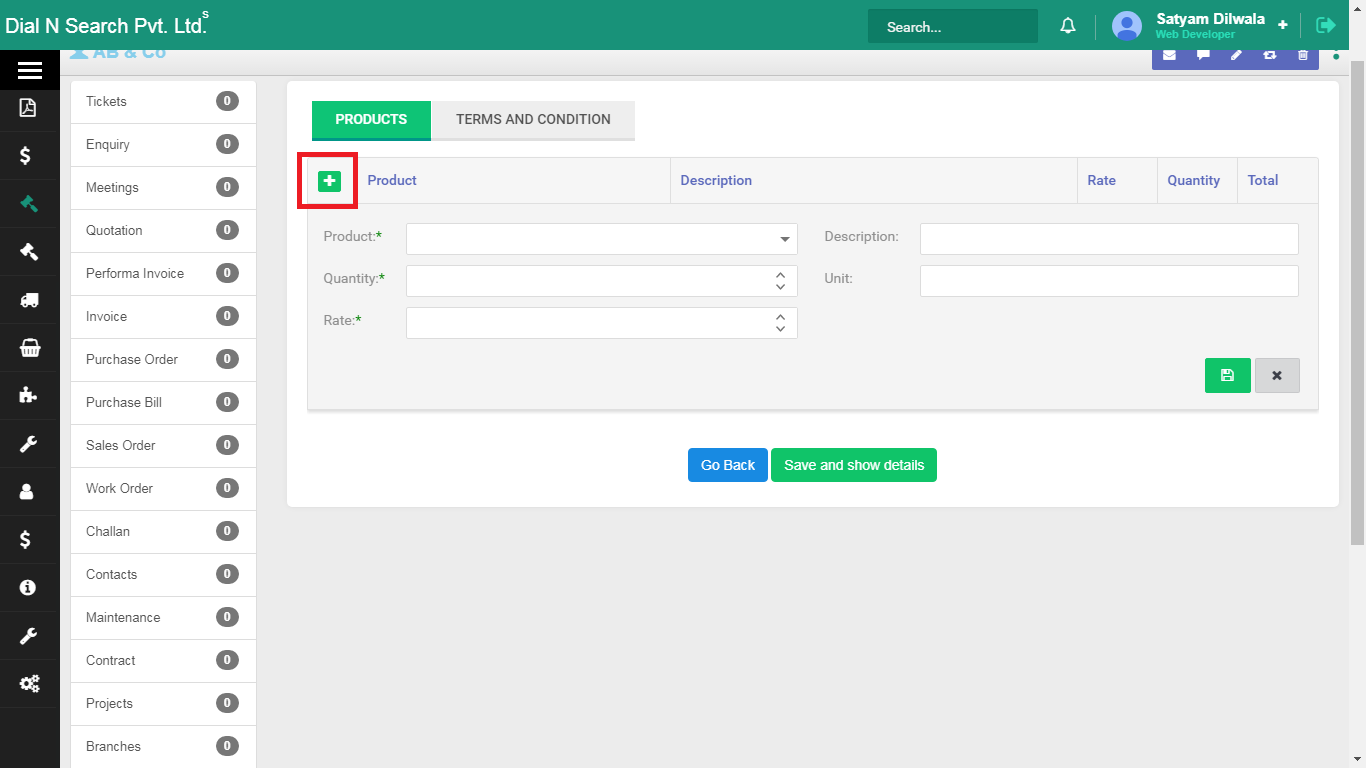
- Click +, fill the product lines as shown, then click the Save icon.
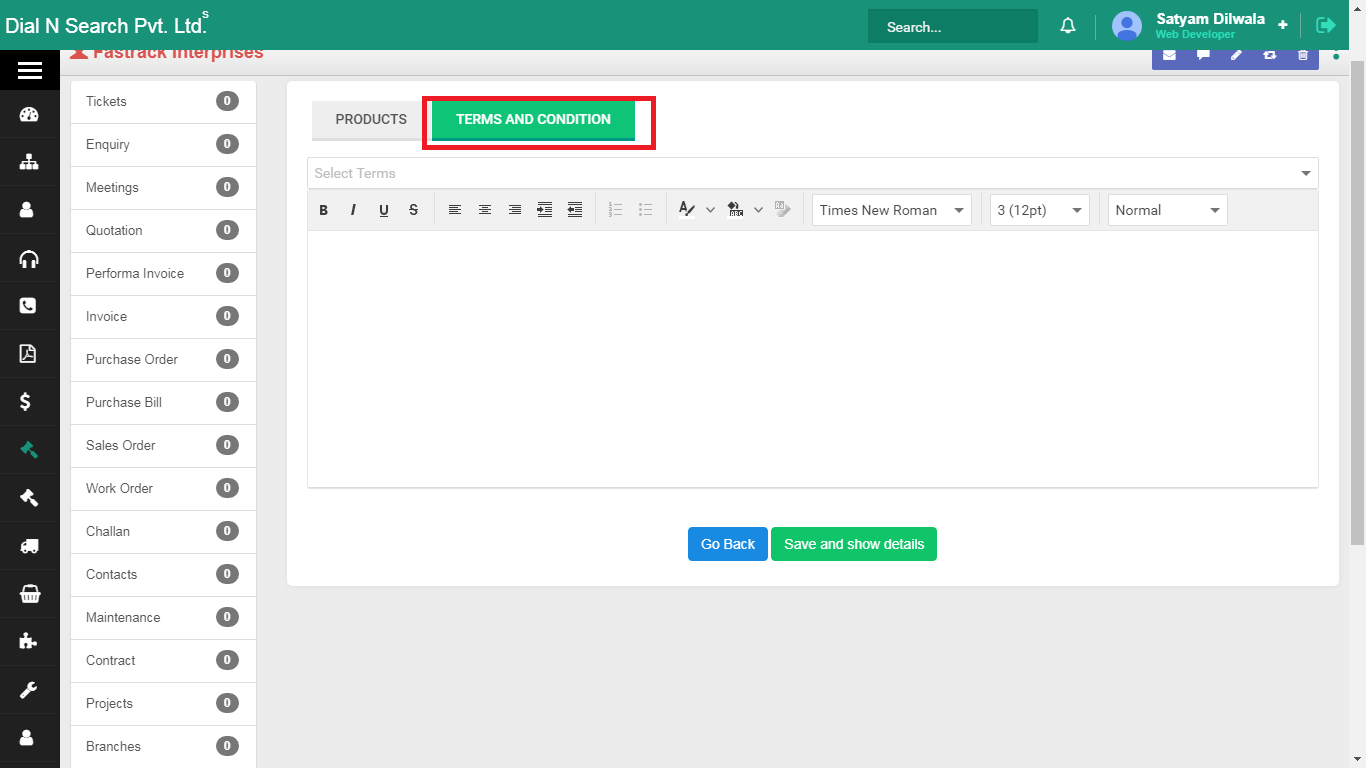
- Open Terms and Conditions, update them, then click Save and show details.
Sales order product lines: add with +, then terms.
![Salesorder2]()
Terms and conditions on the sales order, then Save and show details.
![Salesorder3]()
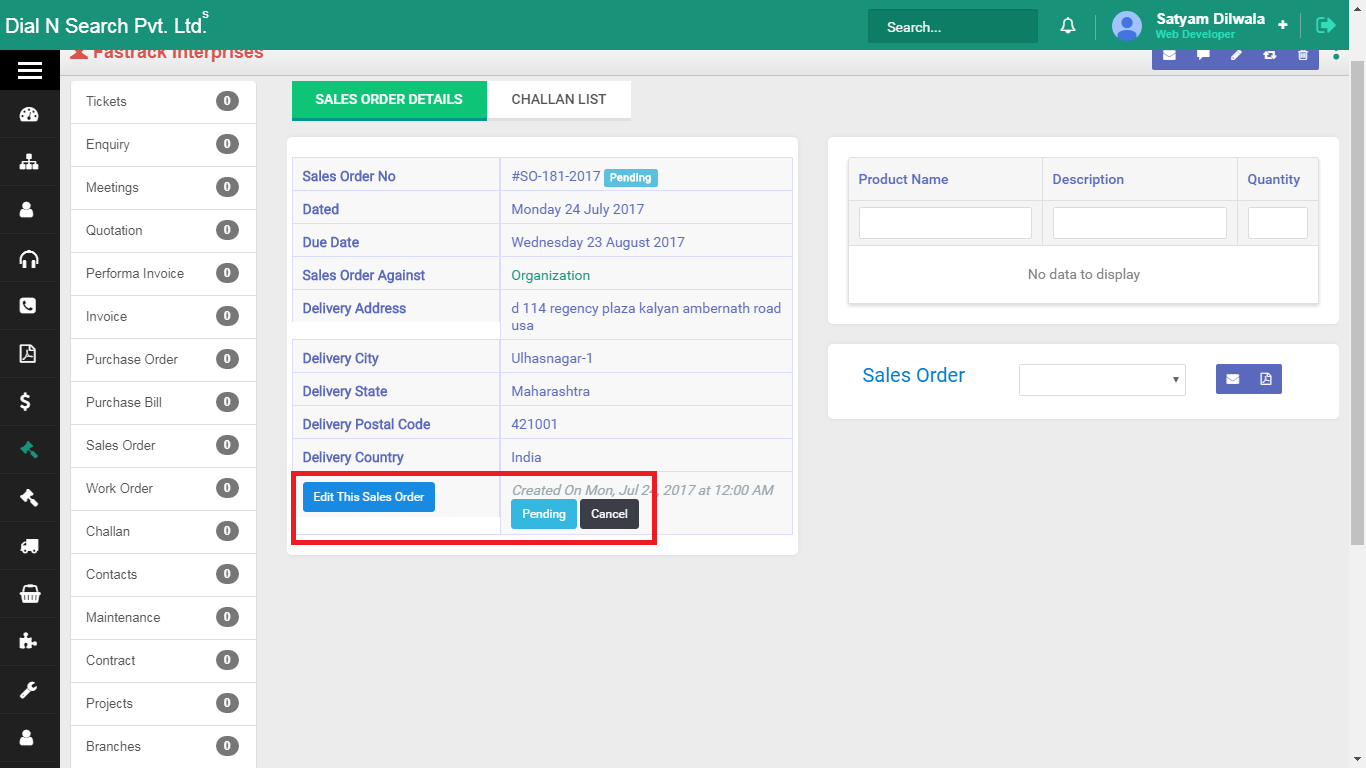
Saved sales order: edit, change status, or cancel from the highlighted buttons.
![Salesorder4]()
Tip. From the saved screen you can edit the order, change its status, or cancel it using the highlighted buttons. This does not create a challan by itself.
- How to view sales orders
-
See every sales order and its current status, then open one to edit or follow up committed supply.
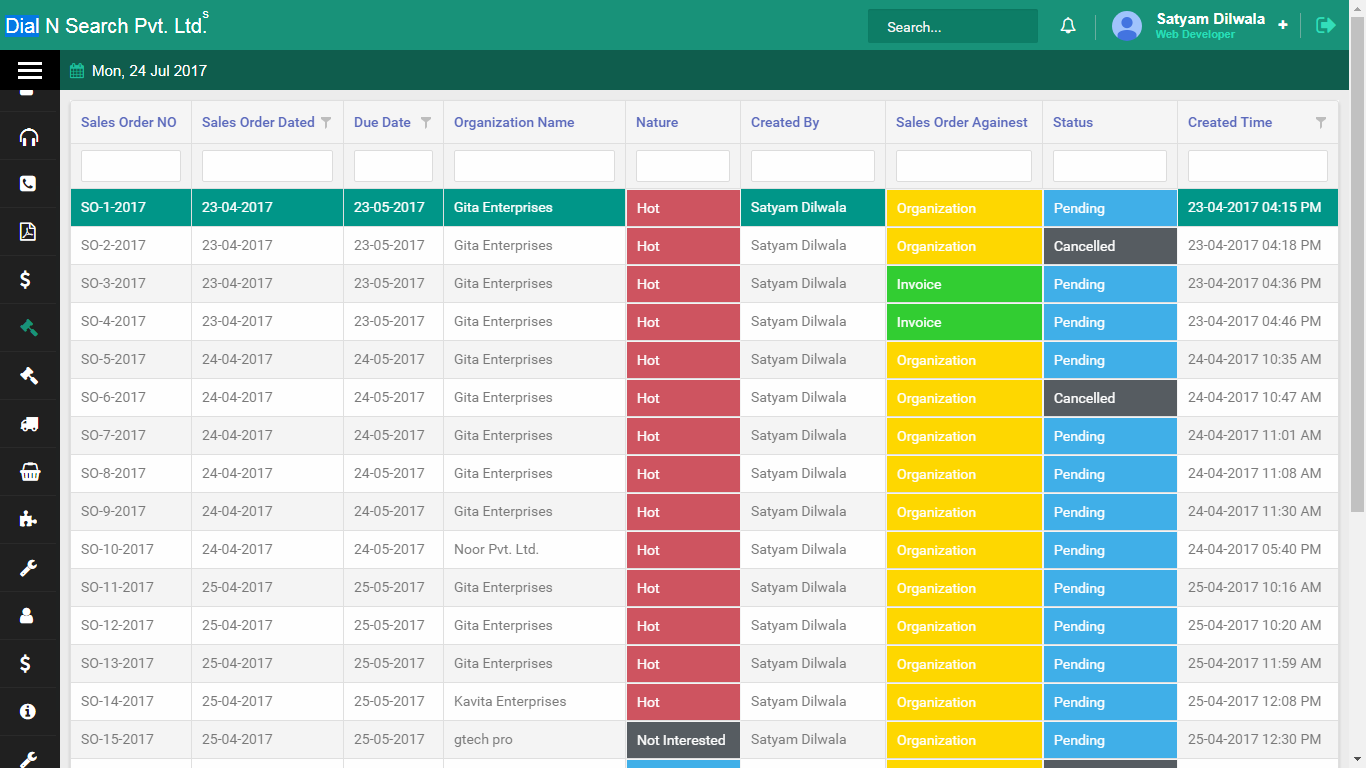
Operations uses this list to know what is committed versus what is only quoted. Open the organisation name on a row to edit or view that order. Status on the list tells you which jobs are still live.
To open the list:
- Click Sales Order → Sales Order List.
- Click the organisation name to edit or view that sales order.
Sales order list: committed orders with current status.
![Salesorder list]()
Work orders
A job you issue to your workshop, a vendor, or a team: what to make or do, on which products, at which address. It is not a customer quotation. It is the work slip.
Who uses it. Operations and the floor supervisor. Sales may raise it from the organisation when a job must be issued.
Example. A panel must be assembled before dispatch to the hotel. You issue a work order with product lines and the site address, then track it on the issued work-order list until it is done.
- How to issue a work order
-
Issue a work slip to the workshop, a vendor or a team: what to make or do, on which products, at which address.
A work order is not a customer quotation. It is the job you issue internally. Operations and the floor supervisor track it. Example: a panel must be assembled before dispatch to the hotel. Issue the work order with product lines and the site address, then follow it on the issued list until it is done.
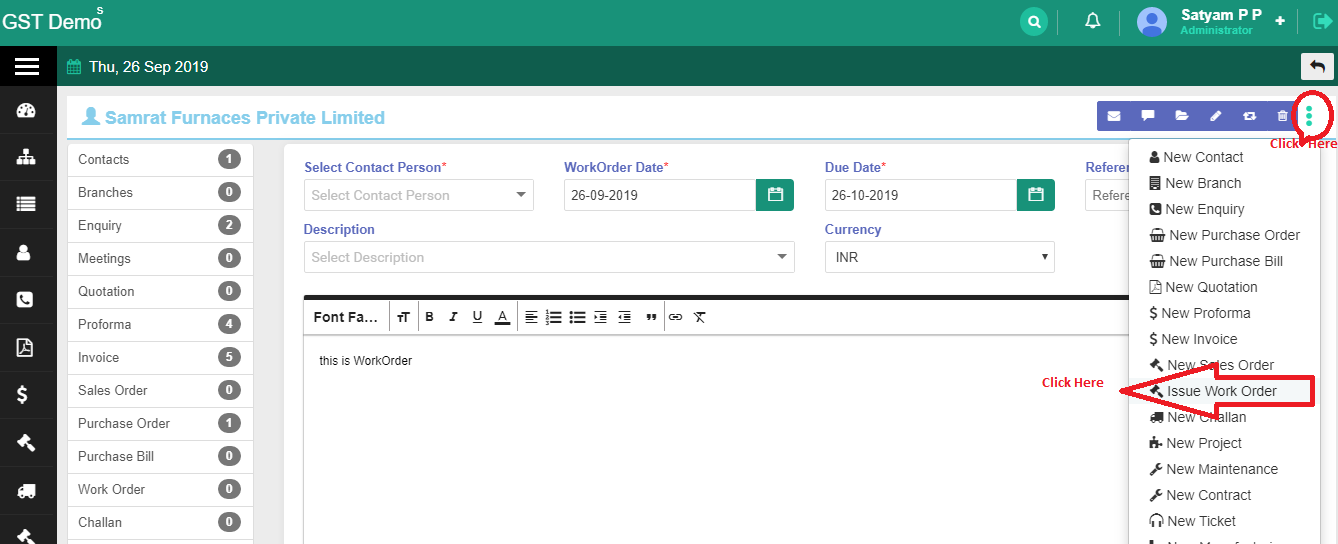
On the organisation:
- Open the organisation.
- Click the three-dot menu at the top right → Issue WorkOrder for that organisation.
Issue work order header: job fields before product lines.
![WorkOrder]()
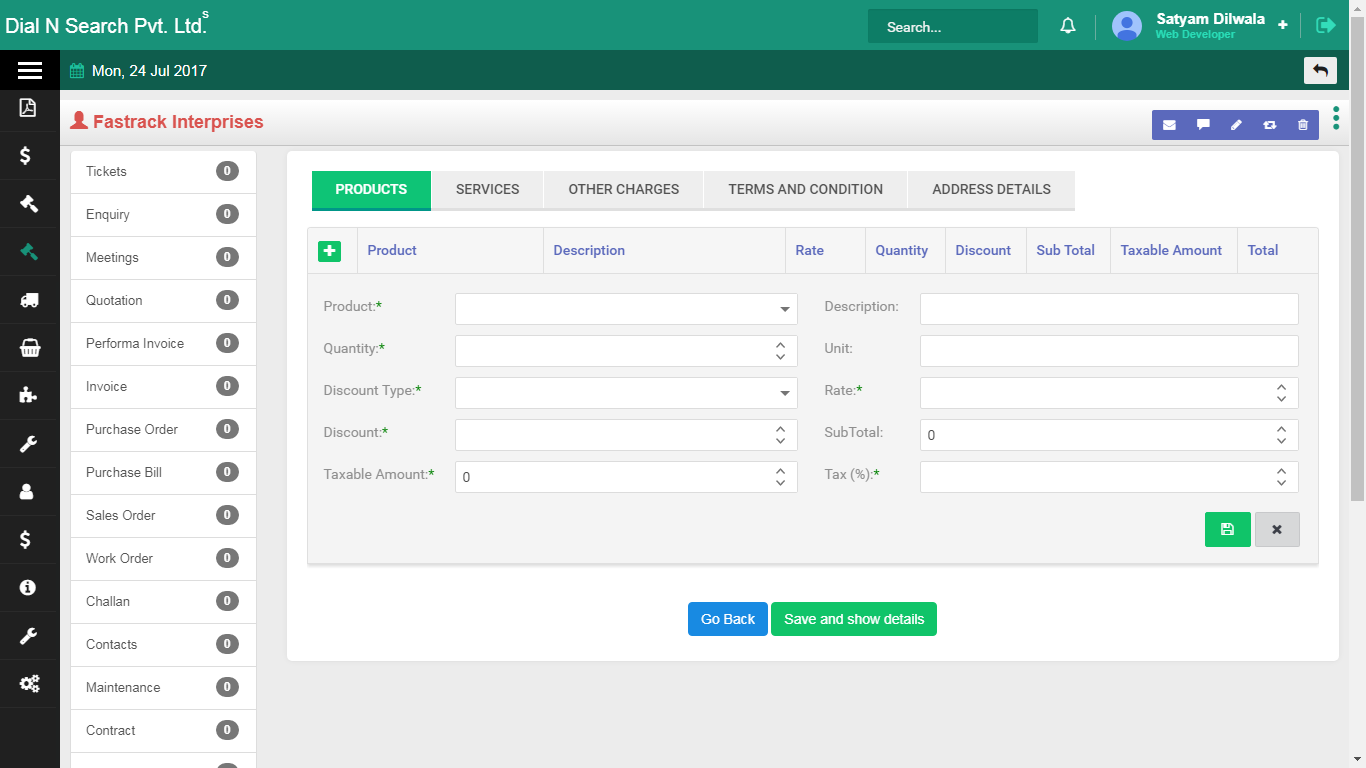
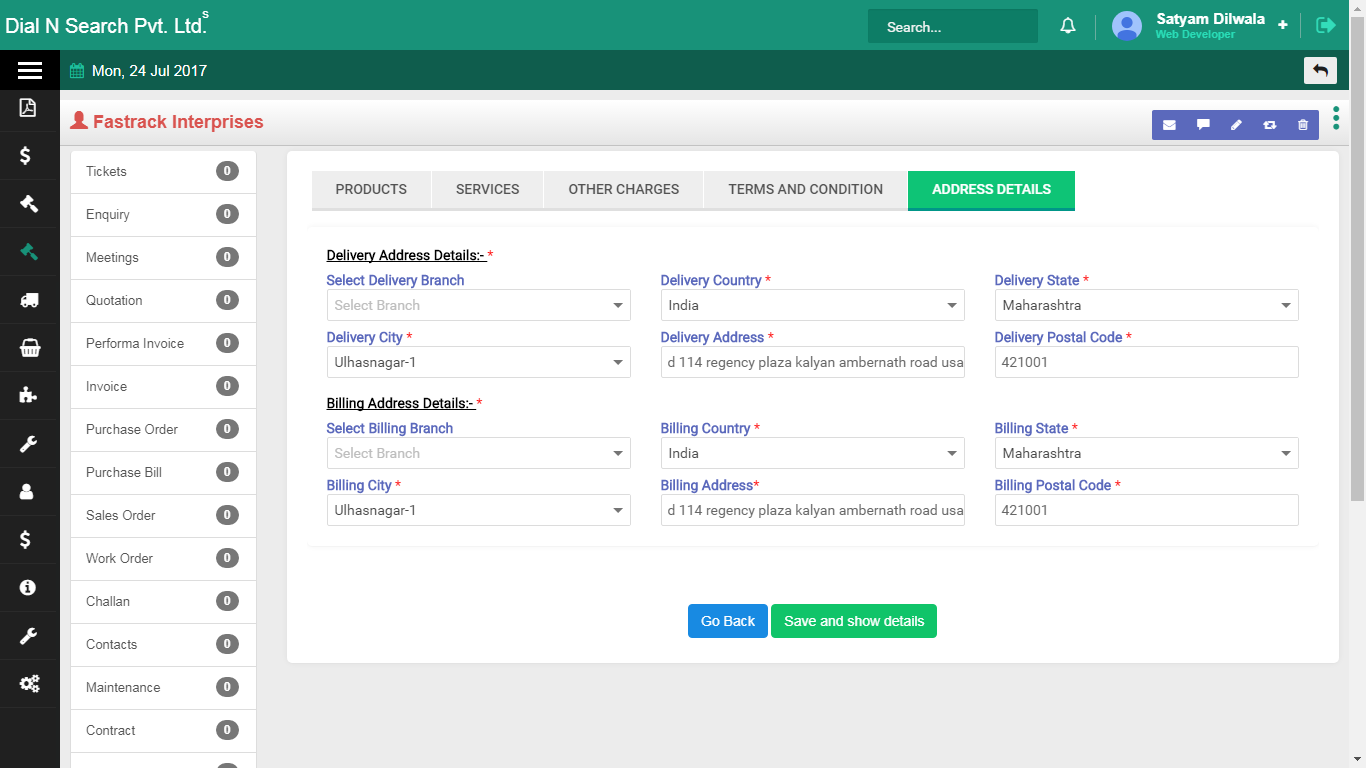
On the lines and address:
- Fill the header fields as shown, then click Next.
- Under Products, click +, fill the product details as shown, then save the line.
- Update services, other charges and terms and conditions on their tabs, then save.
- Open Address details, fill the site address as shown, then click Save.
Work order product lines: add with + under Products.
![Wrkorder2]()
Work order address: site details for where the job is done.
![Wrkorder address]()
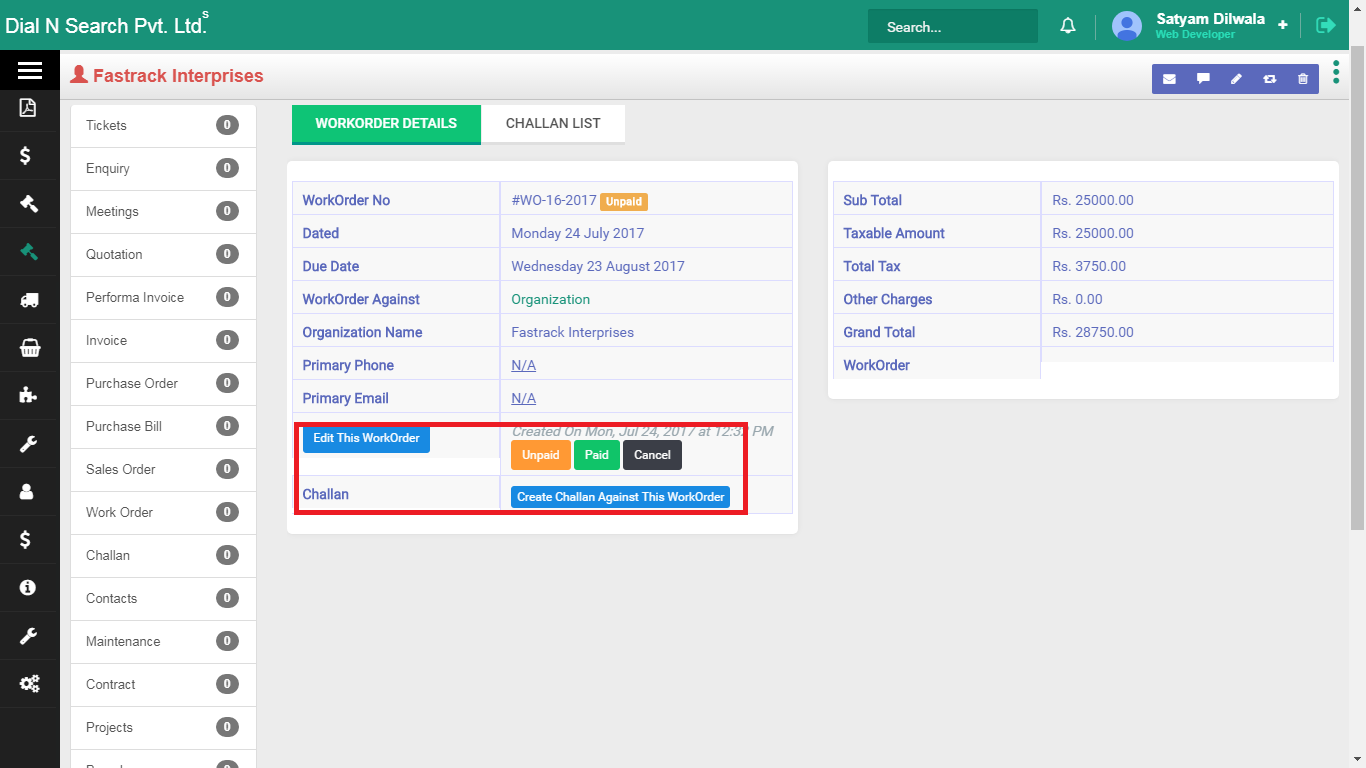
Saved work order: edit, or set status to paid, unpaid or cancel.
![Workordersum]()
Tip. From the summary screen you can edit the work order and update status to paid, unpaid or cancel.
- How to view issued work orders
-
See work orders you have already issued, then open one to check status or the site address.
The floor supervisor uses this list to know which jobs are still open. Open the organisation on a row to view that work order. This is not the quotation list and not the challan list.
To open the list:
- Click Work Order → Issue work order.
- Click the organisation to view that work order.
Challans (delivery)
Goods leaving your store. A delivery challan is the paper that travels with the material. Create it against the organisation, add products (and installation products if needed), then mark status: pending, out, delivered, or cancel. You can also create an invoice from the challan screen.
Who uses it. Stores and dispatch. Accounts may convert the challan to an invoice after delivery.
Example. Eight cassette ACs go to Hotel Sagar’s site. The driver carries the challan. When status is delivered, the hotel has proof of receipt and you can bill. This is delivery, not a purchase GRN.
- How to create a delivery challan
-
Create the paper that leaves with the goods, so stores know what went out and the site has proof of delivery.
A delivery challan is not a purchase GRN and not a tax invoice. Stores and dispatch create it against the organisation after the sales order (or quote) is confirmed. Status — pending, out, delivered, or cancel — tells you whether material is still in the godown. After the site signs, you can create an invoice from the same challan screen. Example: eight cassette ACs go to Hotel Sagar; the driver carries this challan.
Short video: creating a delivery challan.
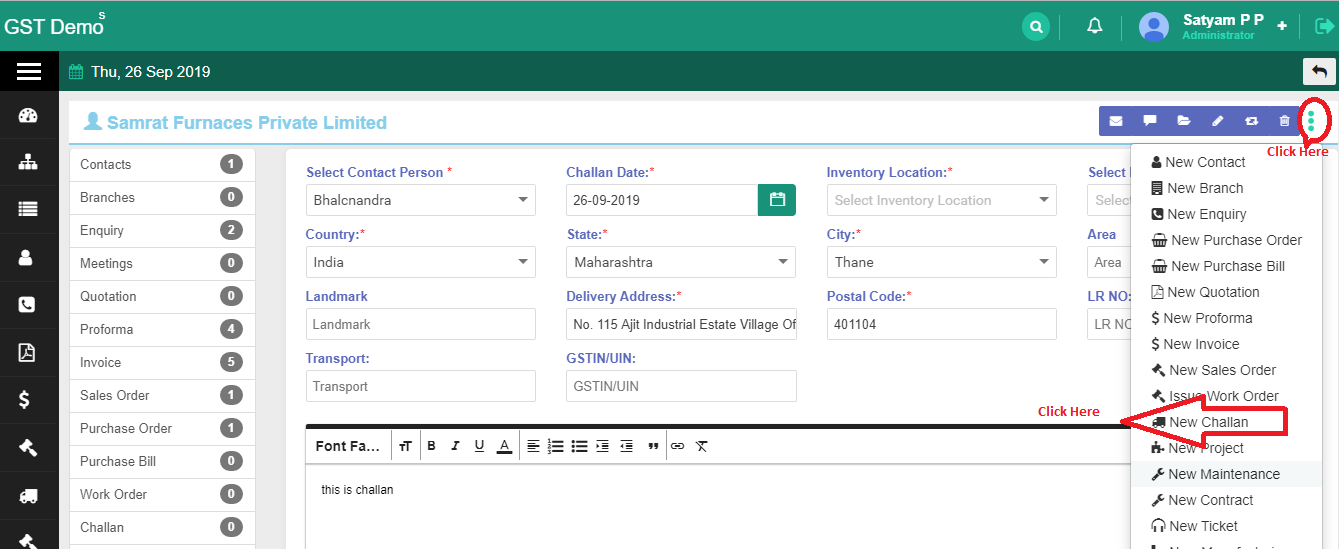
On the organisation:
- Open the organisation.
- Click the three-dot menu at the top right → New Challan.
- Fill the header as shown, then click Next.
New challan header: organisation already selected; fill dispatch fields and click Next.
![Challan]()
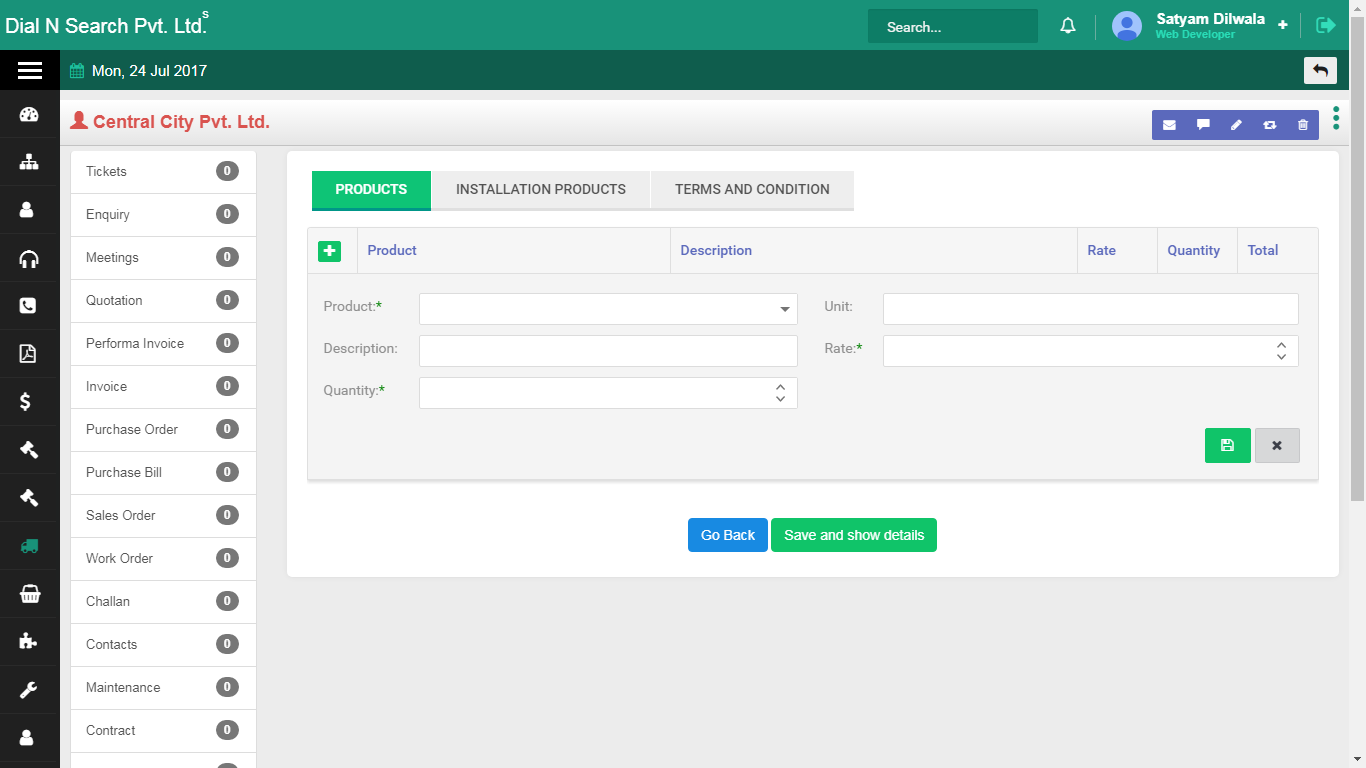
On the product lines:
- Click +, enter the product details as shown, then click the Save icon.
- Update Installation products and terms and conditions on their tabs, then save.
Challan product lines: goods leaving the store, plus installation products if needed.
![Challan2]()
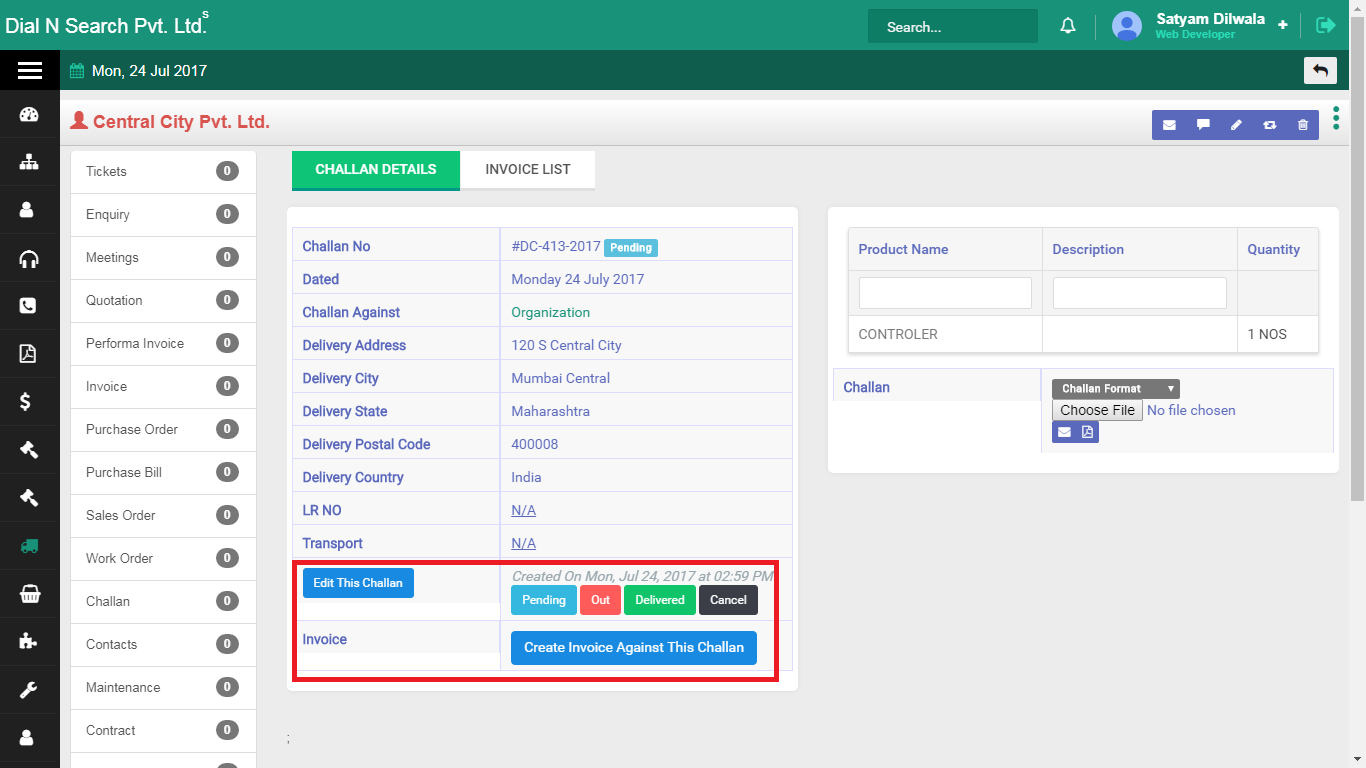
Saved challan: edit, set status (pending / out / delivered / cancel), create invoice, or download.
![Challan3]()
Tip. Mark delivered when the site signs. You can create an invoice against this challan from the highlighted area, and download the challan from the same screen.
- How to view challans
-
See every delivery challan, so stores can check what is pending, out or delivered.
Dispatch uses this list at the start of the day. Open a challan when the driver returns or when accounts needs to bill. This is delivery out of your store, not a purchase receipt.
To open the list:
- Click Challan → challan list.
Projects
Site and job tracking when supply is not a one-line challan: bill of material, tasks, stock requests, project challan, manpower and complaints on that job. Start from the organisation, then keep the project list handy.
Who uses it. Project engineers and stores. Sales creates the project; the site team updates progress.
Example. A 20-ton plant at a factory in Chakan needs staged material, labour hours and a project challan. The project holds BOM and stock requests so the site does not draw material that was meant for another job.
- How to create a project
-
Open a site job on the customer’s organisation so BOM, tasks, stock and complaints sit on one project, not a one-line challan.
Use a project when supply is staged: a 20-ton plant at Chakan needs material in lots, labour hours and a project challan. Sales creates it from the organisation. The site team updates BOM, tasks and stock so material meant for this job is not drawn for another. After save, assign a person from the project list.
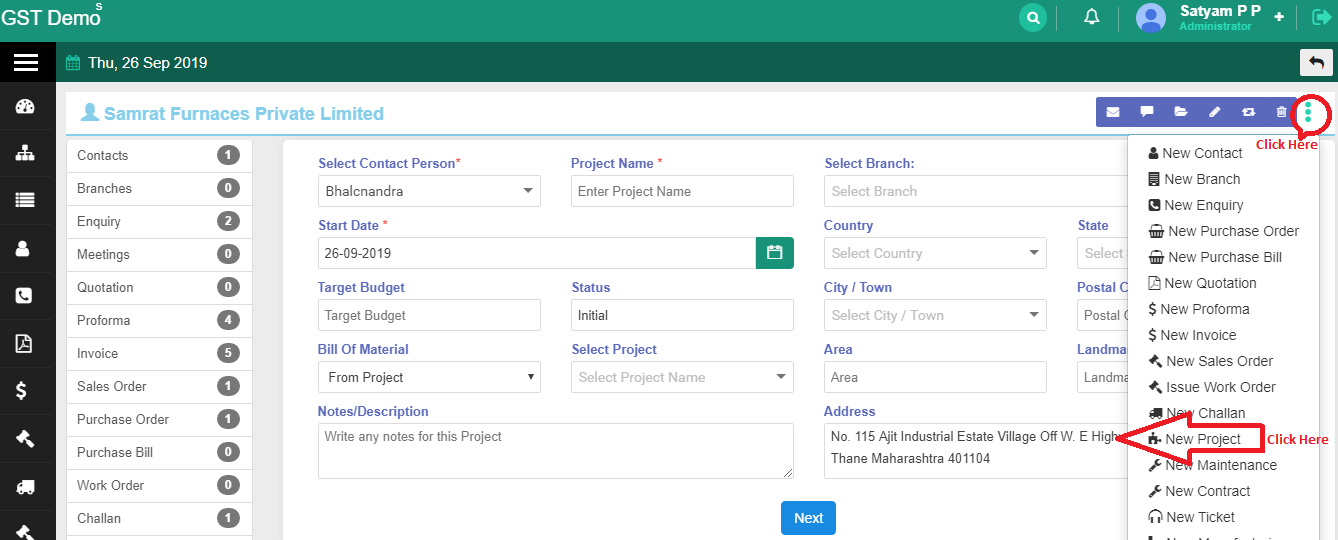
On the organisation:
- Open the organisation.
- Click the three-dot menu at the top right → New project.
- Fill the project fields as shown, then click Next.
New project header: job fields on the selected organisation.
![New Project]()
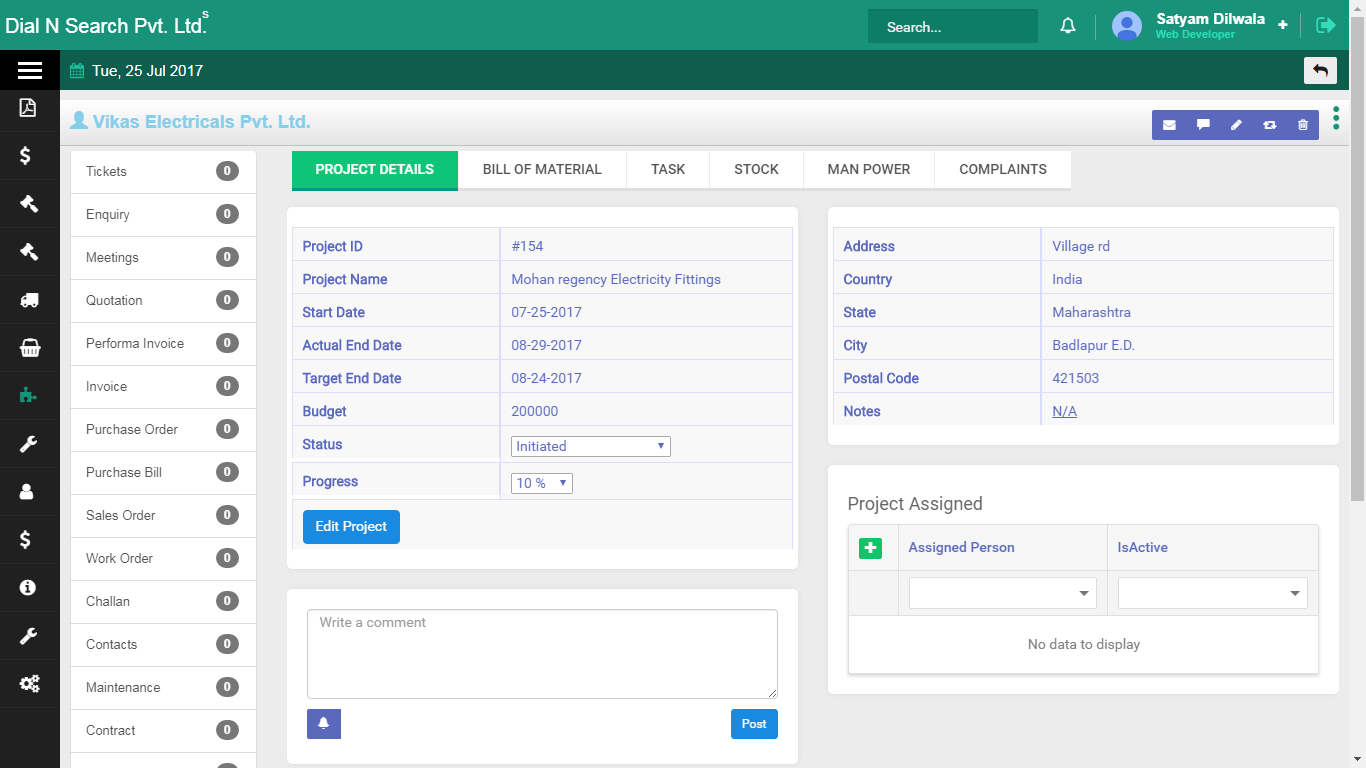
Project detail: tabs for BOM, tasks, stock, manpower and complaints.
![Newproj1]()
On the project tabs:
- Bill of Material — items, unit, rate, quantity, received quantity, remaining quantity, total quantity.
- Task — task name, task no., work hours assigned, progress %, start date, end date, status.
- Stock — new stock, request list, received materials, issue material and stock.
- Manpower — labour name, mobile, Aadhaar, PAN, work address, salary, total hours, salary type.
- Complaints — ticket subject, description, priority, created time, last updated, status, replied by. You can raise a new ticket from here.
To assign a project:
- Click Project → Project List.
- Click the project name.
- Click Assigned Person and select the person.
- How to view projects
-
See every project, then open one for BOM, tasks and who is assigned.
The project list is the site team’s working pile. Open a name when you need progress, stock or to assign a person. This is not the sales-order list and not the delivery-challan list.
To open the list:
- Click Project → Project List.
- Click the project name to view its details.
- How to view stock requests
-
See stock asked for on projects, so stores know what the site has requested.
A stock request is the site asking for material against a project, not a vendor PO. Open the project name on the request list to see what was asked. Approve separately under Request approve stock.
To open the list:
- Click Project → Request List.
- Click the project name to view the request details.
- How to approve requested stock
-
See stock requests waiting for approval, so stores do not issue material that nobody signed off.
This is the approval queue for project stock, not the request list itself. The project engineer or stores head opens it before issuing. Without approval, requested stock stays waiting.
To open the queue:
- Click Project → Request approve stock.
- How to view a project challan
-
See challans raised for a project, so site delivery is separate from the ordinary sales challan list.
A project challan moves material to the job. It is still delivery, but it lives under Projects so the Chakan plant is not mixed with Hotel Sagar’s cassette-AC challan. Open Project Challan to read those documents.
To open the list:
- Click Project → Project Challan.
- How to view project stock
-
See stock sitting on projects, so you know what is already at site versus still in the godown.
Project stock is material tagged to a job. Stores and the site engineer use this list to avoid drawing the same item for two projects. It is not the company-wide stock tile on the Dashboard.
To open the list:
- Click Project → Project stock.
- How to view employee item requests
-
See items employees have asked for on projects, so stores can issue against a person and a job.
This is the project view of employee item requests. It sits next to project stock. Creating a new product request is under Employees; this list is what the project team reads.
To open the list:
- Click Project → Employee Item Request.
- How to view the bill of material
-
See the bill of material for projects: what the job needs, how much, and what is still remaining.
BOM is the shopping list for the site. You also fill it on the project detail tabs after New project. This menu is the list view across projects. Use it before you raise a PO or a project challan, so you buy what the job actually needs.
To open the list:
- Click Project → Bill of Material.
Maintenance, installation and AMC
After-sales on products you sold: pending installations, products still in warranty, conversion to AMC (annual maintenance), upcoming services and service visits. If the product name is empty on a maintenance contract, add the product under Masters first.
Who uses it. Service managers and installation engineers. Sales may open the contract; service runs the visits.
Example. Those cassette ACs at Hotel Sagar need installation, then sit in warranty, then convert to AMC when warranty ends. Pending installations is the list of “sold but not commissioned”. Products in warranty is the list you convert to AMC.
- How to add a maintenance contract
-
Put installation, warranty and AMC on a product you already sold, so service has a record after the challan.
A maintenance contract is after-sales, not a new sale. After the hotel challan, open that organisation and create maintenance so pending installations and warranty lists have something to show. Service managers run visits from here. If Product Name is empty on the form, the product is missing in Masters — add it there first, then come back.
Short video: creating a maintenance contract.
On the organisation:
- Open the organisation.
- Click the three-dot menu at the top right → New Maintenance for that organisation.
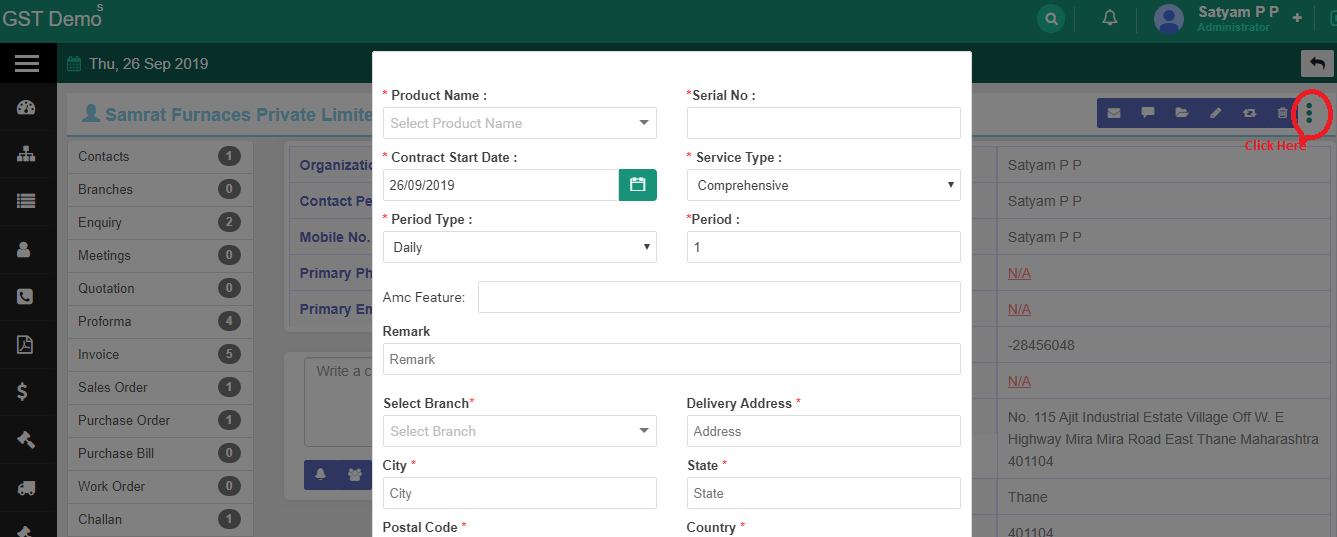
- Fill the fields on the screen below, then save.
New maintenance: contract fields on the selected organisation.
![Maintanance]()
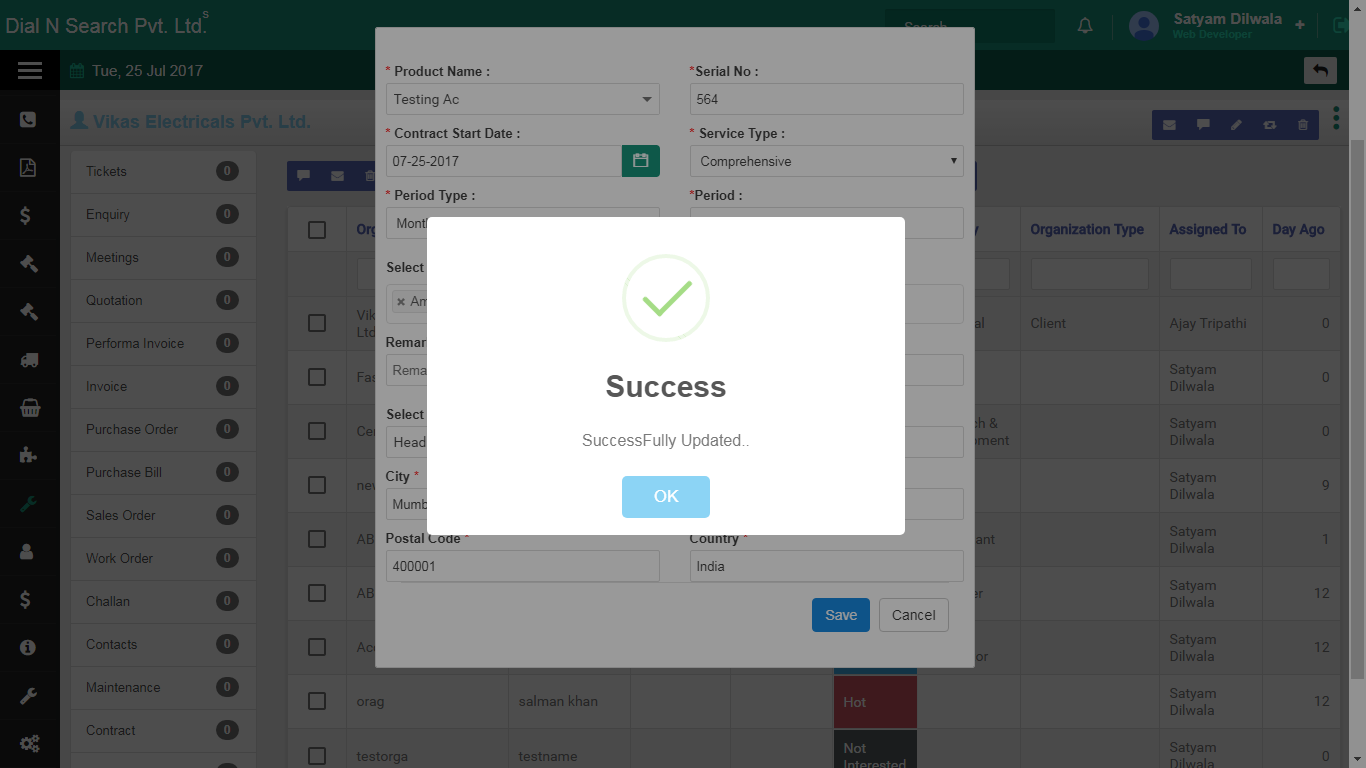
Saved maintenance contract: the product is now on the after-sales record.
![Mcontract3]()
Add the product in Masters if Product Name is empty on the maintenance form.
Quotations, challans and maintenance all pick products from Masters. If the cassette AC is not in the list, you cannot put it on a contract. Add it once; every later document can pick it.
On Masters:
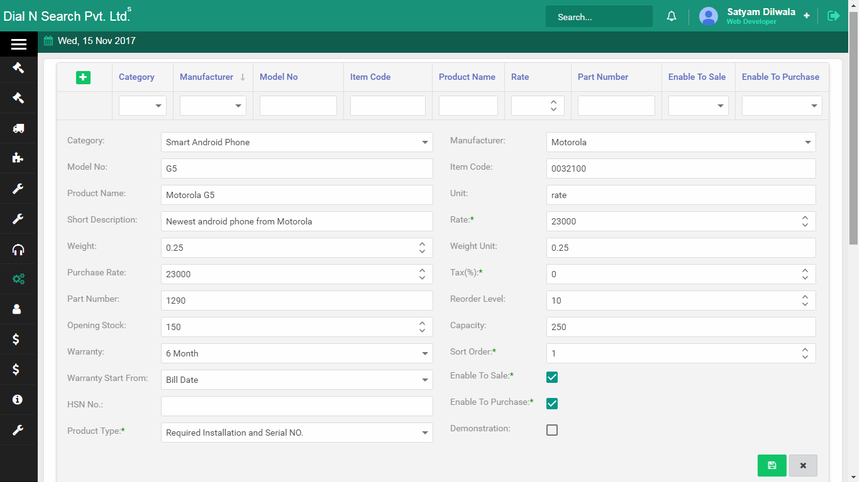
- Click Master → Products → the + icon.
- Fill the fields below, then click Save.
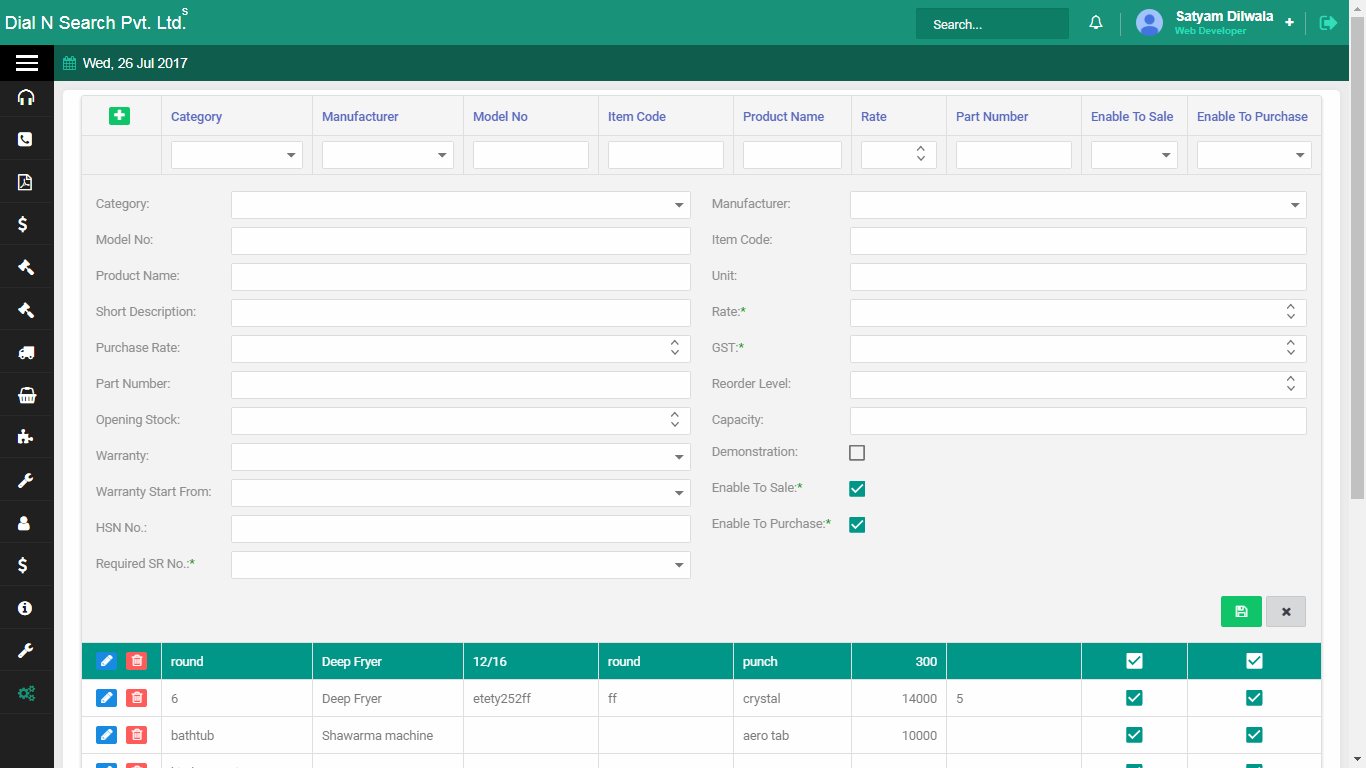
Add product in Masters: the catalogue every quotation and maintenance contract uses.
![How to add Product in Master]()
Fields on this screen:
- Category — type of product (lighting, industrial machinery, kitchen equipment, home appliances, and so on).
- Manufacturer — who makes it.
- Model No — the model number.
- Item Code — your item code.
- Product Name — the name that appears on quotes and contracts.
- Unit — unit of measure.
- Short Description — a short note on the product.
- Rate — selling price per unit.
- Weight — weight in kg.
- Weight Unit — weight per unit in kg.
- Purchase Rate — what you pay the vendor.
- Tax (%) — tax rate if applicable, numbers only.
- Part Number — unique part number.
- Reorder Level — minimum stock; reorder when stock falls to this.
- Opening Stock — quantity available at the start of the year.
- Capacity — how many the inventory can hold.
- Warranty — warranty period if applicable.
- Sort Order — sequence in lists.
- Warranty Start From — bill date or installation date.
- Product Type — Required Installation and Serial No. if it is in warranty and needs installation; Required Serial No. if it is in warranty but does not need installation; None if neither applies.
- Enable To Sale — tick if you sell this product.
- Enable To Purchase — tick if you buy this product.
- Demonstration — tick if the product needs a demonstration.
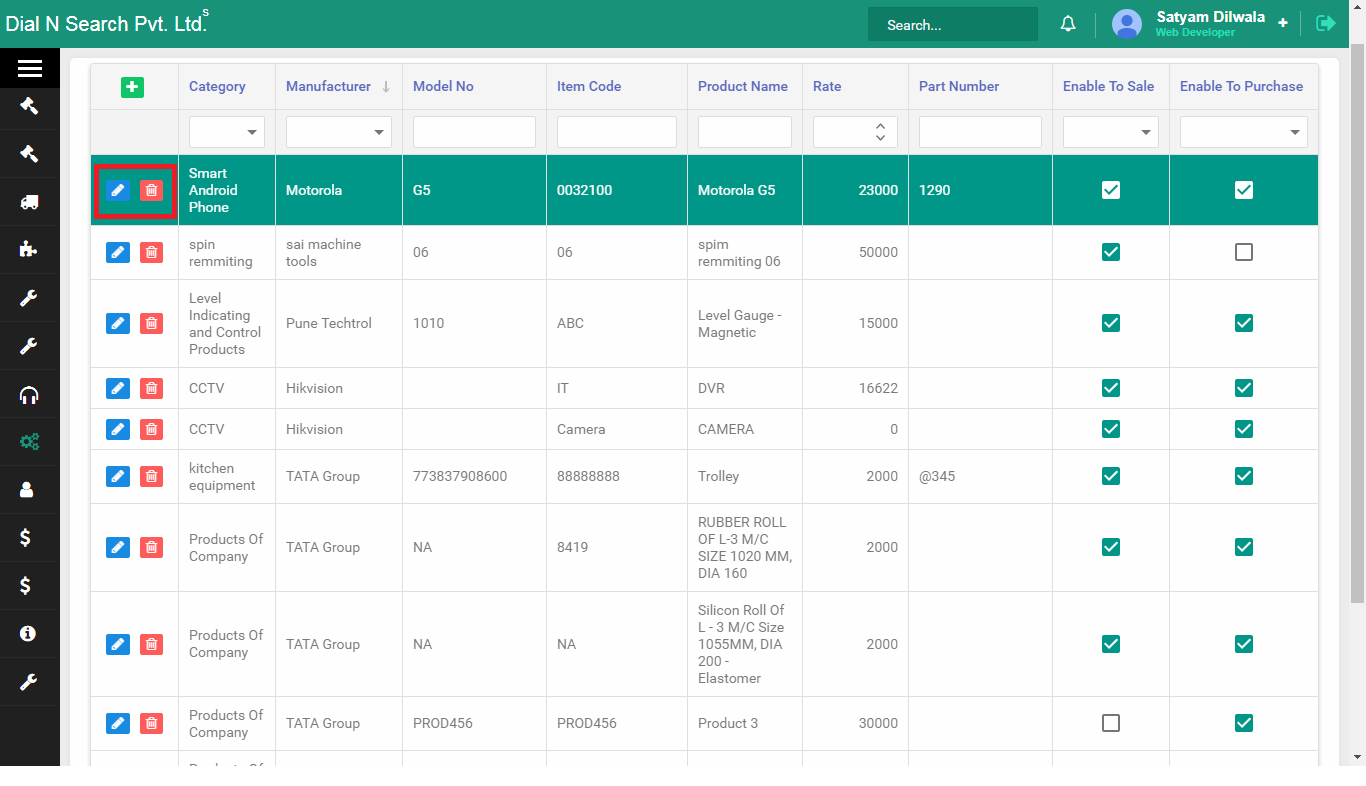
To edit a product:
- Click Master → Product.
- Click the Edit icon (red highlight) against the product name, change the fields, then click Save.
To delete a product:
- Click Master → Product.
- Click the delete icon (red highlight) against the product name.
Product list: Edit and Delete icons against each product name.
![Edit Delete a Product]()
Tip. After the product exists in Masters, return to New Maintenance and pick it. Pending installations and warranty lists then have a product to show.
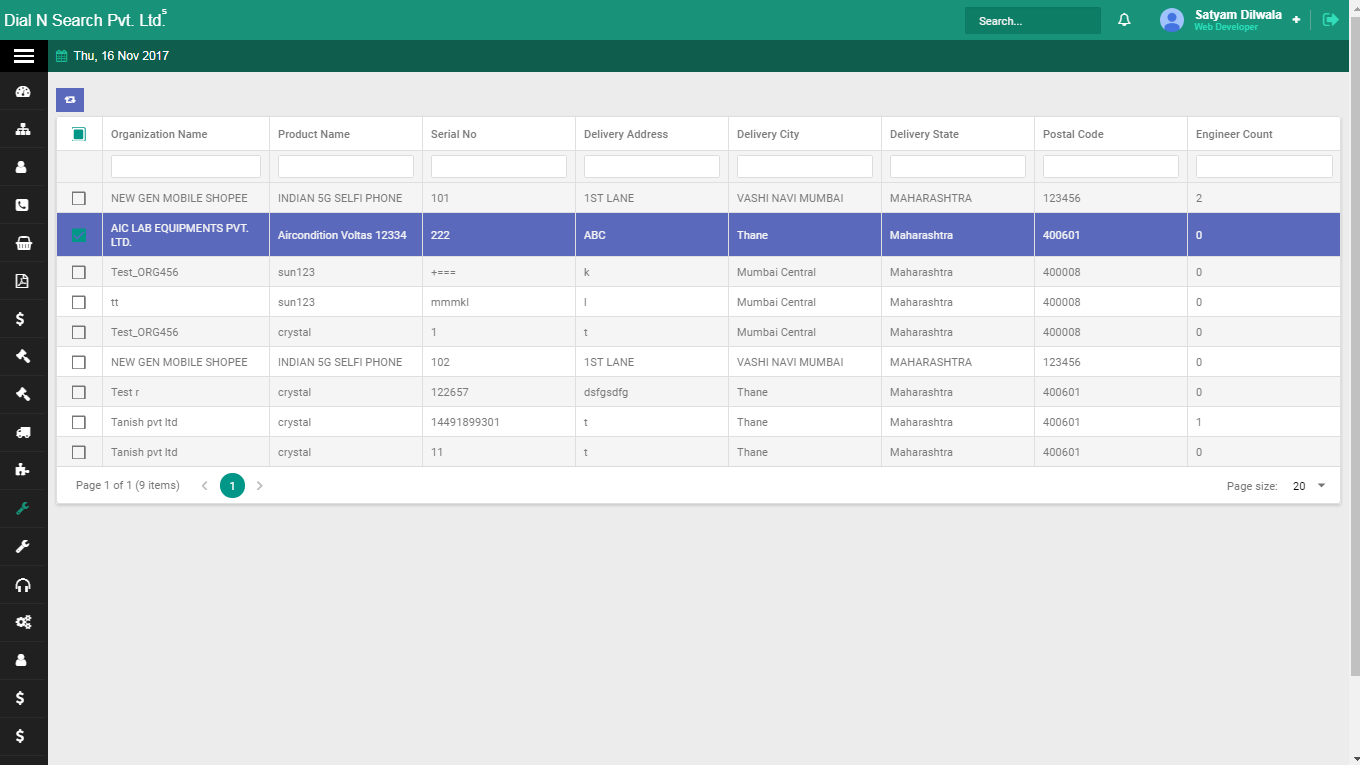
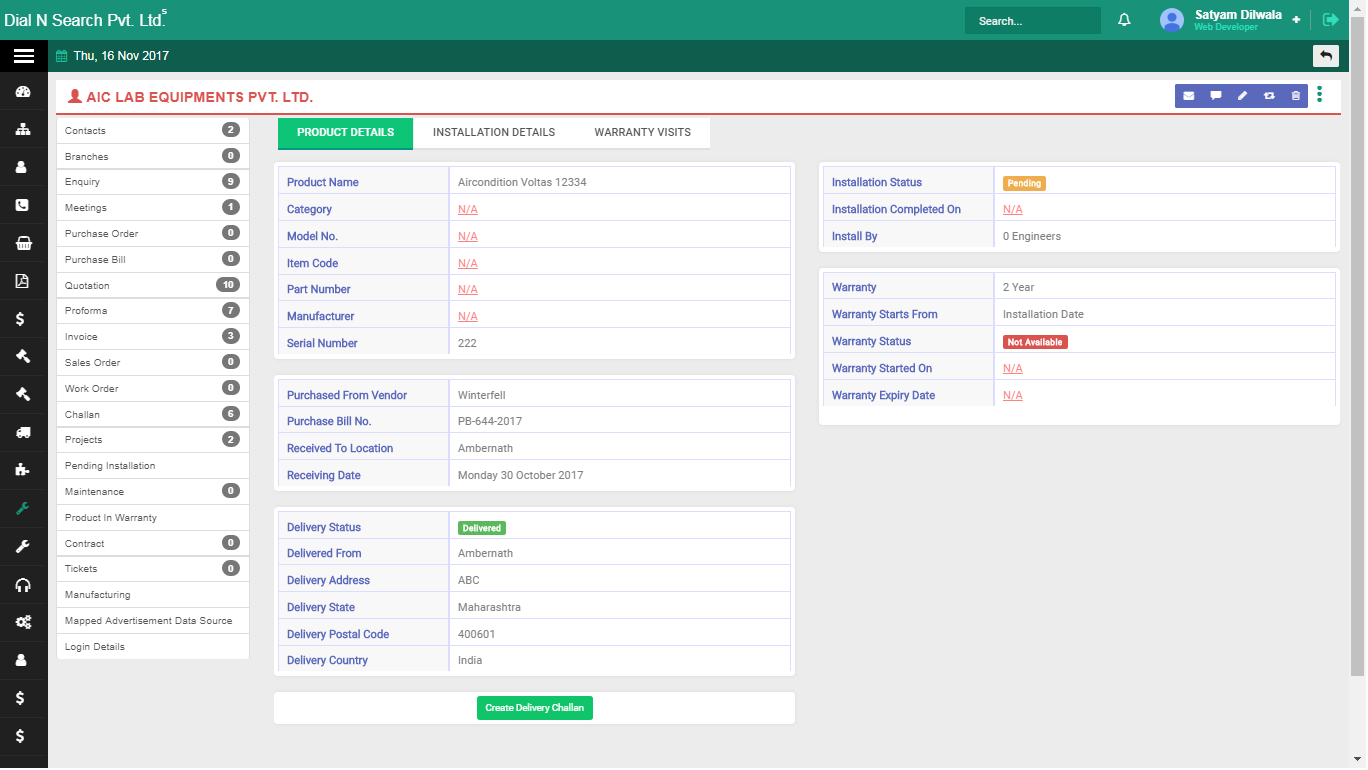
- How to view pending installations
-
See products that were sold but are not commissioned yet, so installation does not get lost after the challan.
Sold is not the same as running. Pending installations is the list of goods that still need an engineer on site. Cassette ACs that reached Hotel Sagar on a challan but are not commissioned should appear here until installation is done. Open the organisation name to see product details, installation details and tickets on that contract.
To open the list:
- Click Maintenance contract → Pending Installations.
- Click the organisation name to view product details, installation details and tickets raised for the contract.
Pending installations: products sold but not yet commissioned.
![Pending Installation main view]()
Pending installation detail: product, installation and tickets on that organisation.
![Pending Installations]()
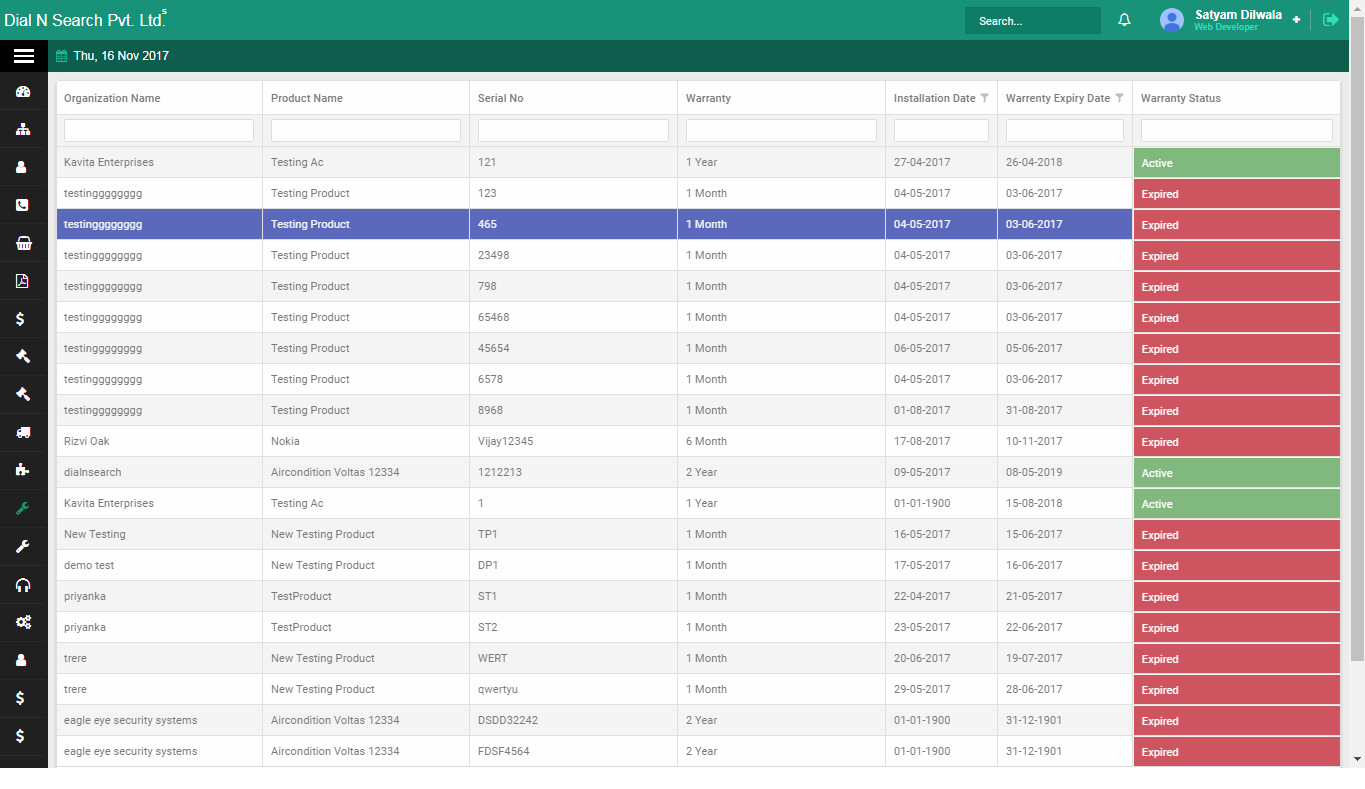
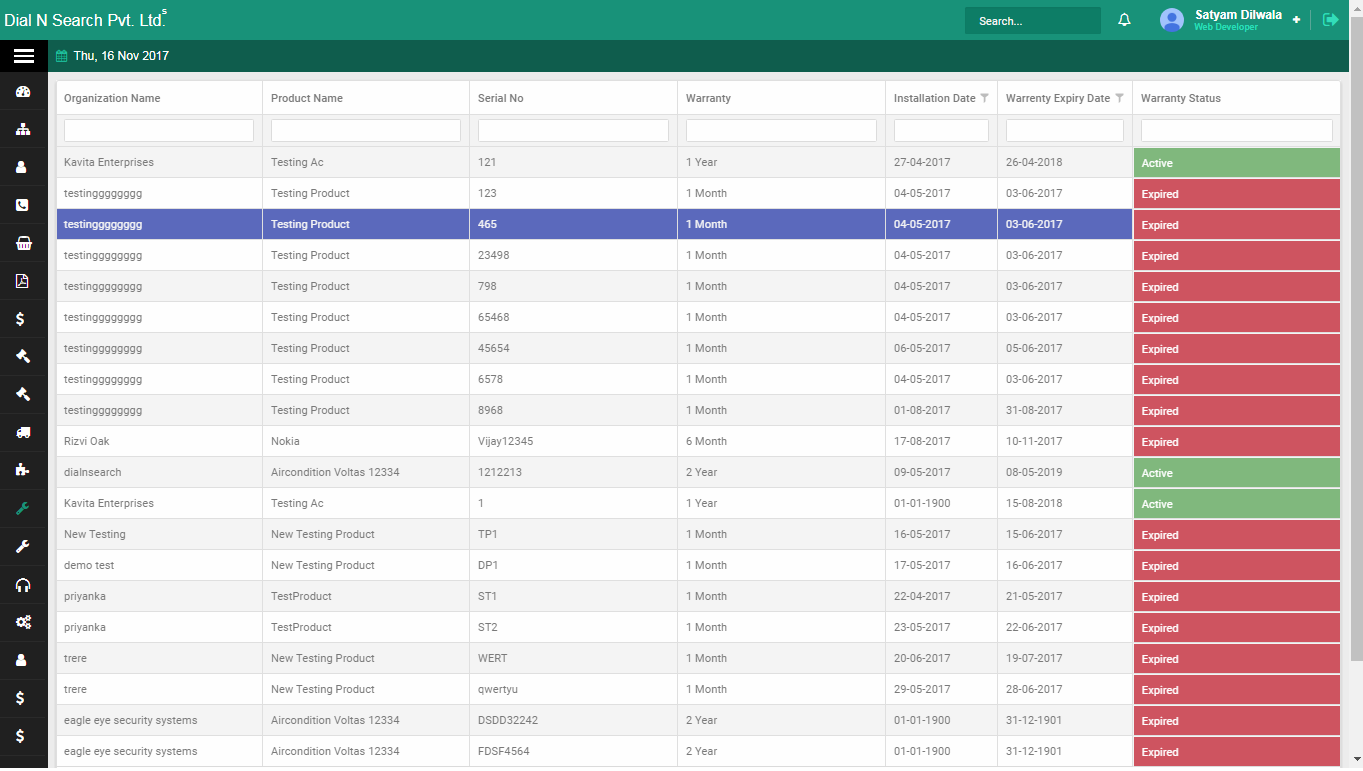
- How to view products in warranty
-
See products still under warranty, and convert them to AMC before support stops.
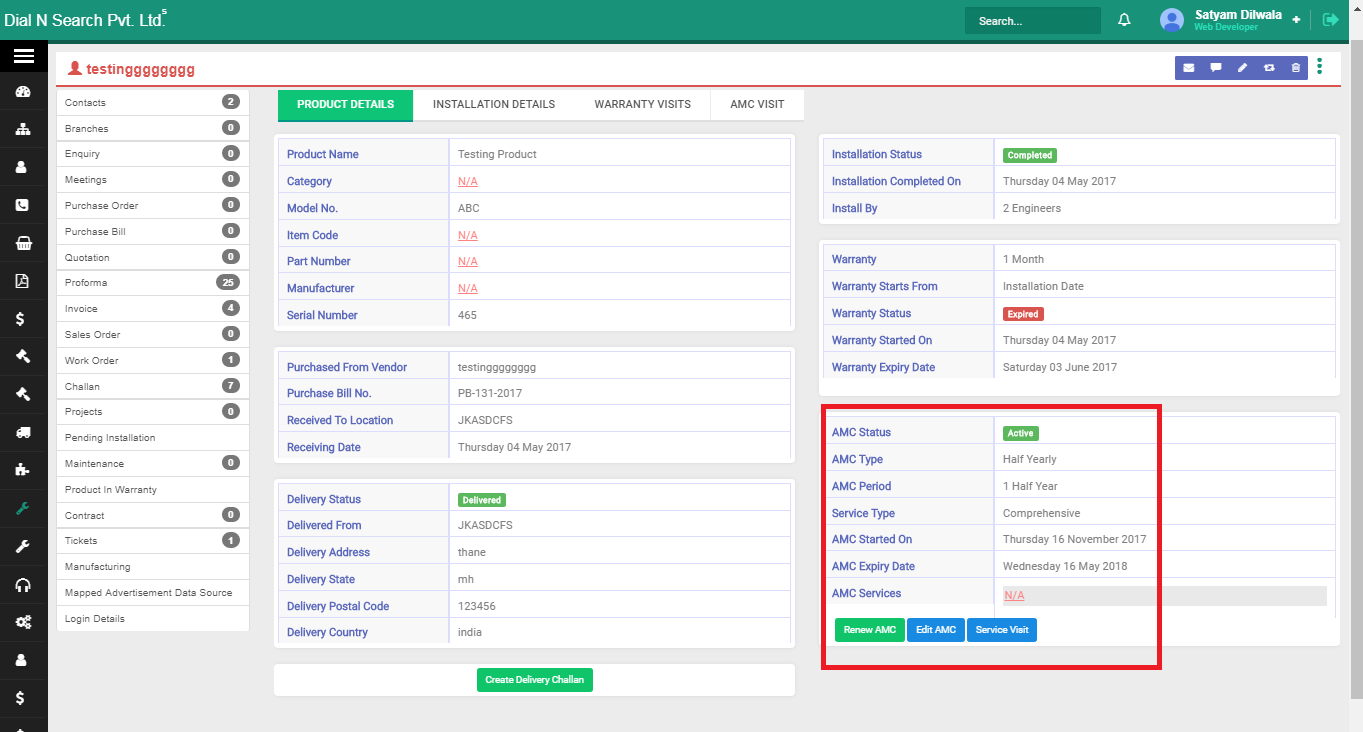
Warranty is the period you still support without an AMC. This list is also where you convert a product to AMC when warranty is ending. Eleven months after installation, convert Hotel Sagar’s ACs from this screen so service visits do not stop on month twelve. You can also edit, renew AMC, and arrange a service visit from the same record.
To open the list:
- Click Maintenance contract → products in warranty.
- Click the organisation name for the detailed view.
Products in warranty: sold products still in the warranty period.
![Products in warranty main view]()
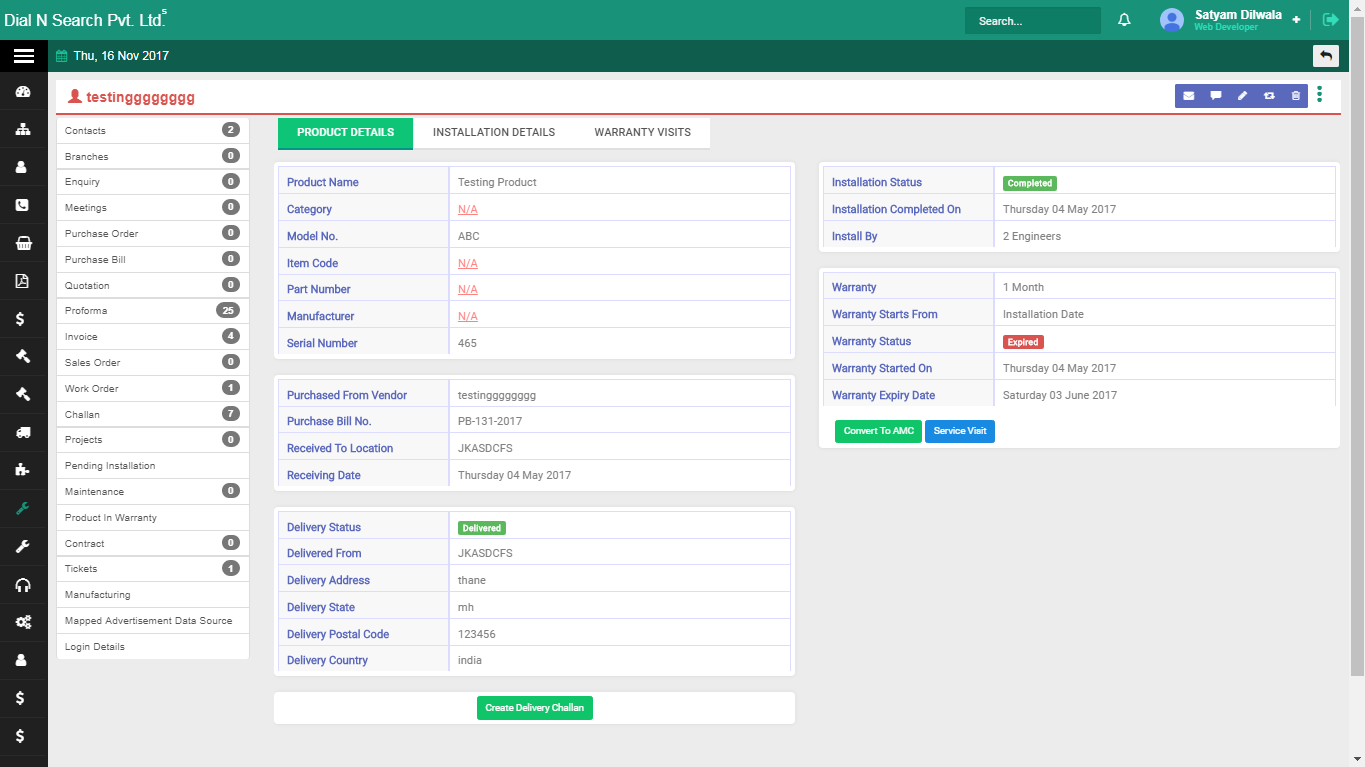
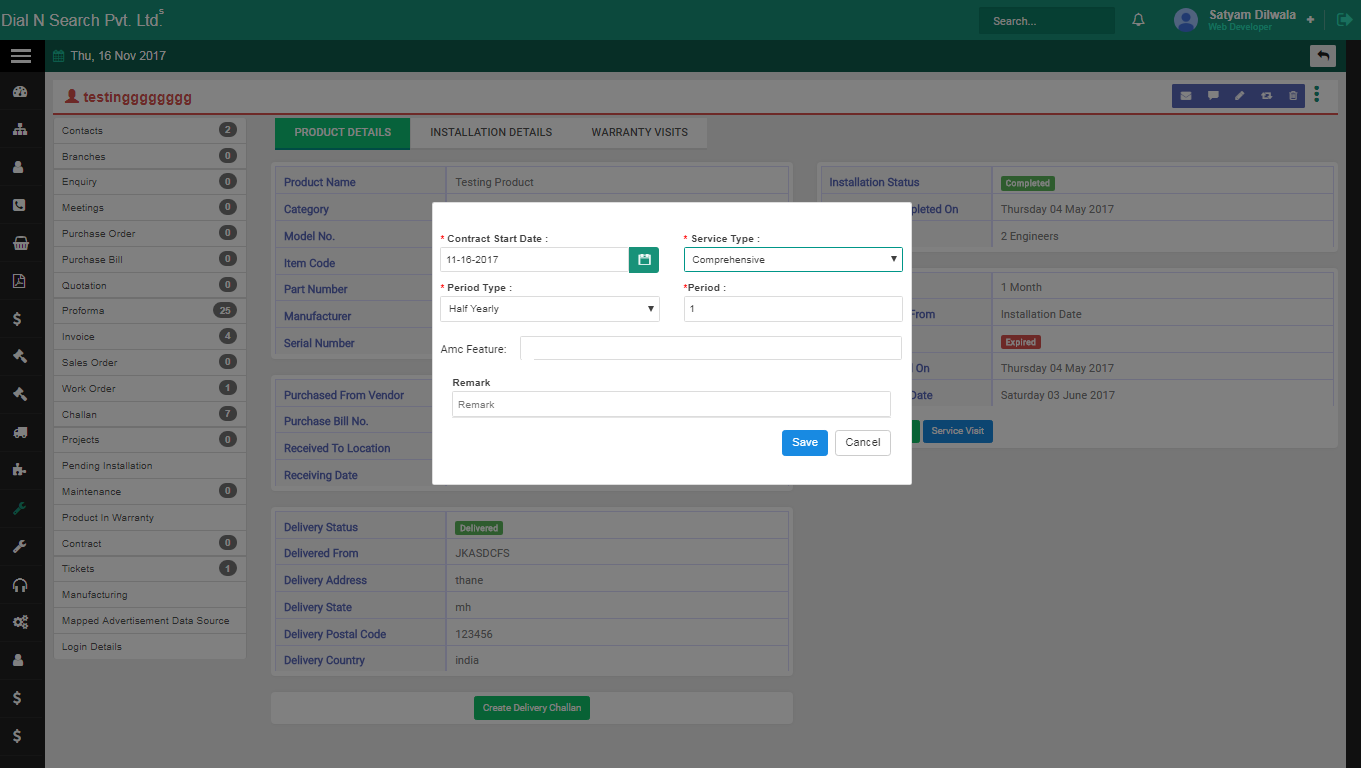
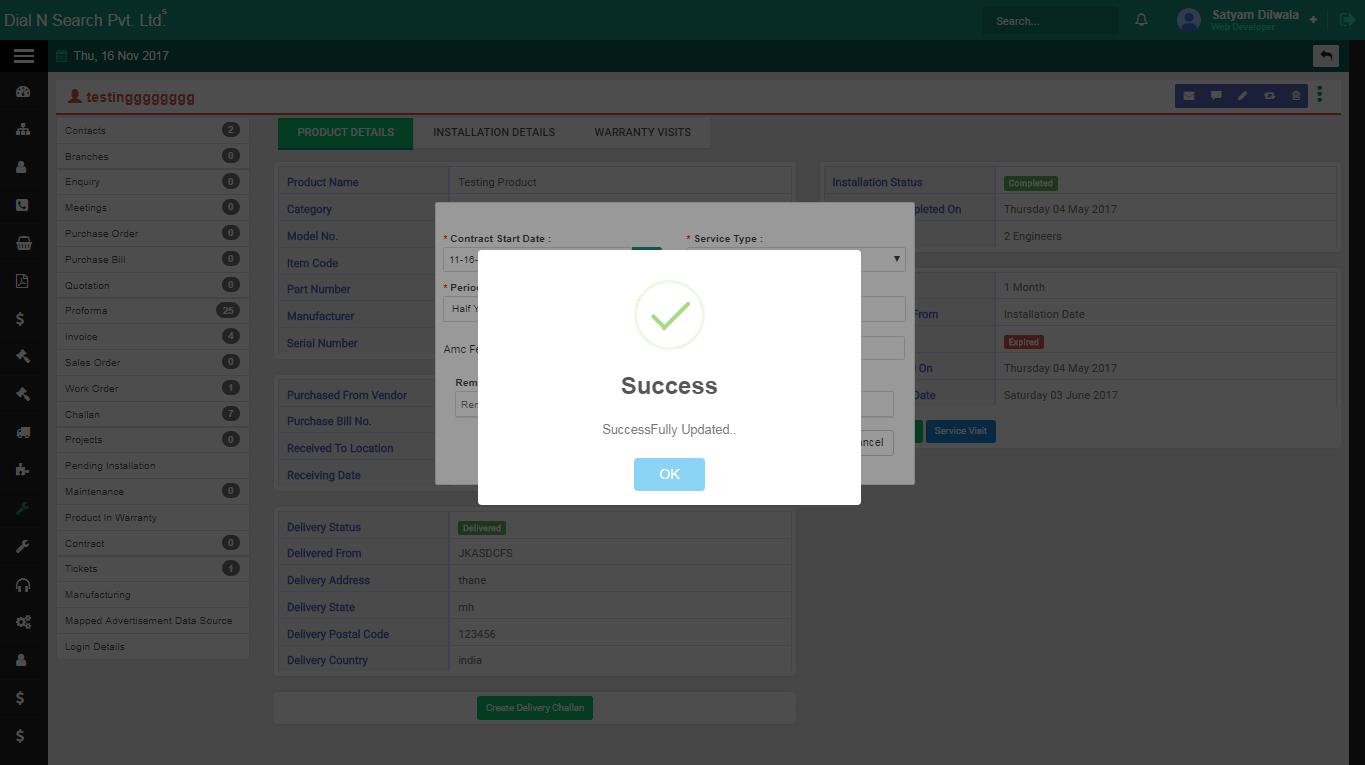
To convert to AMC:
- Click Maintenance → Products in warranty.
- Click the organisation you want to convert.
- Click the Convert to AMC tab.
- Select Contract Start Date, Service type, Period type, enter Period, add remarks if needed.
Convert to AMC: start date, service type, period type, period and remarks.
![Convert to AMC 1]()
![Convert to AMC 2]()
![Convert to amc 3]()
![Convert to amc 4]()
![Convert to amc 5]()
Tip. You can Edit and Renew the AMC from the same screen (red highlight).
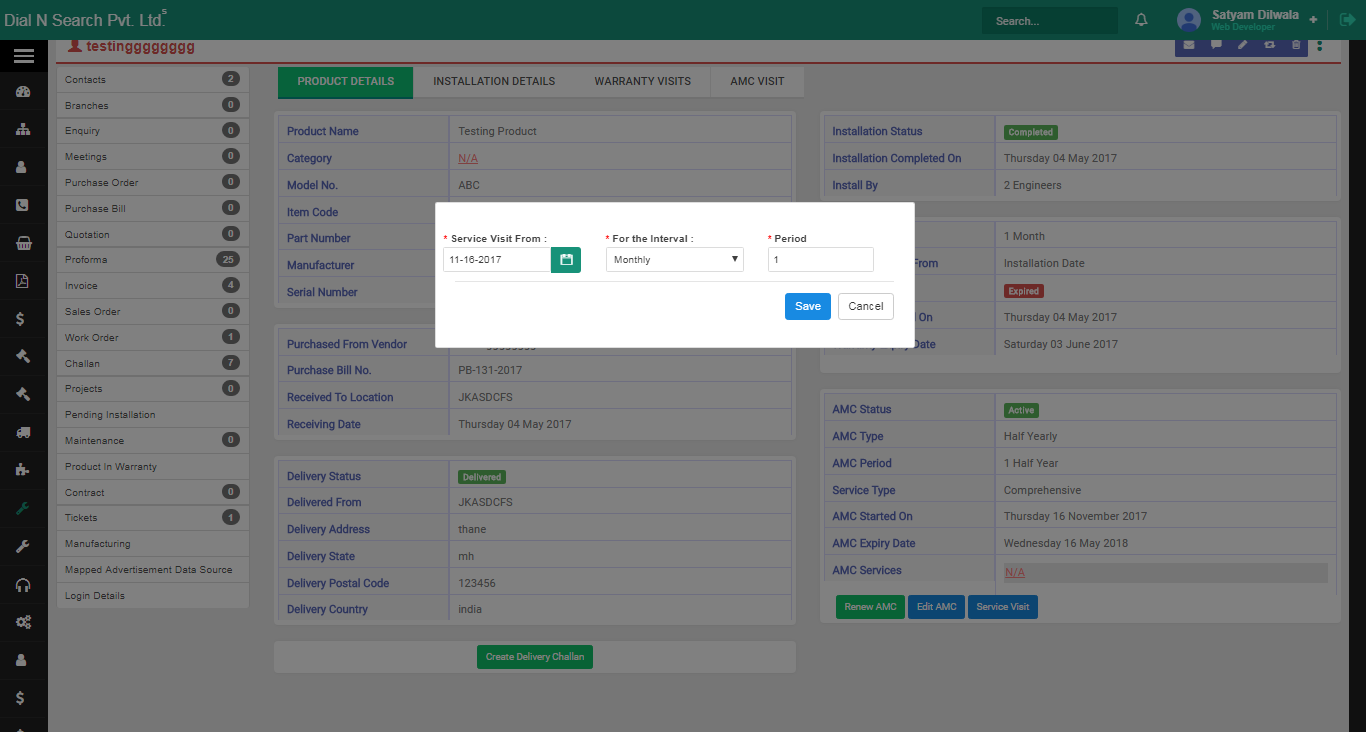
To arrange a service visit:
- Click the Service Visit tab.
- Select the date for the visit, select interval period, enter Period, then click Save.
Service visit on the AMC: date, interval and period.
![Service visit 1]()
- How to view products in maintenance
-
See products already on a maintenance contract, with visits and tickets on that product.
This is the after-sales list after warranty has become maintenance. Open the organisation to see the product, contract visits and tickets raised. Use it when the service desk asks “is this machine on AMC?”
To open the list:
- Click Maintenance → Products in Maintenance.
- Click the organisation name for product, contract visit and ticket details.
- How to view upcoming services
-
See which service visits are due next, so engineers are planned before the customer calls.
Upcoming services is the planner for AMC and maintenance visits. Filter to the nearest date when you are allocating the day’s engineers. A sudden breakdown is a ticket; this list is planned work.
To open the list:
- Click Maintenance → Upcoming Services.
- Filter by the nearest upcoming service date if you need a shorter list.
- How to view a service visit
-
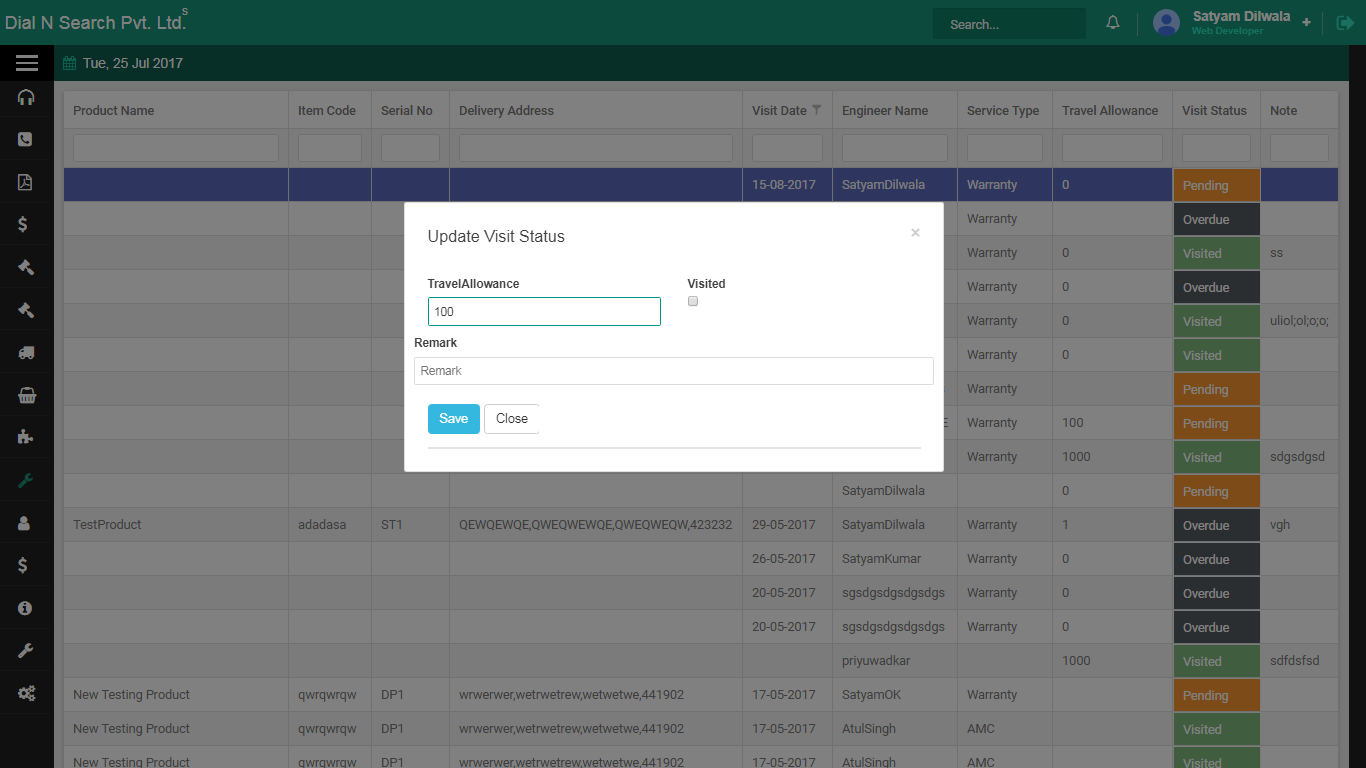
Open a service visit, update whether the engineer went, and record travel and remarks.
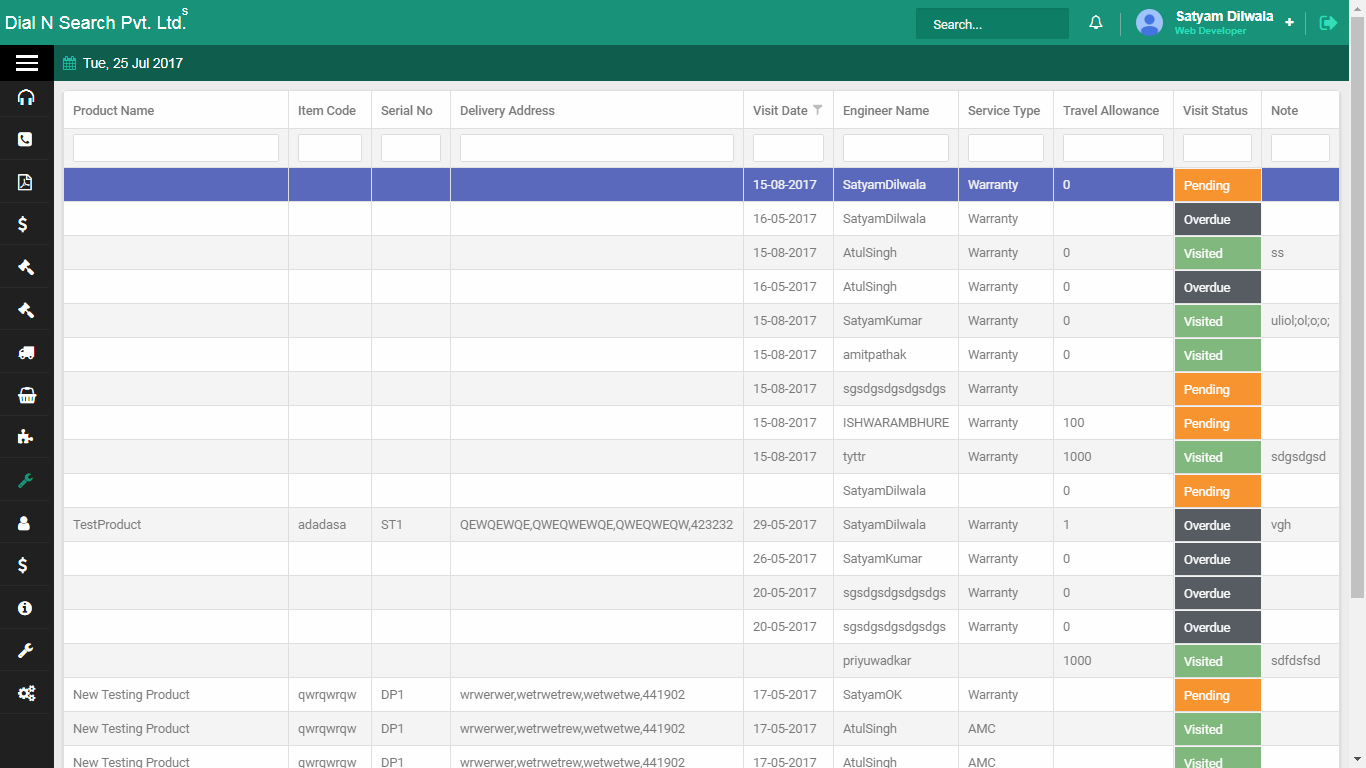
After a planned visit, the coordinator or engineer updates this screen so the contract history is true. Status on the list tells you which visits are still open. This is maintenance-module service visit, not a complaint ticket.
To open visits:
- Click Maintenance → Service Visit.
- The list shows products and visit status.
- Click a product to update the visit.
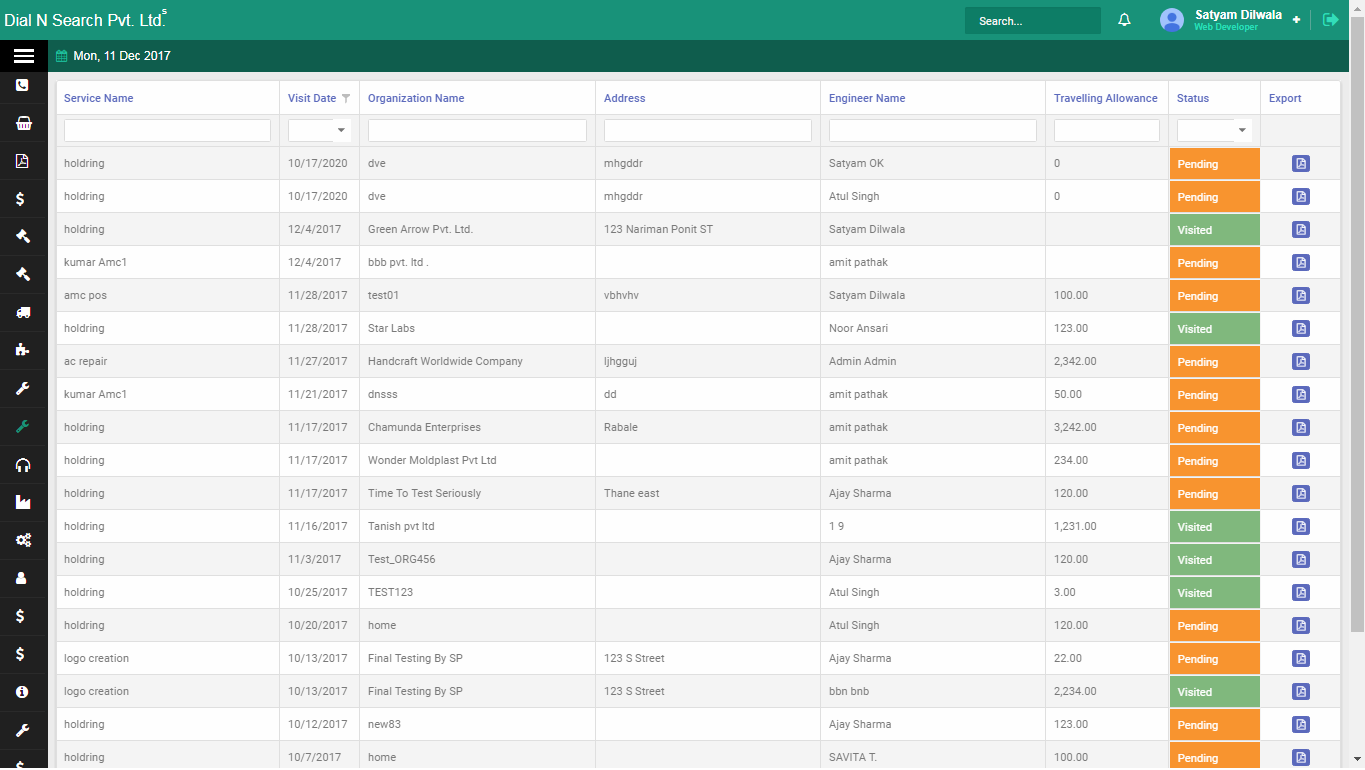
- Enter travel allowance, remarks, visited, then click Save.
Service visit list: products and visit status.
![Service visit]()
Service visit detail: travel allowance, remarks and visited, then Save.
![Service visit1]()
Service contracts
A standing service contract with upcoming visits and engineer assignment. Use this when the customer is on a contract, not a one-off complaint ticket. Tickets are for a break-down. Contracts are for planned visits.
Who uses it. Service coordinators who schedule engineers.
Example. Hotel Sagar’s AMC includes four visits a year. Upcoming visits shows who must go next. You assign the engineer here, then the visit is recorded. A sudden “not cooling” call is a ticket, not a new contract.
- How to add a service contract
-
Create a standing service contract on a company, so planned visits have a home — not a one-off complaint.
A service contract is for scheduled work (AMC visits). A ticket is for a breakdown. Open the company, then the new-contract screen, and add contract lines with +. Hotel Sagar’s four visits a year live here. A sudden “not cooling” call is a ticket, not a new contract.
On the company:
- Open the company.
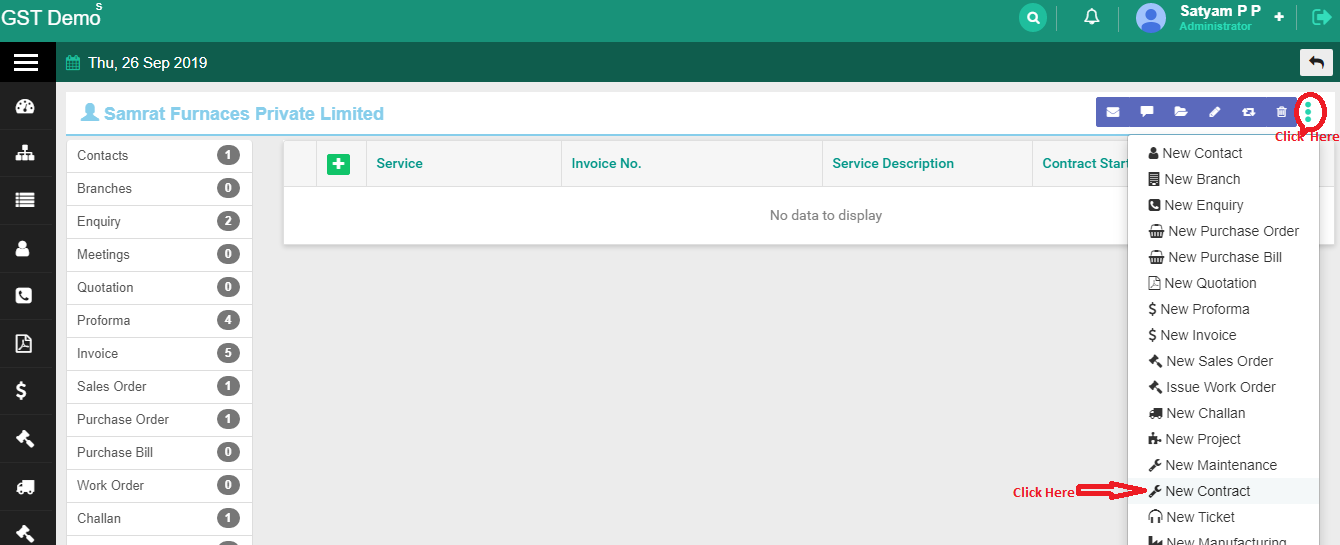
- Click the three-dot menu at the top right, then open the new contract screen shown below.
- Click +, enter the contract details, then click Save.
New service contract: add contract lines with + and Save.
![NewContract]()
- How to view upcoming visits
-
See which contract visits are due, then assign an engineer so someone owns the visit.
Service coordinators use upcoming visits to plan the week. Hotel Sagar’s AMC visit appears here; you assign the engineer, then the visit is recorded. This is planned contract work, not a breakdown ticket.
To open upcoming visits:
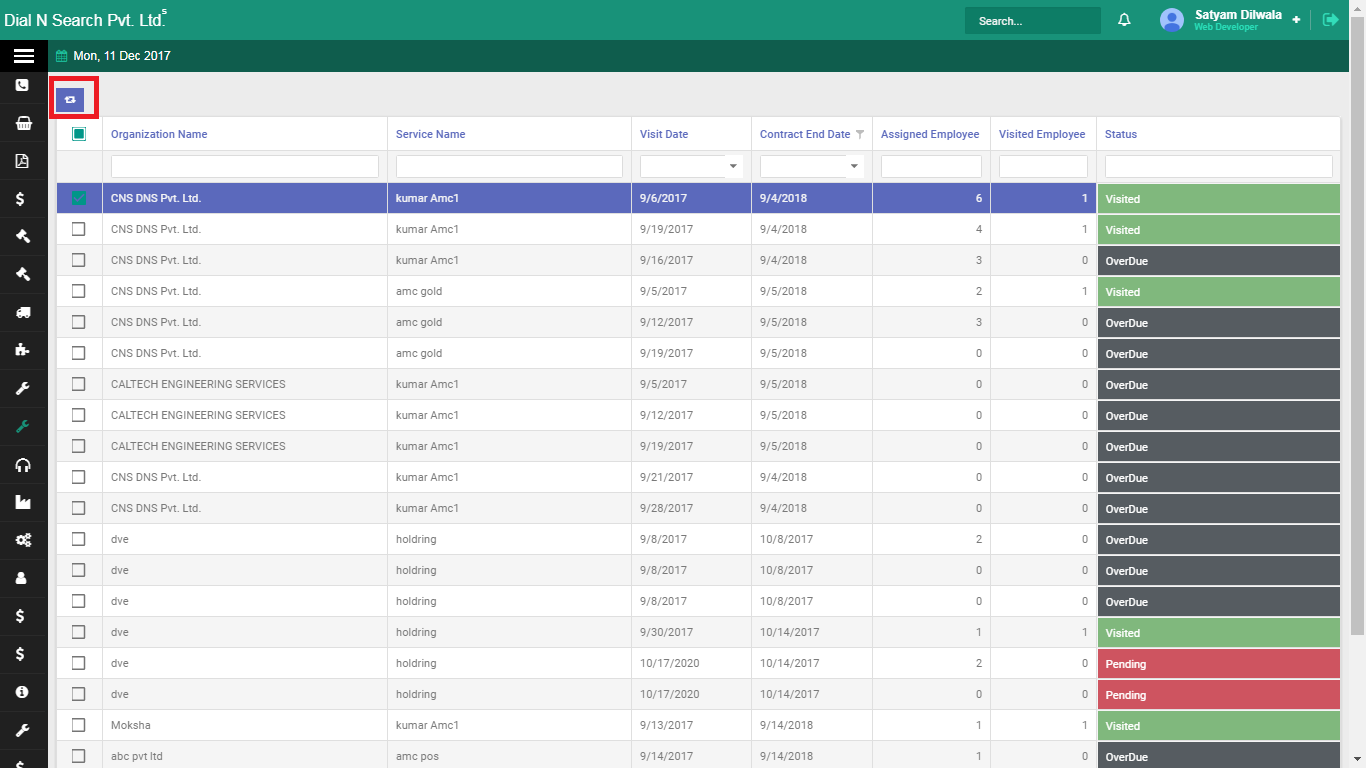
- Click Contract → upcoming visits.
To assign an engineer:
- Select the contract.
- Click the Assigned engineer icon.
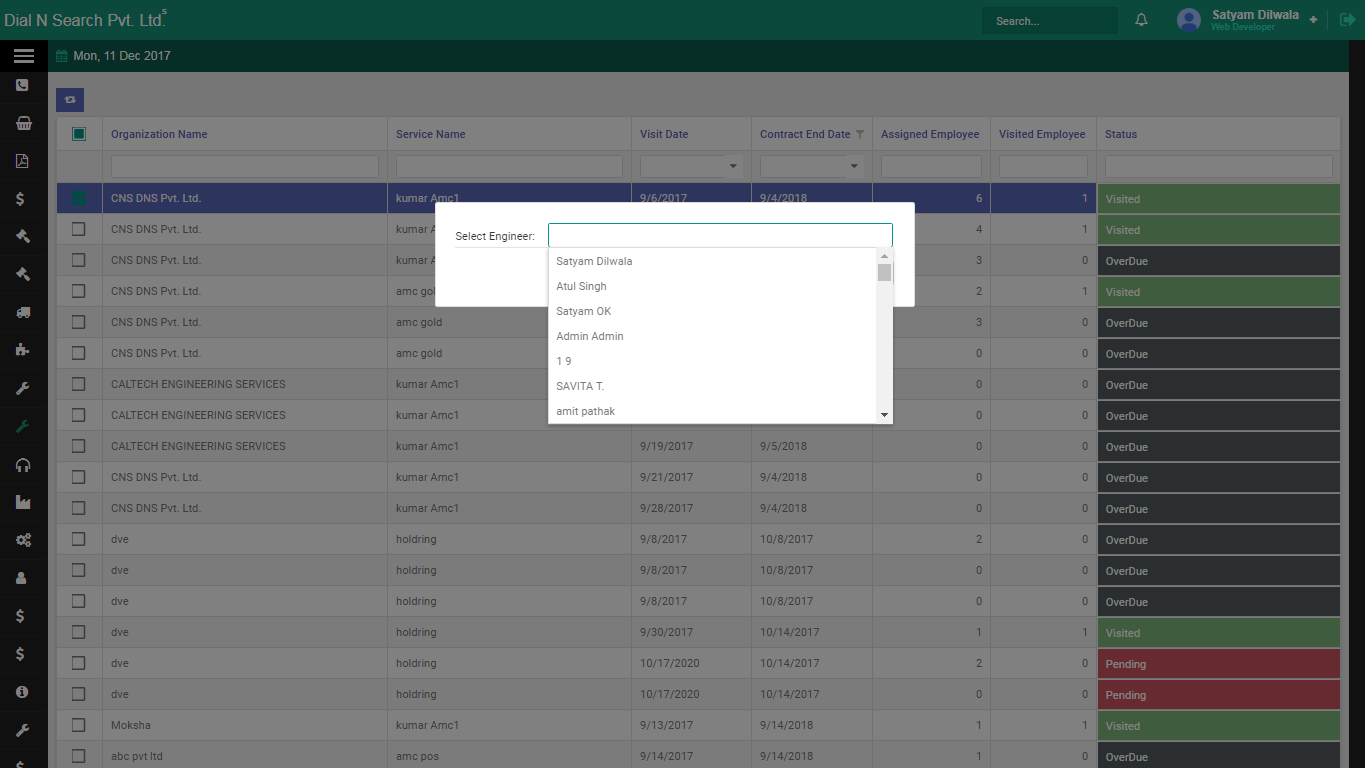
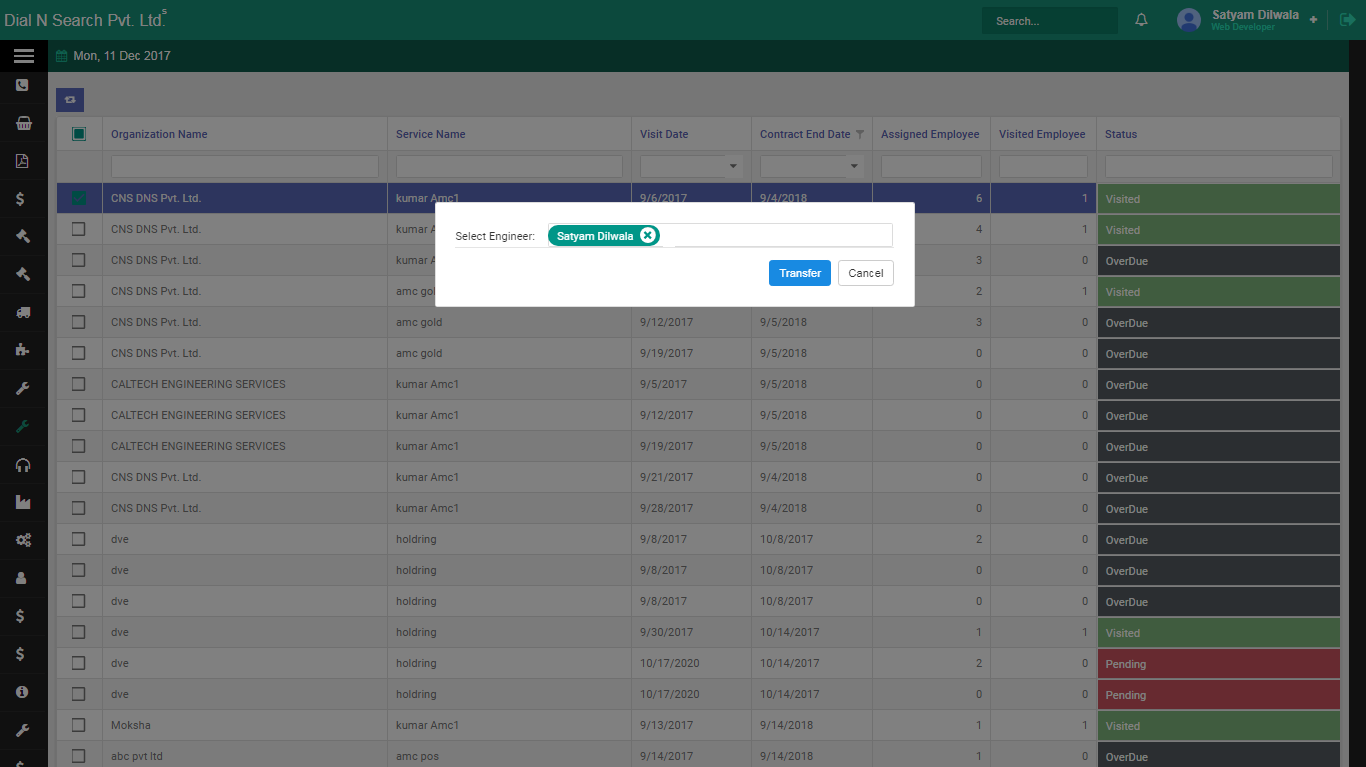
- Select the engineer name, then click Transfer.
Upcoming visits: contracts due, then Assigned engineer and Transfer.
![Upcoming visits 1]()
![Upcoming visits 2]()
![Upcoming visits 3]()
- How to view a service visit
-
See service visits already recorded on contracts, so you know who went and when.
This is the history of planned contract visits, not the ticket list. Coordinators use it after engineers return. Open Contract → Service visits to read the details.
To open visits:
- Click Contract → Service visits.
Contract service visits: recorded visits on standing contracts.
![Service visit]()
Tickets (complaints)
A ticket is a complaint or service request on a product the customer already has. Raise it against the organisation and the product, set priority, then assign it from the ticket list so an employee owns it.
Who uses it. The front desk raises it. The service head assigns it. The engineer closes it.
Example. Hotel Sagar says a cassette AC is not cooling. You raise a ticket on that model (the how-to uses a mobile example: OPPO MOB A37F GOLD), pick department and priority, then assign it to the engineer who covers Aurangabad. This is not a new enquiry and not a new quotation.
- How to raise a ticket
-
Log a complaint on a product the customer already has, so support owns it instead of a WhatsApp message.
A ticket is not a new enquiry and not a new quotation. Raise it on the organisation and the product, set department and priority, then assign an employee from the ticket list. Example: Hotel Sagar says a unit is not cooling. The screenshot uses sample model OPPO MOB A37F GOLD. Front desk raises it; the service head assigns it; the engineer closes it.
Short video: raising a ticket.
On the organisation:
- Open the organisation.
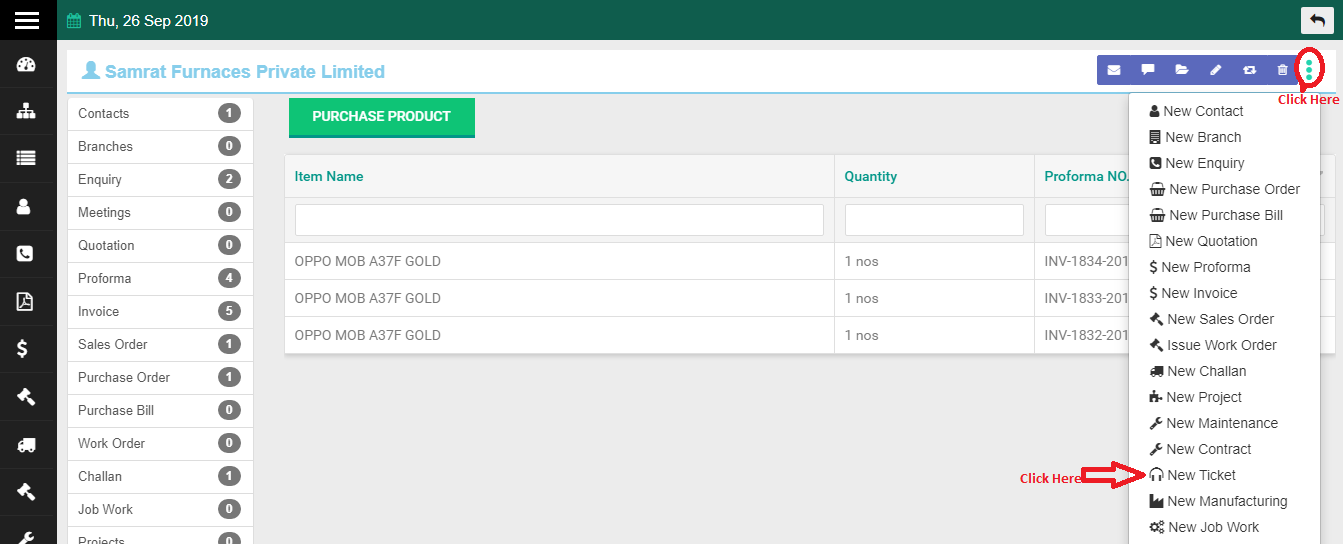
- Click the three-dot menu at the top right → New Ticket.
Organisation menu: New Ticket starts a complaint on that company.
![Ticket]()
On the ticket:
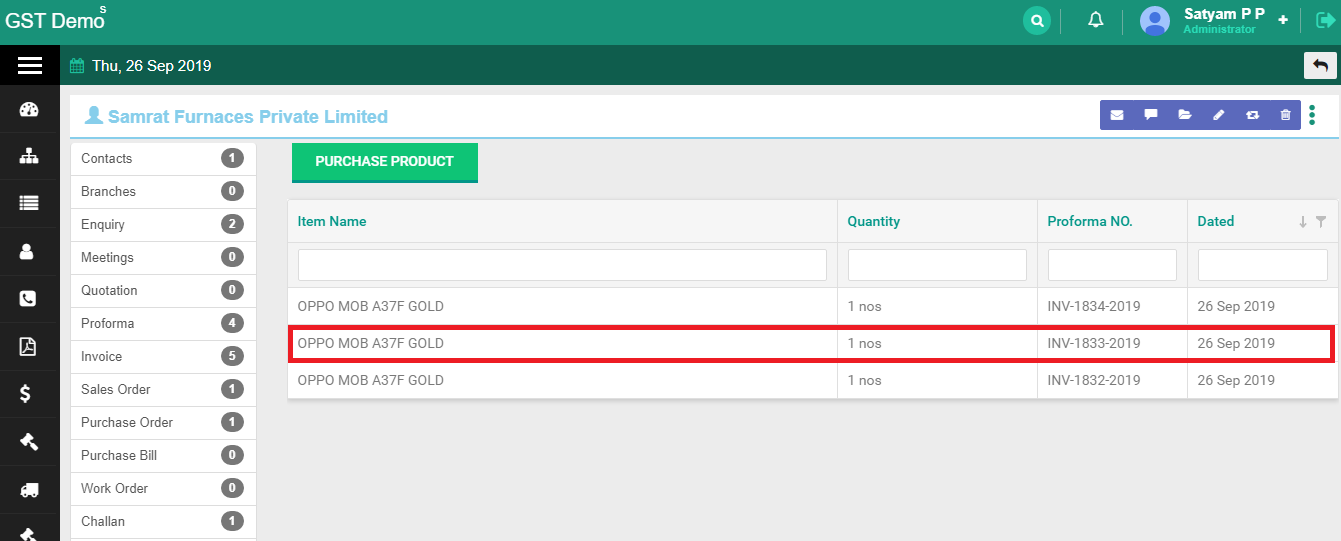
- Select the organisation if it is not already selected.
- Select the product the complaint is about (the screenshot uses OPPO MOB A37F GOLD, red highlight).
Pick the product for the ticket — sample model OPPO MOB A37F GOLD.
![TicketRais]()
On the complaint form:
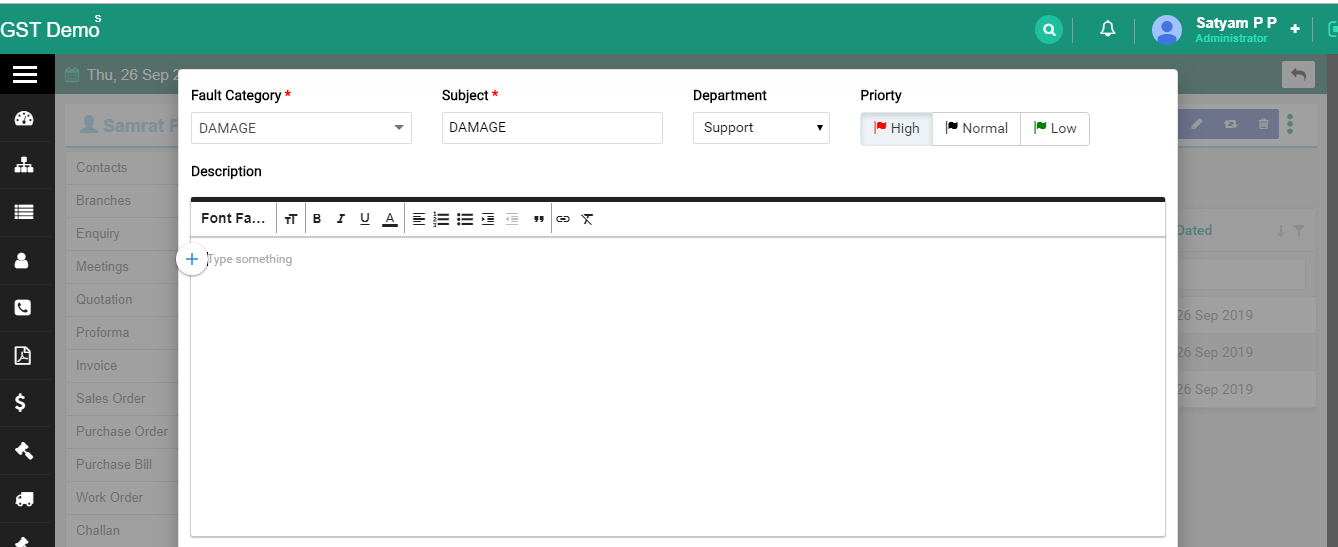
- Enter Subject — a short line for the complaint.
- Select Department — which team should see it.
- Select Priority — High, Normal or Low (how serious it is).
- Explain the complaint in the main body, then click Save.
Ticket form: subject, department, priority and complaint body.
![Ticktet2]()
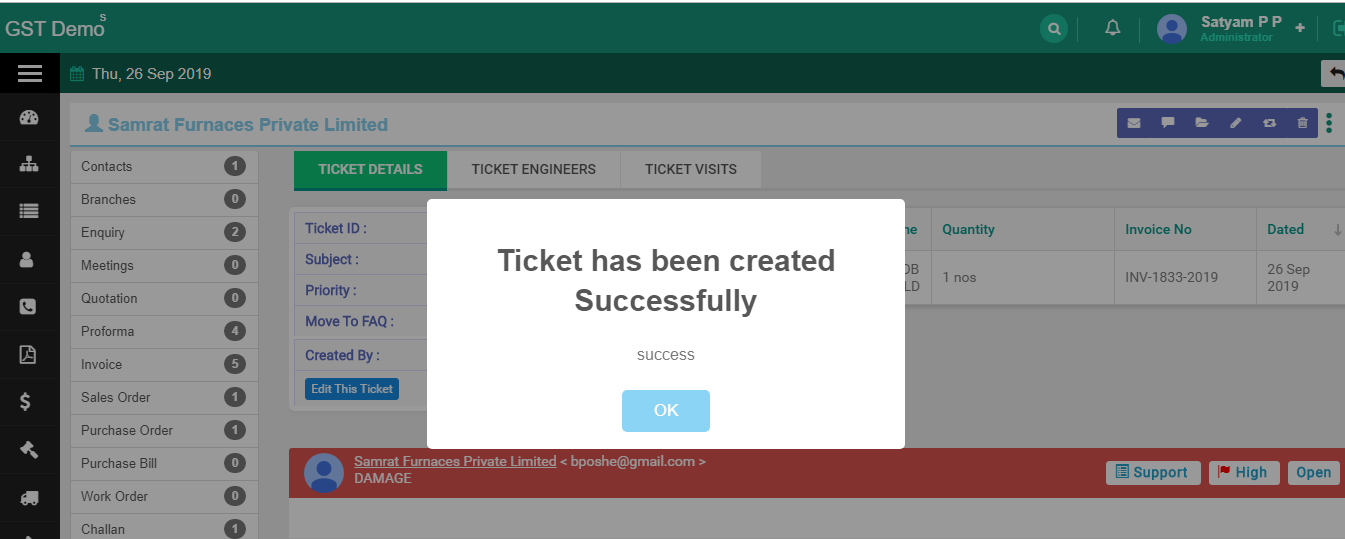
Saved ticket: the complaint is on the organisation record, ready to assign.
![Ticket3]()
Tip. After Save, assign the ticket from Ticket → Assign Ticket visit so an engineer owns it. An unassigned ticket sits in the list with nobody going.
- How to view and assign tickets
-
See open complaints, then hand one to an engineer so it has an owner.
The ticket list is the service desk’s pile. Ticket List shows what has been raised. Assign Ticket visit is where you tick the organisation and transfer to an engineer. If Ramesh is not in Employees, the dropdown has nobody to pick.
To see tickets:
- Click Ticket → Ticket List.
To assign a ticket:
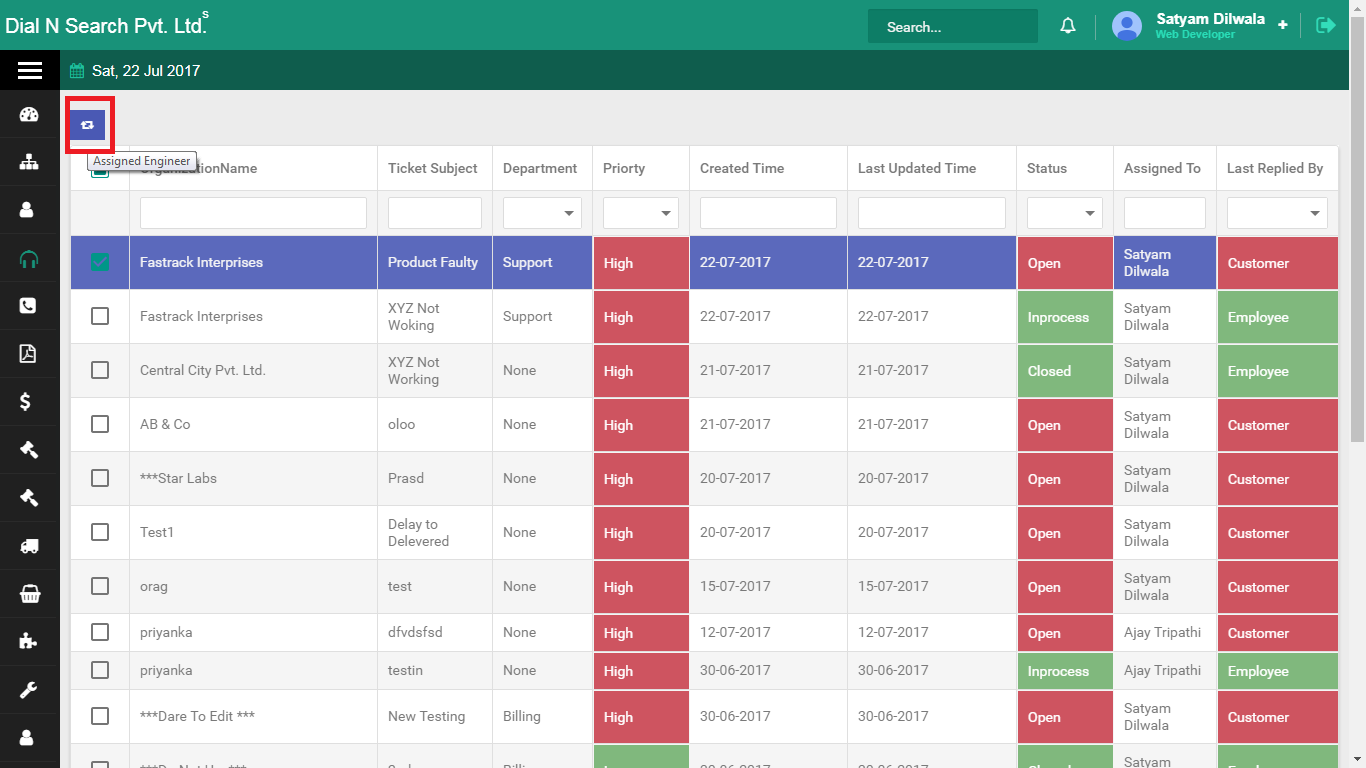
- Click Ticket → Assign Ticket visit.
- Tick the checkbox against the organisation name.
- Click the Assigned Engineer icon (red highlight).
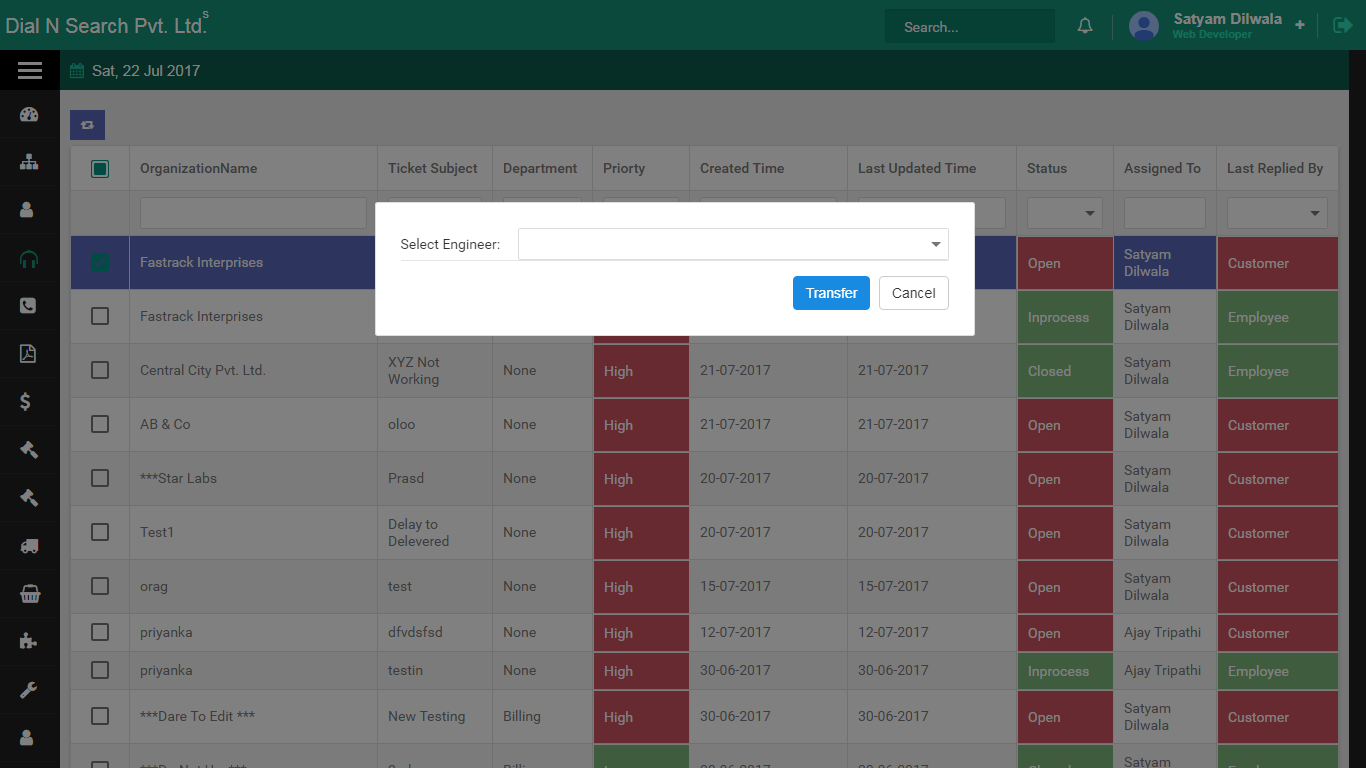
- Select the engineer from the dropdown, then click Transfer.
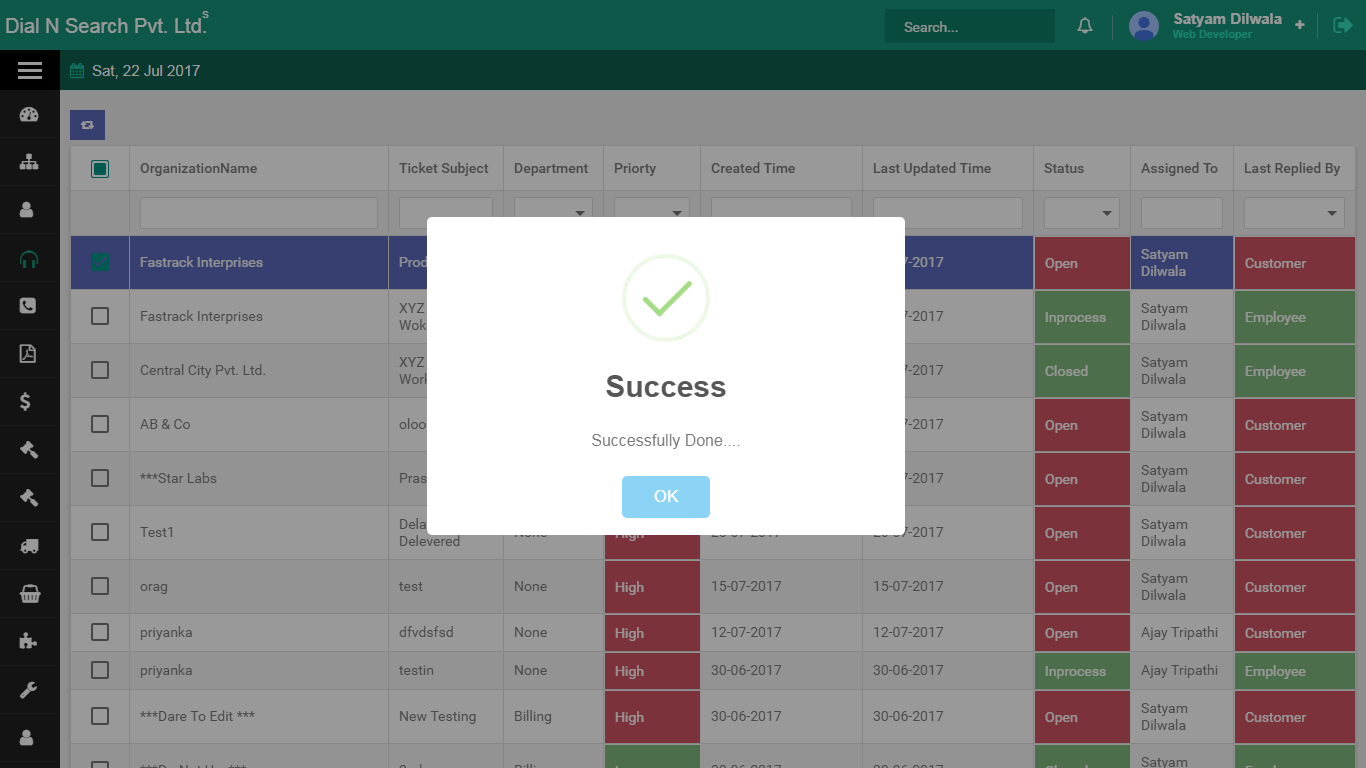
- Click OK on the confirmation.
Assign Ticket visit: tick the organisation, then Assigned Engineer (red).
![Tkt assign]()
Choose the engineer and click Transfer.
![Tktassign2]()
Ticket transferred: click OK.
![Tktassign3]()
Masters (setup lists)
The lists your other screens use: branch, bank, product, tax, terms, data source, SMTP and more. If a dropdown is empty on a quotation or challan, the value is missing here. Add it once, then every document can pick it.
Who uses it. An admin or owner, usually at go-live and when you add a new model or tax rate.
Example. You cannot quote “Voltas 1.5T Split” until that product exists in Masters. You cannot mark a lead source as Justdial until Data Source exists. Do not wait until the customer is on the phone. Fill Masters first.
- How to add a data source
-
Add where a lead came from (Justdial, walk-in, Yellow Pages) so organisations can pick a data source.
If Data Source is empty, you cannot mark how Hotel Sagar found you. Add it once in Masters; every new organisation can pick it. Do this at go-live, not while the customer is on the phone.
Short videos: adding a data source.
On Masters:
- Click Master.
- Click +, enter the data source name, then click Save.
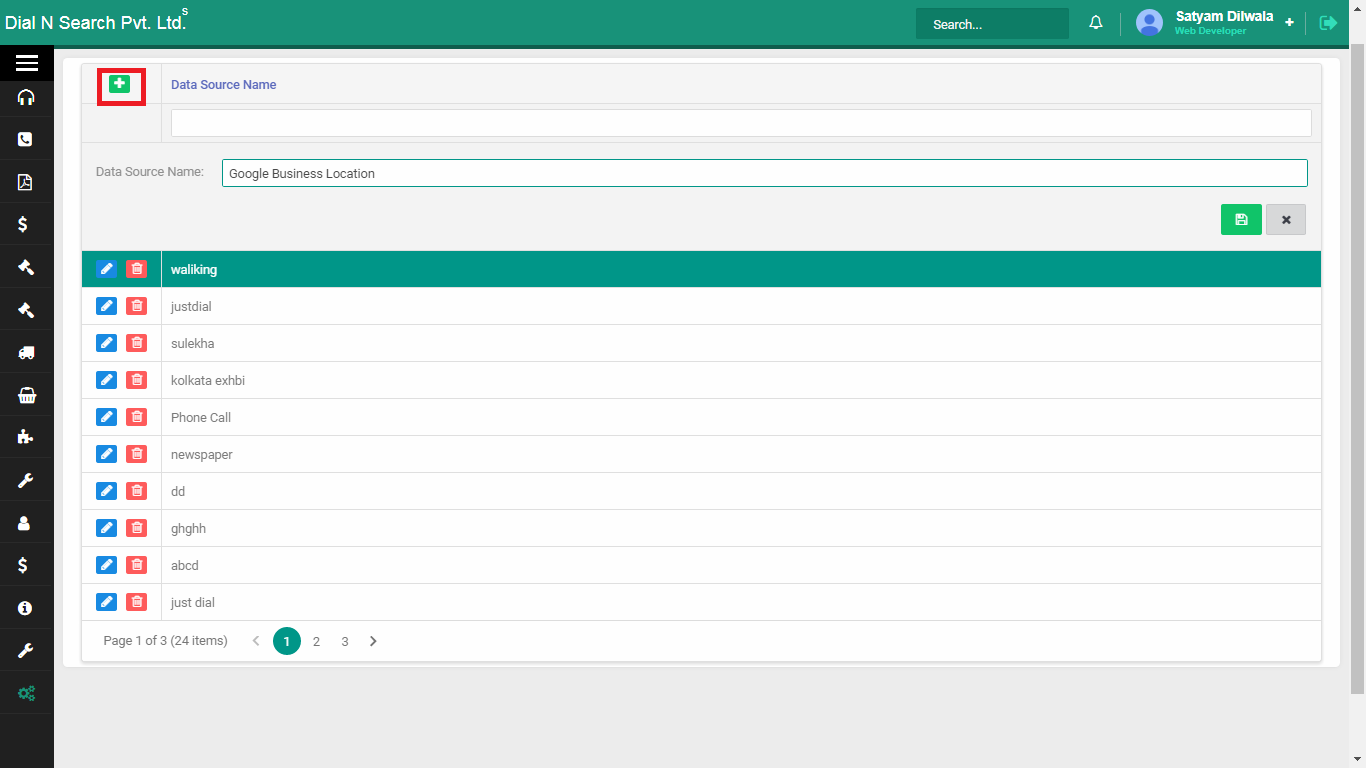
Data source list: add Justdial, Yellow Pages or walk-in with +.
![Data source]()
- How to add a branch
-
Add a branch (Pune, Aurangabad) so documents and employees can belong to the right office.
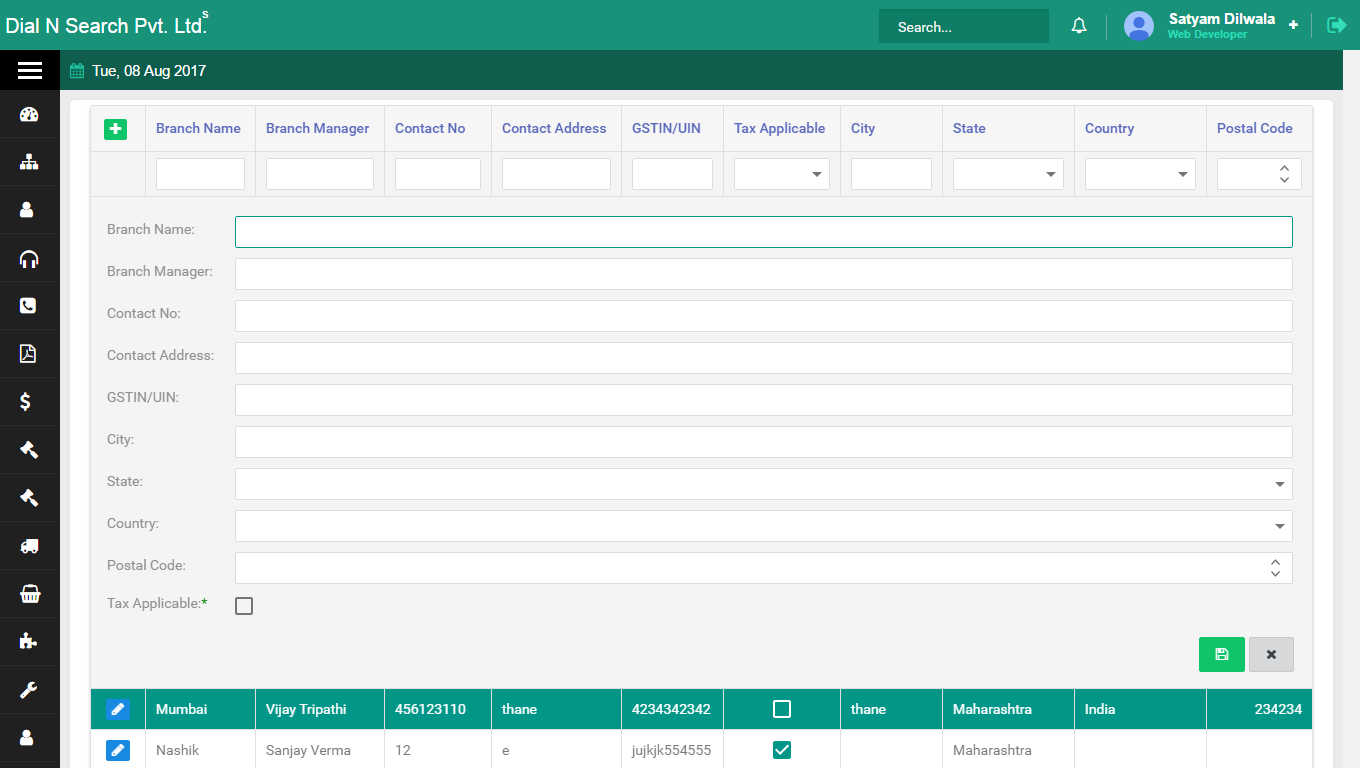
If you have more than one location, Branch is the list those screens pick from. Add the office once, with the fields on the second screenshot. Filename on disk is Brach Details — that is the real file; the path is unchanged.
On Masters:
- Click Master → Branch.
- Click +, fill the fields as shown on the second screenshot, then click Save.
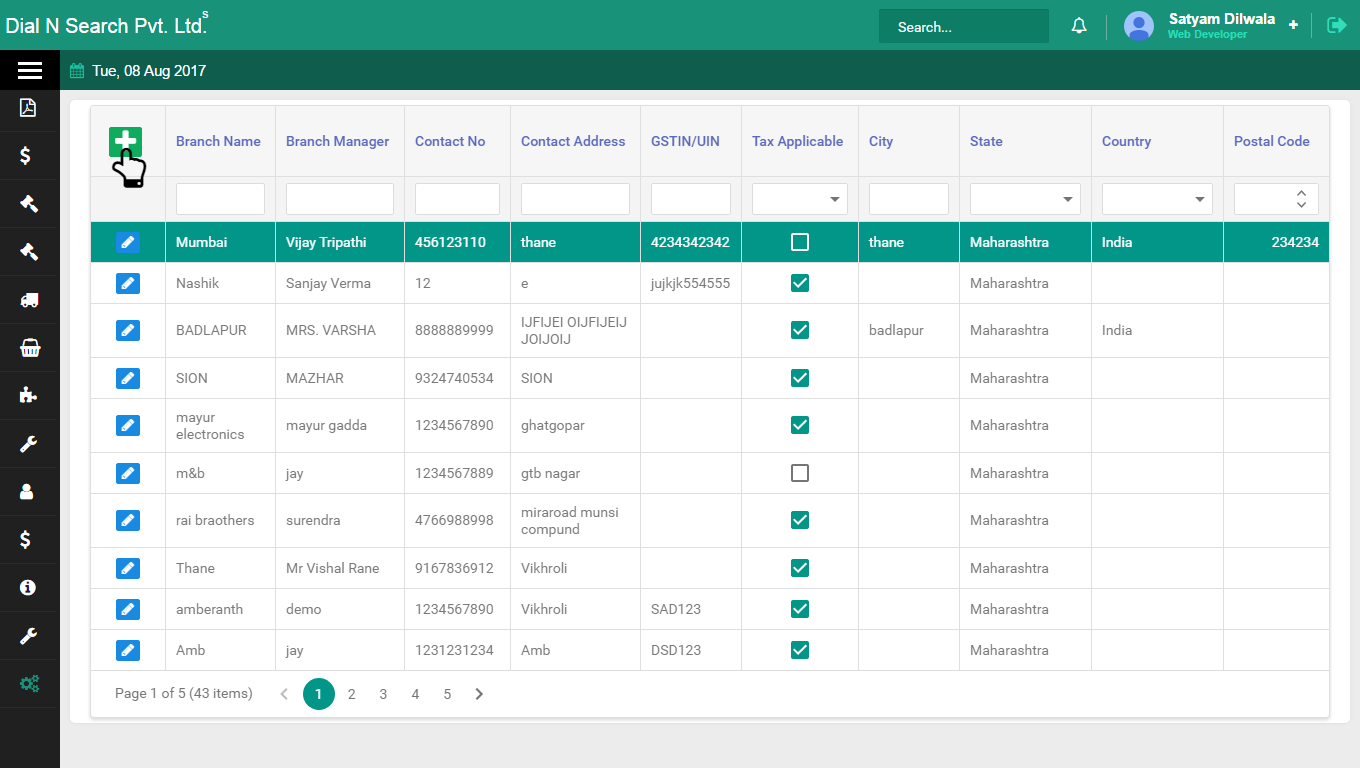
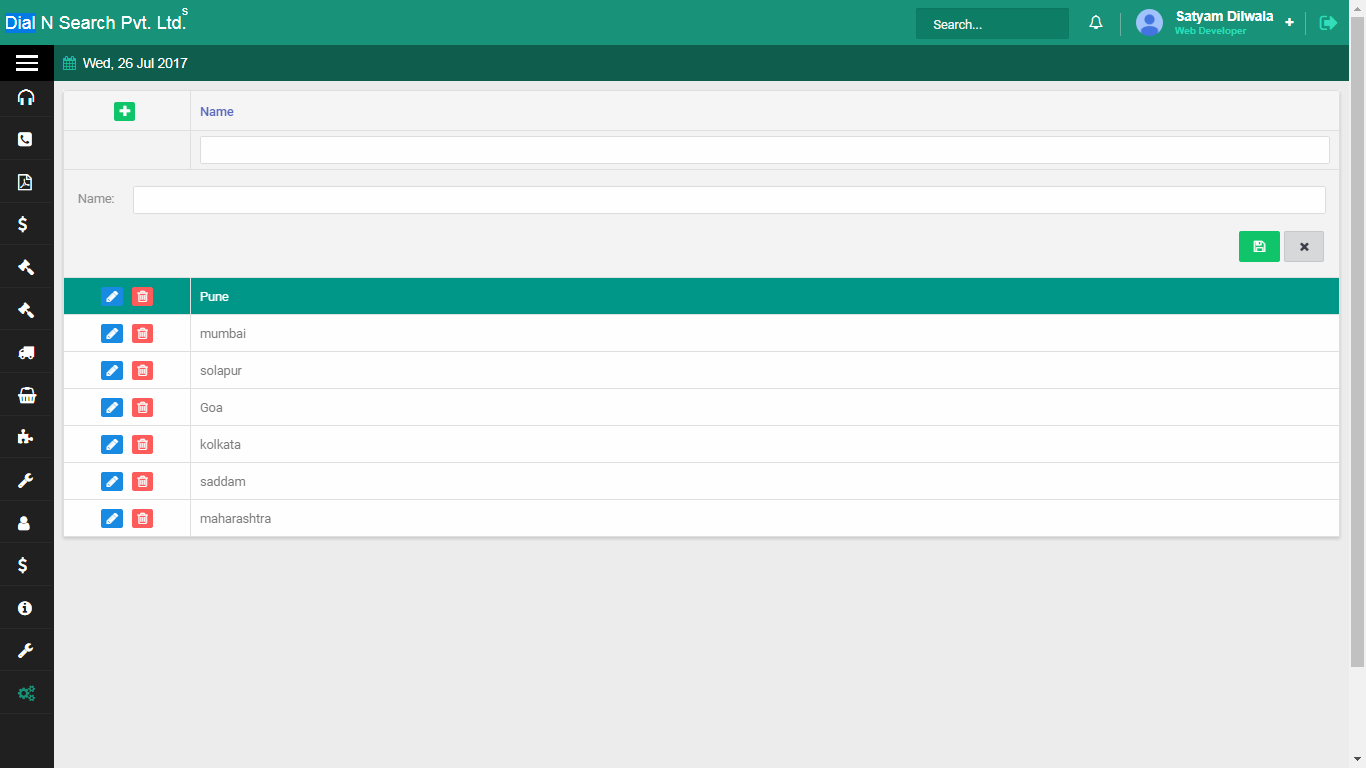
Branch list: offices you can pick on other screens.
![Add New Branch]()
Branch details form: fill the office fields, then Save.
![Brach Details]()
- How to add a bank
-
Add your bank so invoices and receipts can show the account you want customers to pay into.
Bank is a Masters list, not a payment gateway. Add the bank once; documents that need bank details pick from here. Fill this before you email the first tax invoice.
On Masters:
- Click Master → Bank.
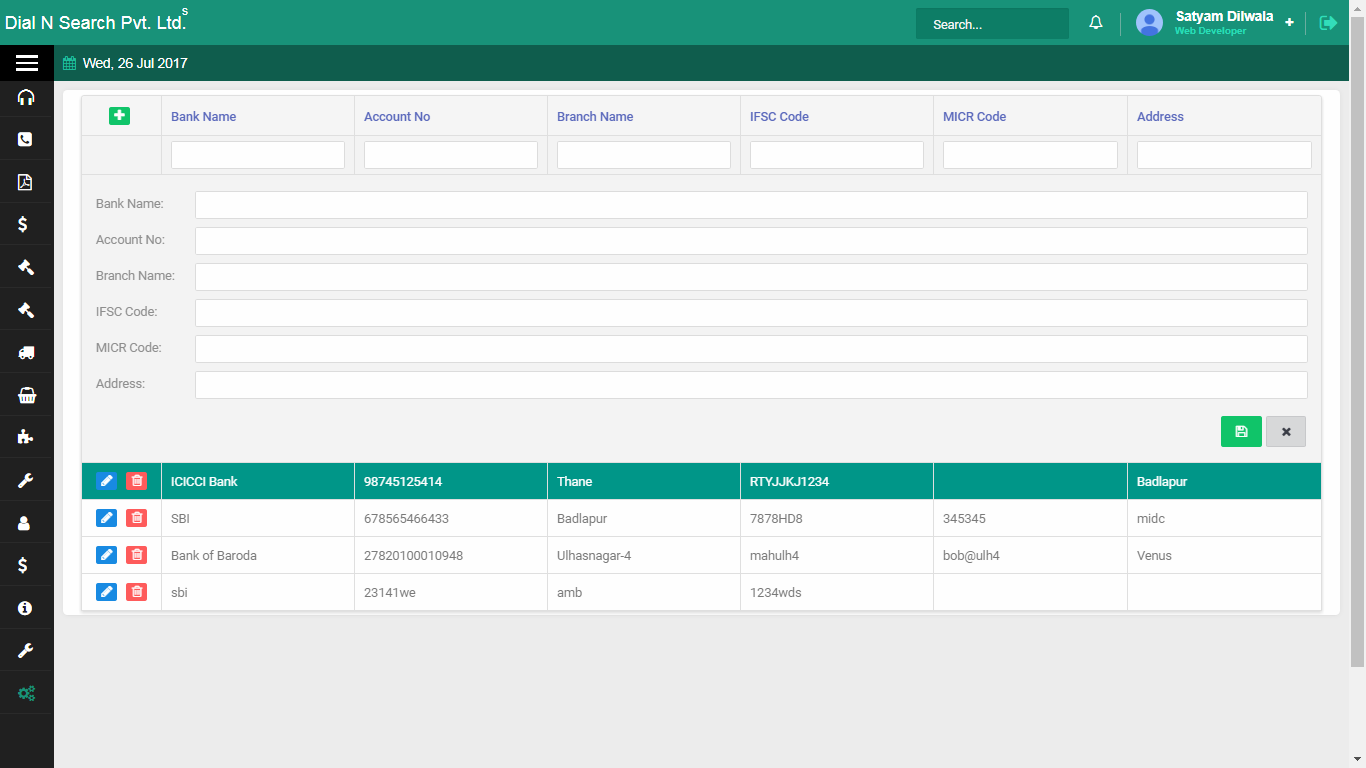
- Click +, enter the bank details, then click Save.
Bank master: add account details with +.
![Bank]()
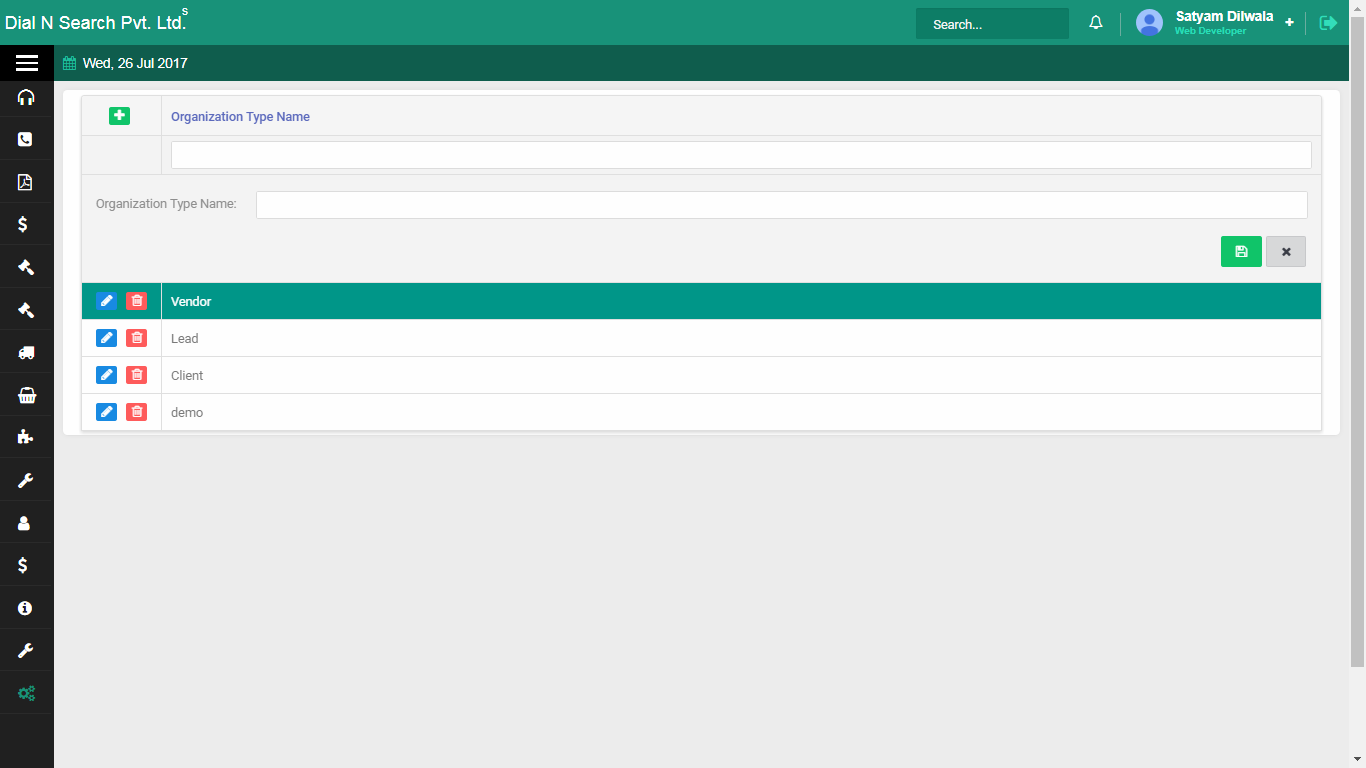
- How to add an organisation type
-
Add organisation types (hotel, hospital, dealer) so companies can be grouped the way you sell.
Type is a label on the organisation, not GST. If “Hotel” is not in this list, you cannot pick it on Hotel Sagar. Add types you actually use, then every new company can choose one.
On Masters:
- Click Master → Organization type.
- Click +, enter the type name, then click Save.
Organisation type: add hotel, hospital, dealer and similar labels.
![Org name]()
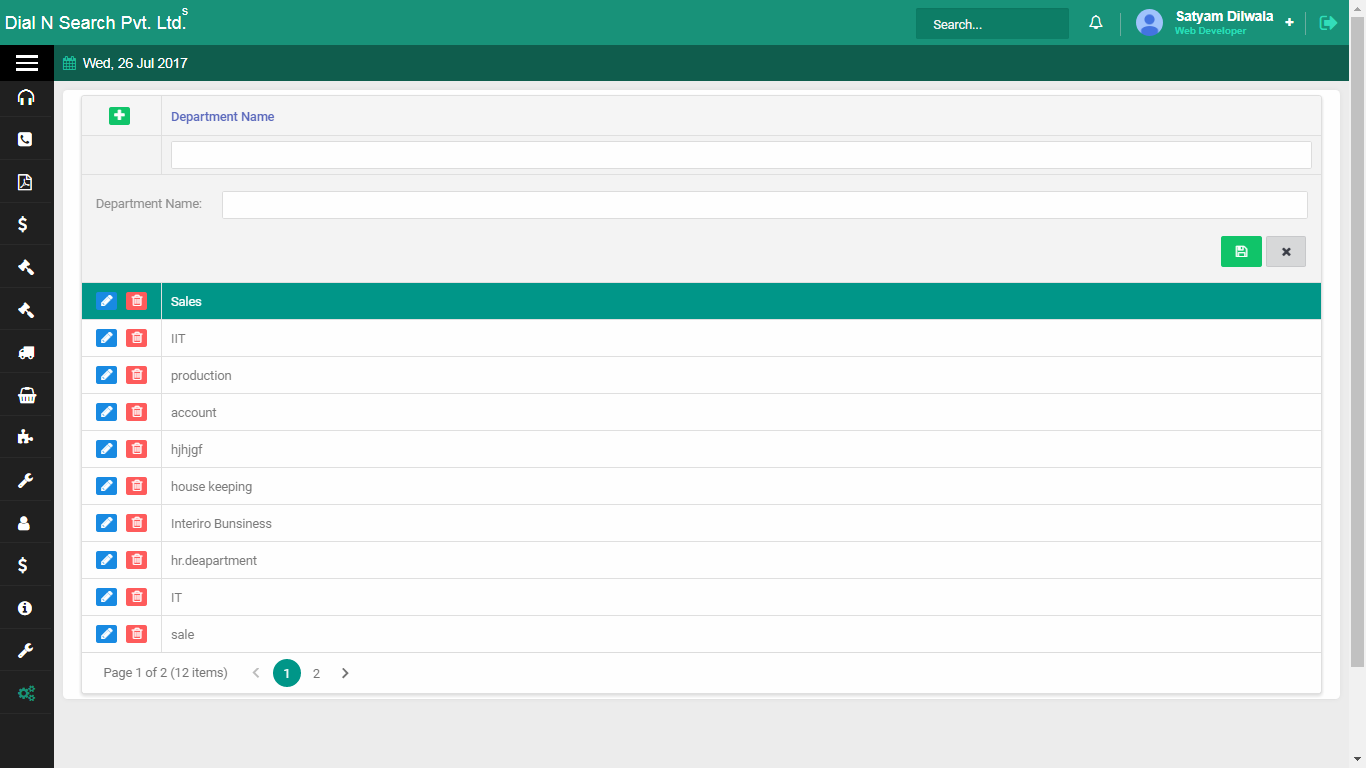
- How to add a department
-
Add departments (Sales, Service, Accounts) so tickets and employees can pick a team.
When you raise a ticket you select a department. If Service is not here, the dropdown is empty. Add the teams you actually have, then tickets and other screens can use them.
On Masters:
- Click Master → Department.
- Click +, enter the department name, then click Save.
Department master: team names for tickets and similar screens.
![Dept]()
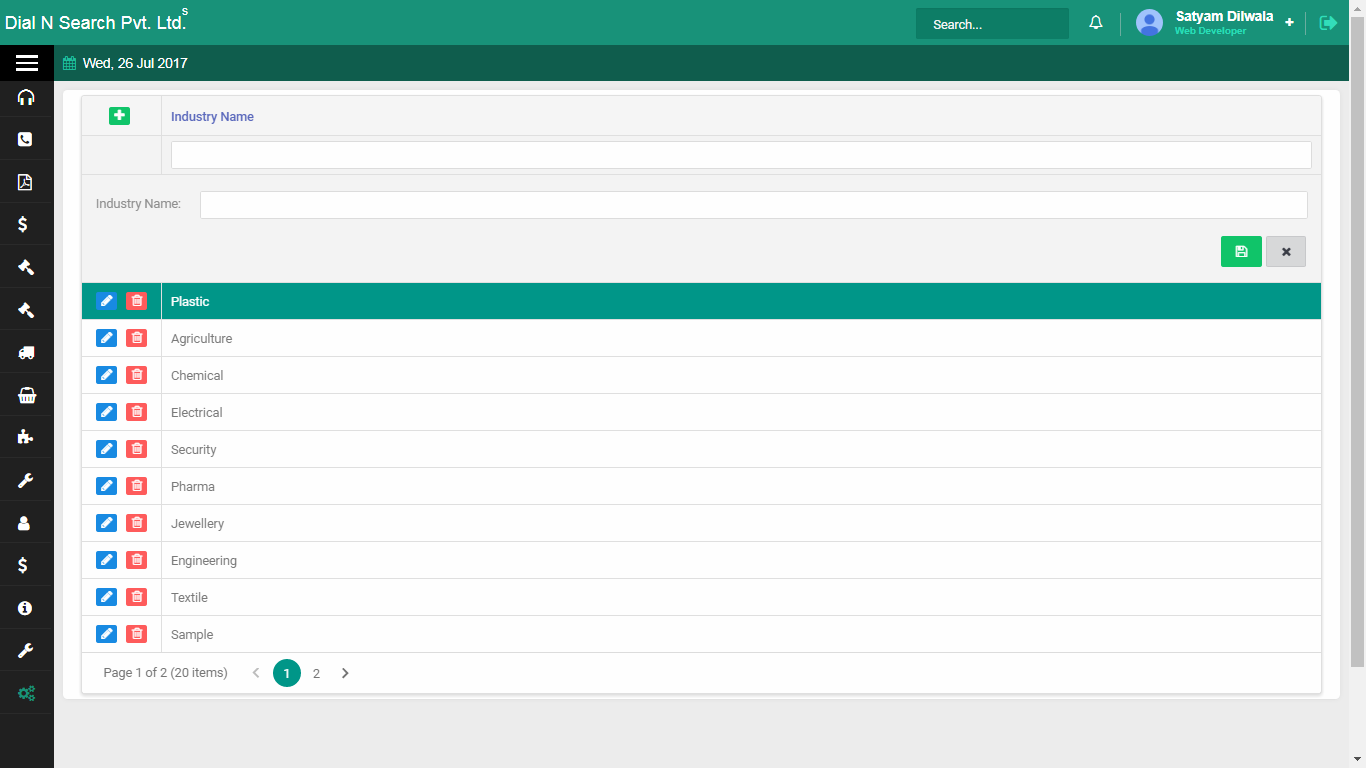
- How to add an industry
-
Add industries (hospitality, healthcare) so you can classify organisations the way you report.
Industry sits on the company record. It is not organisation type. Add the sectors you sell into, then Hotel Sagar can be Hospitality instead of a blank dropdown.
On Masters:
- Click Master → Industry.
- Click +, enter the industry name, then click Save.
Industry master: sectors you sell into.
![Industry name]()
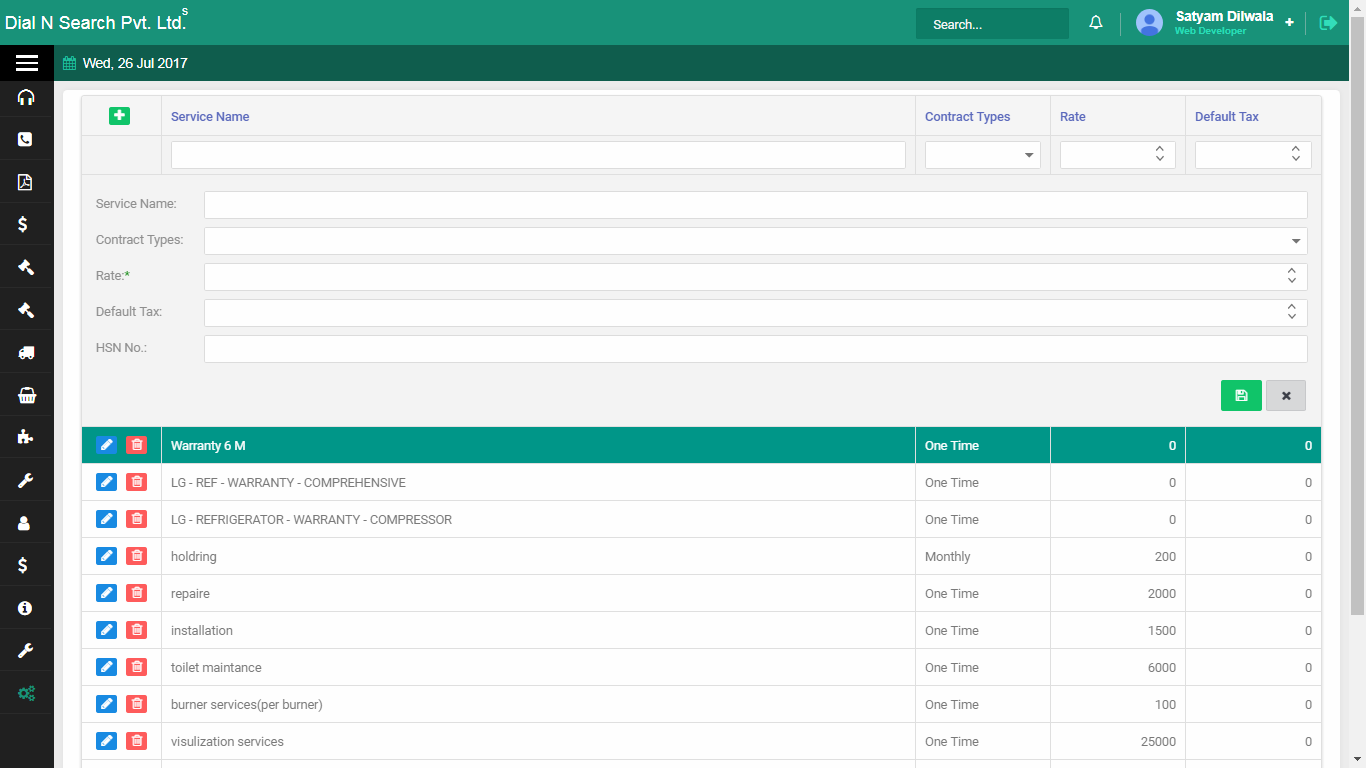
- How to add a service
-
Add a service (installation, gas charging) so quotations and enquiries can pick it on the Service tab.
Products are boxes. Services are work. If installation is not in this list, you cannot put it as a service line on Hotel Sagar’s quote. Add the services you actually sell, then the Service tab on documents can use them.
On Masters:
- Click Master → services.
- Click +, enter the service details, then click Save.
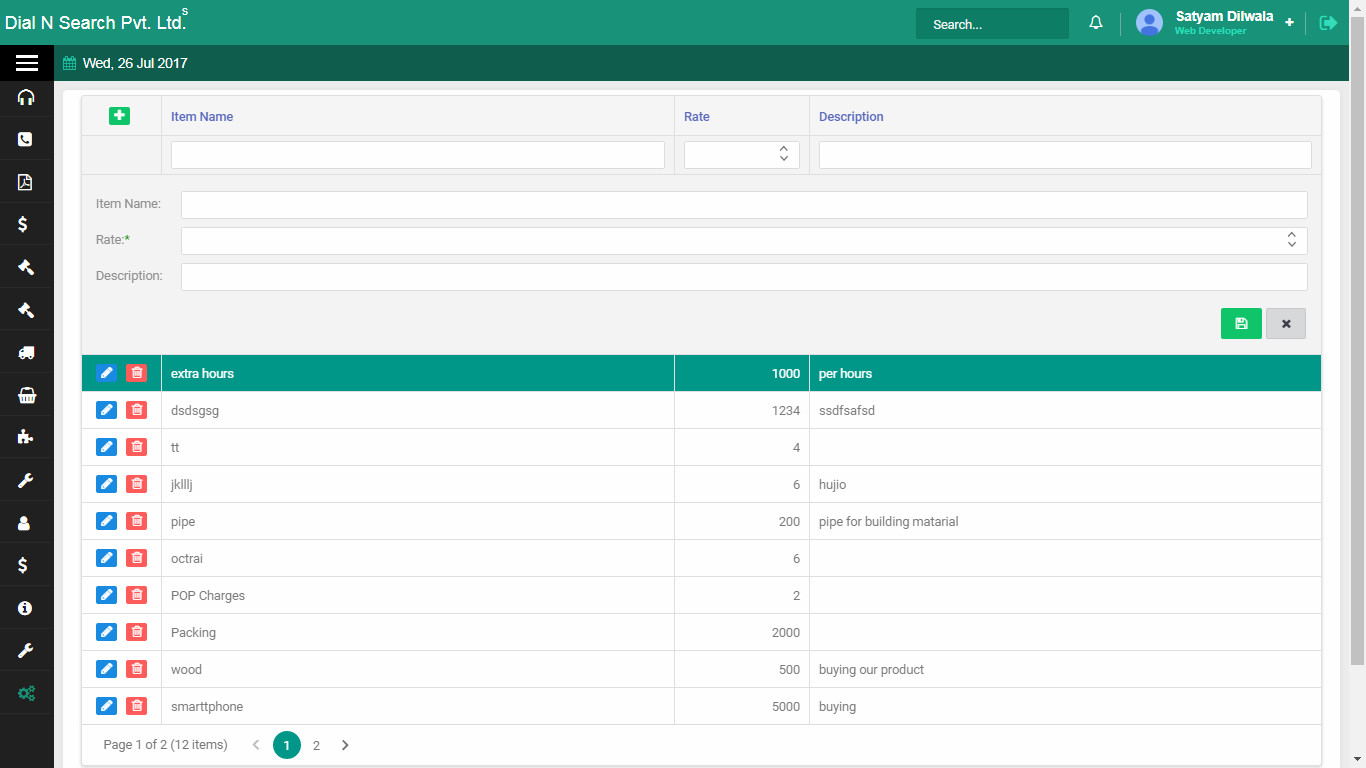
Services master: work you sell, for the Service tab on quotes and bills.
![Services]()
- How to add a manufacturer
-
Add a manufacturer (Voltas, Blue Star) so products can pick who makes them.
Manufacturer is used when you add a product in Masters. If Voltas is not here, the product form cannot pick it. Add brands you stock, then add products under them.
On Masters:
- Click Master → Manufacturer.
- Click +, enter the manufacturer name, then click Save.
Manufacturer master: brands your products belong to.
![Mfg]()
- How to add a category
-
Add a product category (split AC, cassette, spare) so the catalogue is grouped.
Category is the first field on the product form. If “Cassette AC” is missing, you cannot file the hotel’s indoor units correctly. Add categories before you add products.
On Masters:
- Click Master → category.
- Click +, enter the category name, then click Save.
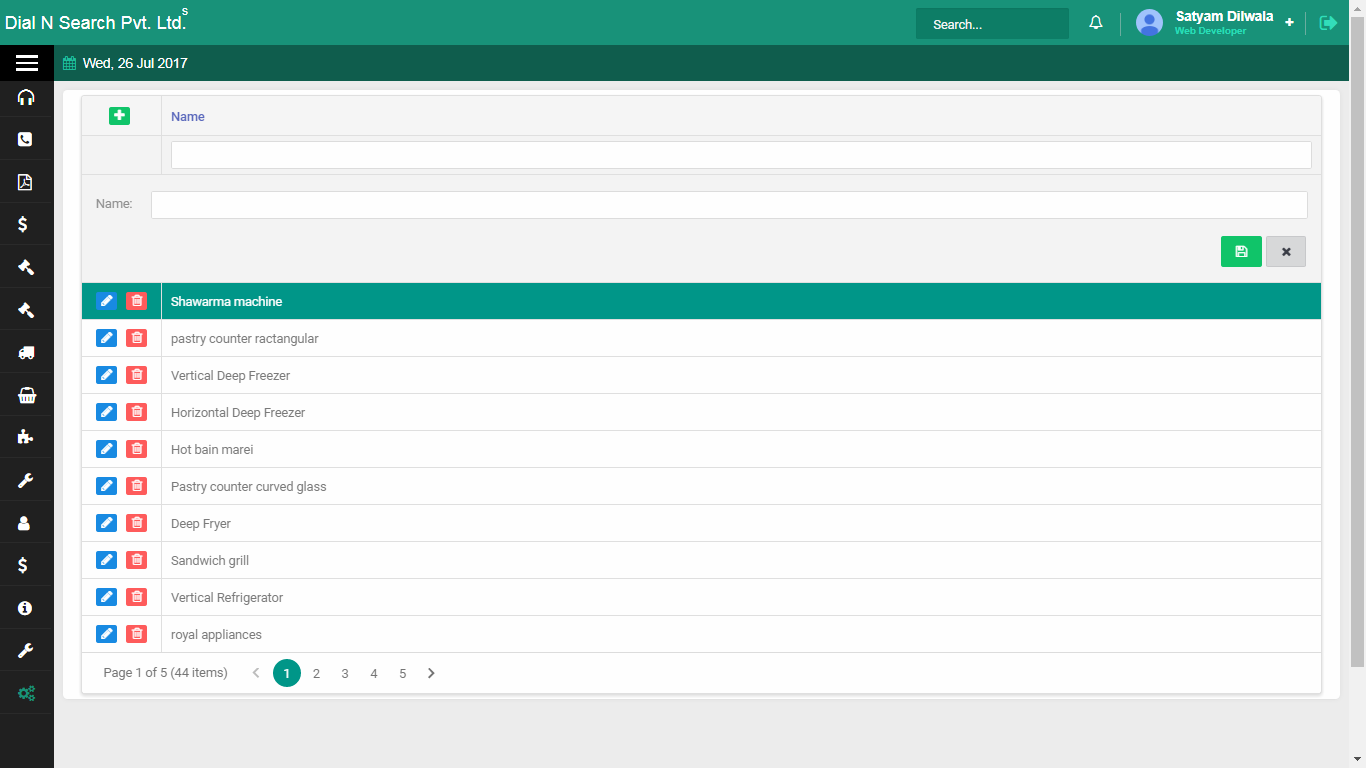
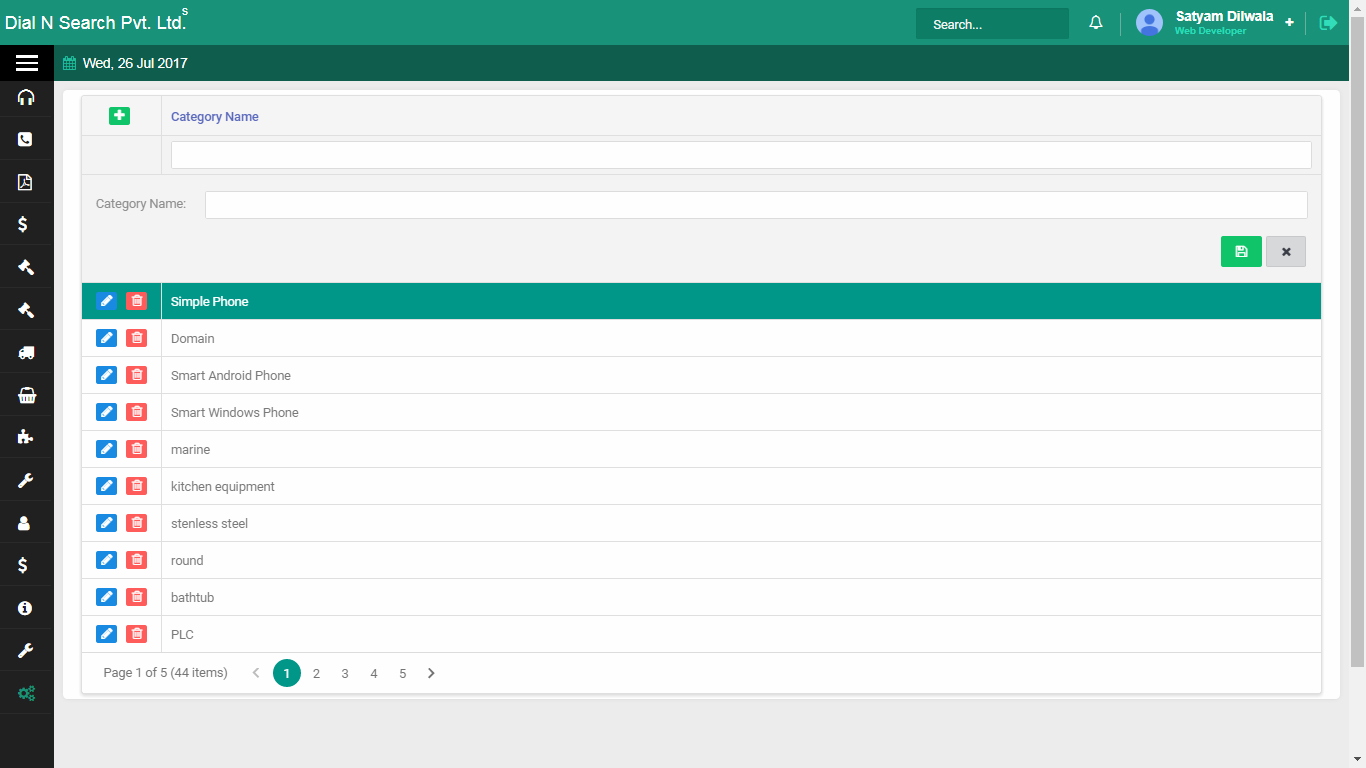
Category master: groups for the product catalogue.
![Category]()
- How to add a product
-
Add a sellable product so quotations, challans and maintenance can pick it from a dropdown.
You cannot quote “Voltas 1.5T Split” until that product exists here. The same catalogue feeds challans and maintenance. For the full field list (warranty, serial, installation), see How to add a maintenance contract, which includes the product Master fields. Add category and manufacturer first if those dropdowns are empty.
On Masters:
- Click Master → product.
- Click +, enter the product details, then click Save.
Product master: the catalogue every quote and challan uses.
![Prod]()
Tip. Tick Enable To Sale if you sell it, Enable To Purchase if you buy it. Product Type controls whether installation and serial number are required.
- How to add other charges
-
Add extra charges (freight, packing) so quotations and invoices can pick them on the Other charges tab.
Other charges are not products and not tax. If freight is not in this list, the Other charges tab on a quote has nothing to pick. Add the extras you actually bill.
On Masters:
- Click Master → Other Charges.
- Click +, enter the charge, then click Save.
Other charges master: freight, packing and similar extras.
![Other charges]()
- How to add a quotation description
-
Save a reusable quotation description (subject and body) so you do not retype the same offer note.
The quotation header can pick a description from Masters. Add subject and description once (menu: Other Quotation Description → New). Then New Quotation can use it instead of a blank note.
On Masters:
- Click Master → Other Quotation Description.
- Click New, enter subject and description, then click Save.
Quotation description: reusable subject and body for quotes.
![Quotation descp]()
- How to add terms and conditions
-
Save terms and conditions once, so every quotation and invoice can pick the same legal text.
The Terms tab on a quote does not invent the wording. It picks from this master. Add subject and terms here, then Save and show details on the document can include them without retyping.
On Masters:
- Click Master → Terms and Condition.
- Click New, enter subject and terms, then click Save.
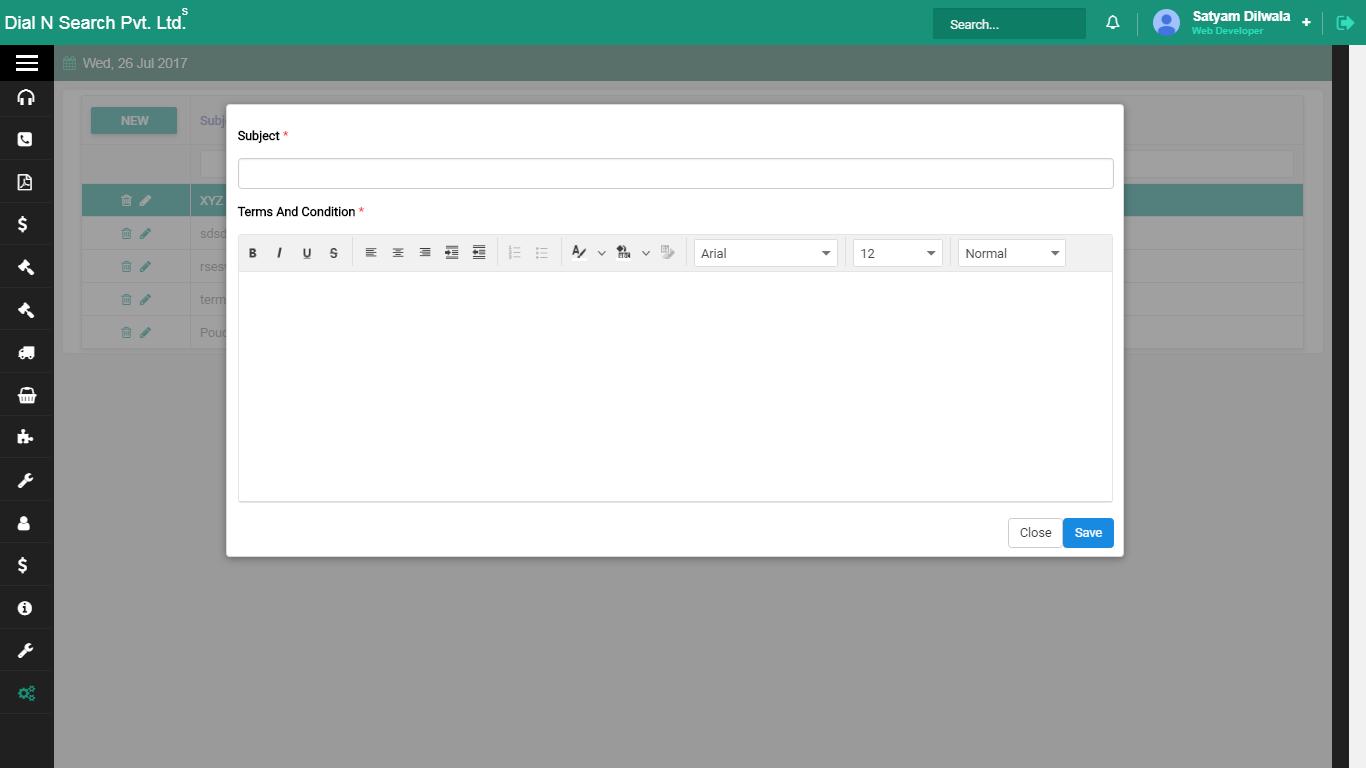
Terms and conditions master: reusable text for quotes and bills.
![Terms and cond]()
- How to add tax
-
Add a tax rate so quotations and invoices can apply GST (or other tax) from a dropdown.
Tax on a line comes from this master, not from typing a percentage each time. Add the rates you use (for example 18%), then product and invoice screens can pick them. This is setup, not a tax filing screen.
On Masters:
- Click Master → Tax.
- Click +, enter the tax details, then click Save.
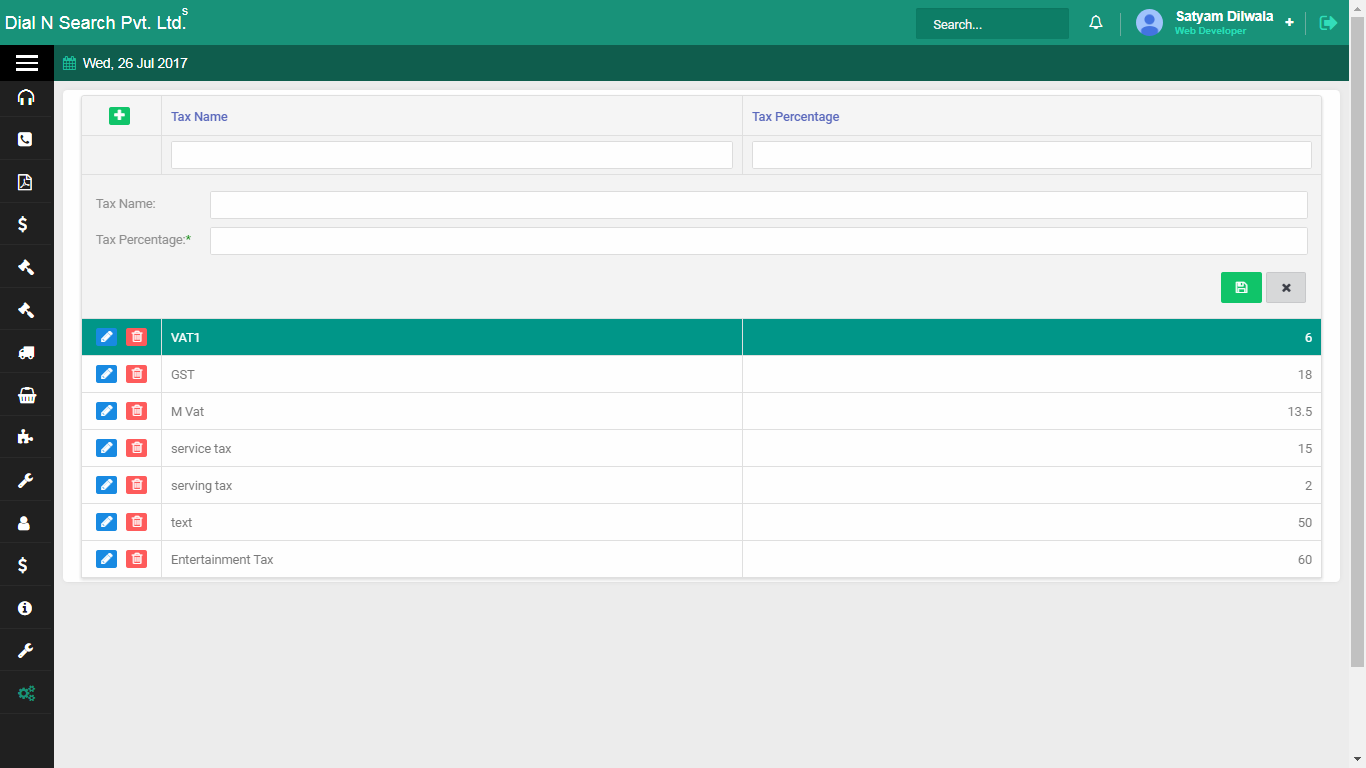
Tax master: rates documents pick on product and invoice lines.
![Tax]()
- How to add a lead-lost reason
-
Add reasons a lead was lost (price, competitor, not interested) so you can mark why a deal died.
When a lead will not convert, the reason comes from this list. If “Price” is not here, you cannot pick it. Add the reasons your sales team actually uses. Menu name in the product is Reason.
On Masters:
- Click Master → Reason.
- Click +, enter the reason name, then click Save.
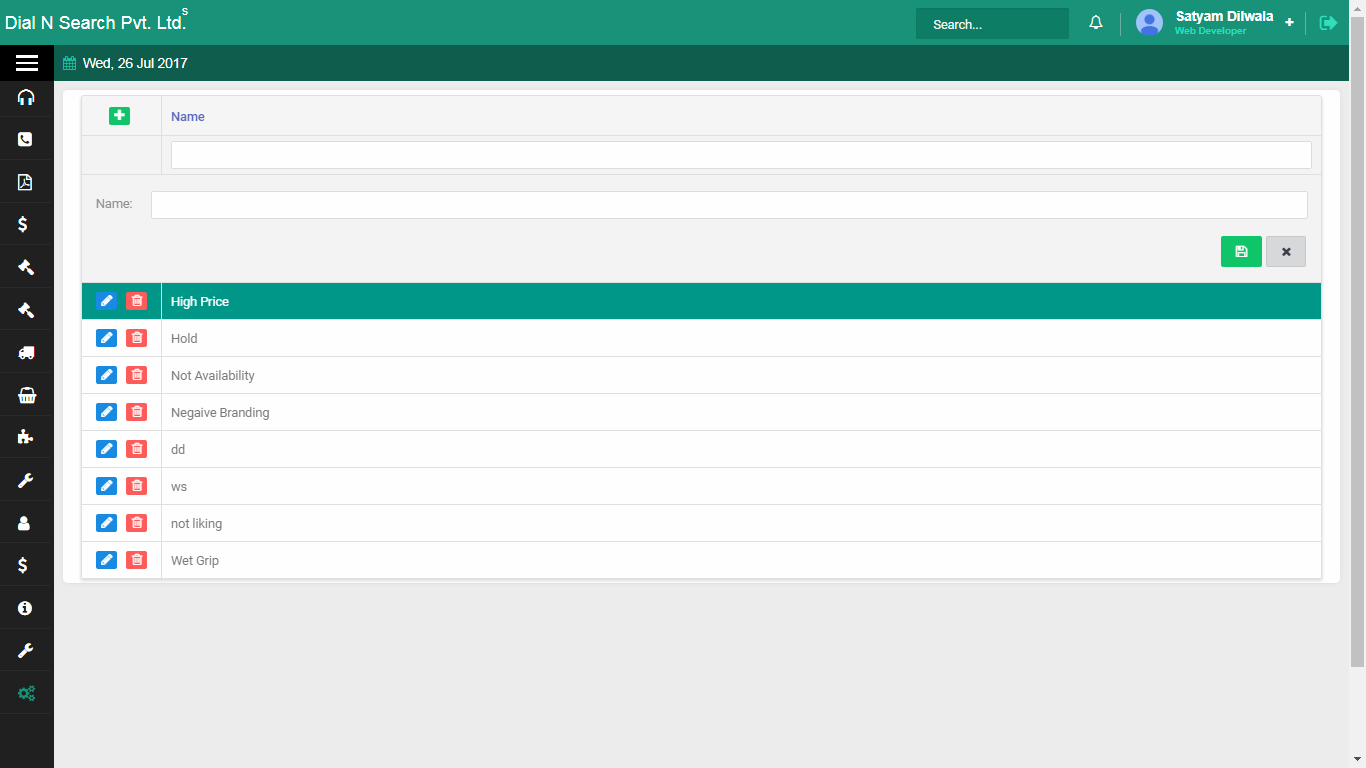
Lead-lost reasons: why a deal did not convert.
![Reason]()
- How to add an AMC feature
-
Add AMC features (filter clean, gas check) so a maintenance contract can list what is included.
When you convert warranty to AMC, features come from this list. If “filter clean” is not here, the contract cannot pick it. Add the visit work you actually promise.
On Masters:
- Click Master → AMC Feature.
- Click +, enter the feature name, then click Save.
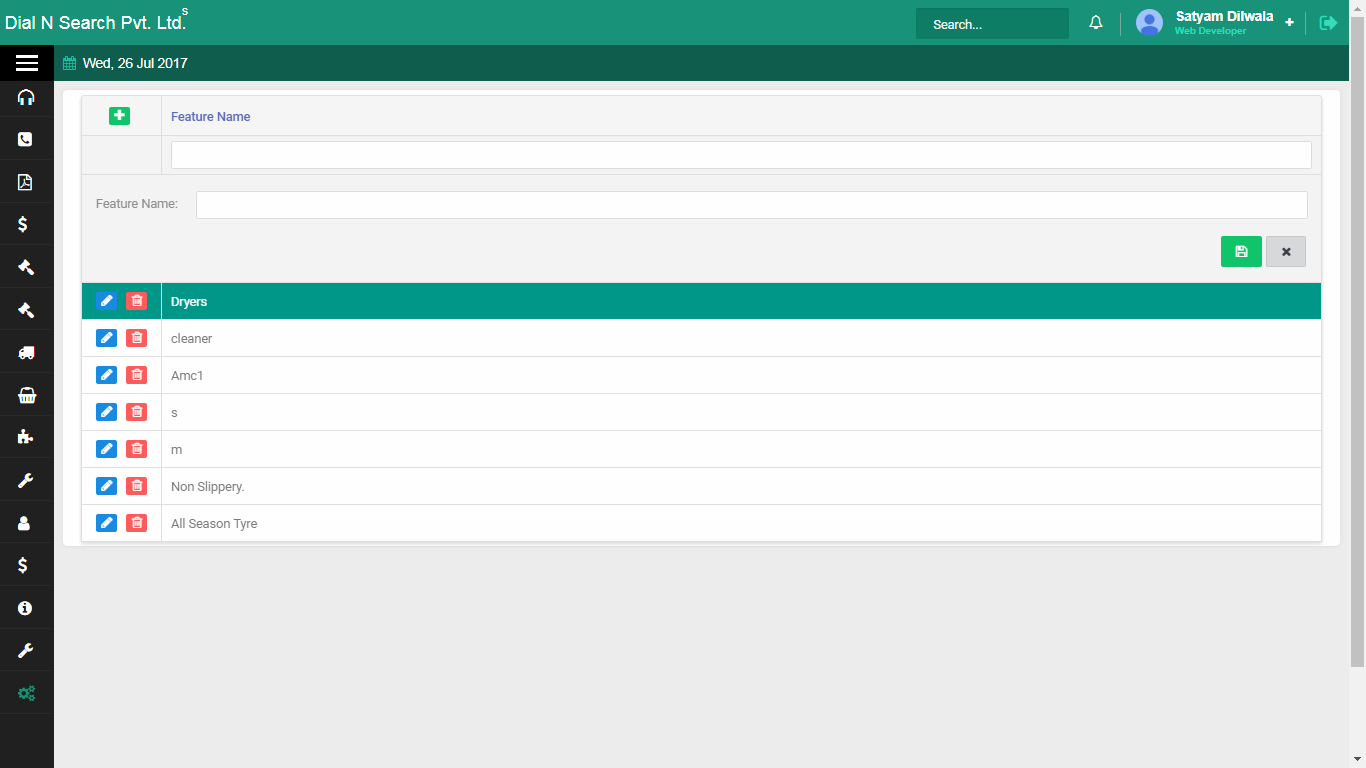
AMC feature master: work included on a maintenance contract.
![Amc feature]()
- How to add addition / deduction
-
Add addition or deduction heads so documents can add or subtract a named amount.
This is a setup list for plus/minus lines (discount, extra), not a bank transaction. Add the heads you use, then the document screens that pick Addition/Deduction can use them.
On Masters:
- Click Master → Addition/Deduction.
- Click +, enter the details, then click Save.
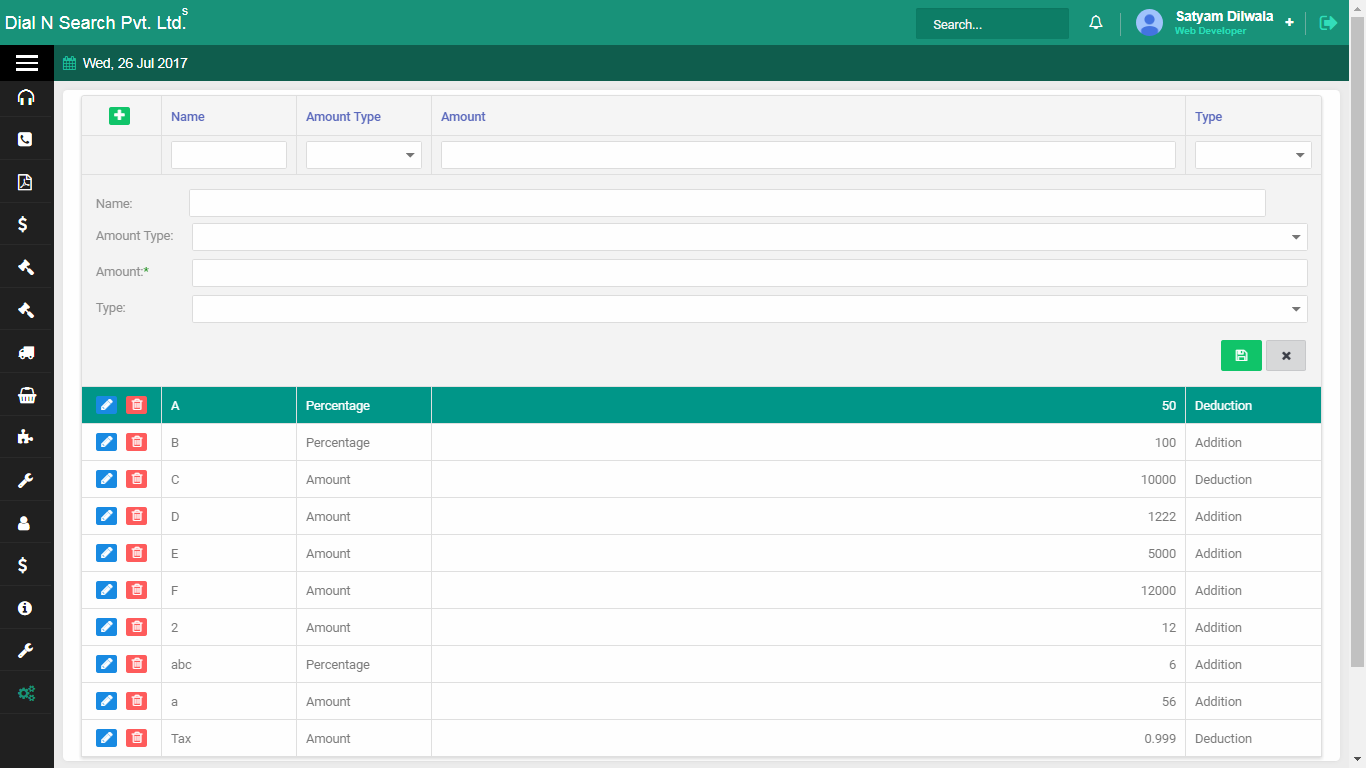
Addition/Deduction master: named plus or minus heads.
![Add educt]()
- How to add a particular
-
Add a particular (a named line item) so screens that pick Particular have something to choose.
Particular is a Masters label for a line description. Add the names you use in your business, then those dropdowns are not empty. This is not a product and not a tax rate.
On Masters:
- Click Master → Particular.
- Click +, enter the particular name, then click Save.
Particular master: named line items for documents that pick Particular.
![Particular]()
- How to add an inventory location
-
Add a godown or store location so stock can sit in Pune vs Aurangabad, not in one unnamed pile.
Inventory location is where material lives. If you have two stores, add both here. Documents and stock screens that pick a location use this list. This is not a project site address.
On Masters:
- Click Master → Inventory Location.
- Click +, enter the details, then click Save.
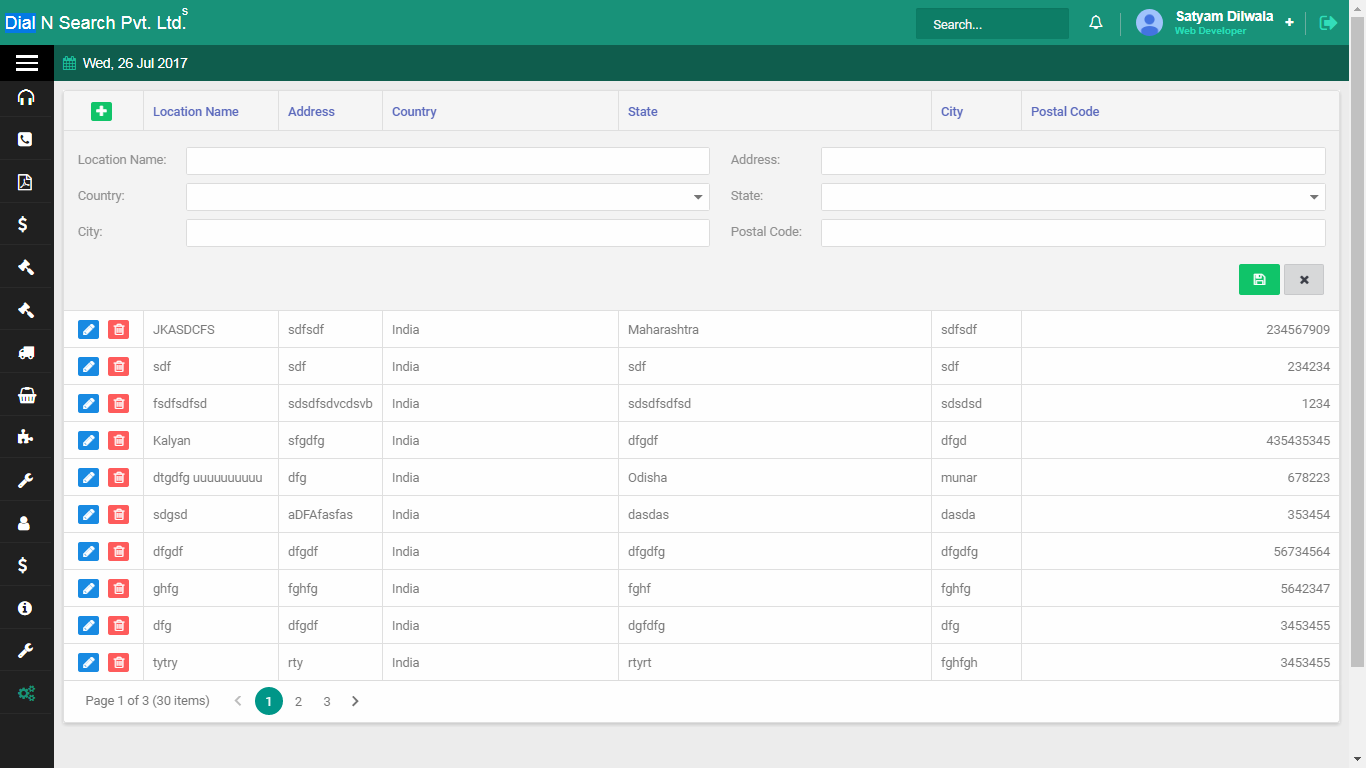
Inventory location: godowns or stores stock can belong to.
![Inv location]()
- How to set common SMTP (group)
-
Set the shared mailbox a group of users send from, so quotations go out from one company address.
Common SMTP is for a group, not one person. Fill the mandatory mail-server fields, then Save. Use this when the whole sales team should send from the same From address. One user’s own SMTP is the next how-to. We do not invent server names — use the values your email provider gave you.
On Masters:
- Click Master → Common SMTP settings.
- Fill all mandatory fields, then click Save.
Common SMTP: shared mail settings for a group of users.
![Smtp]()
- How to set SMTP for one user
-
Set mail-server details for one user, when that person should send from their own mailbox.
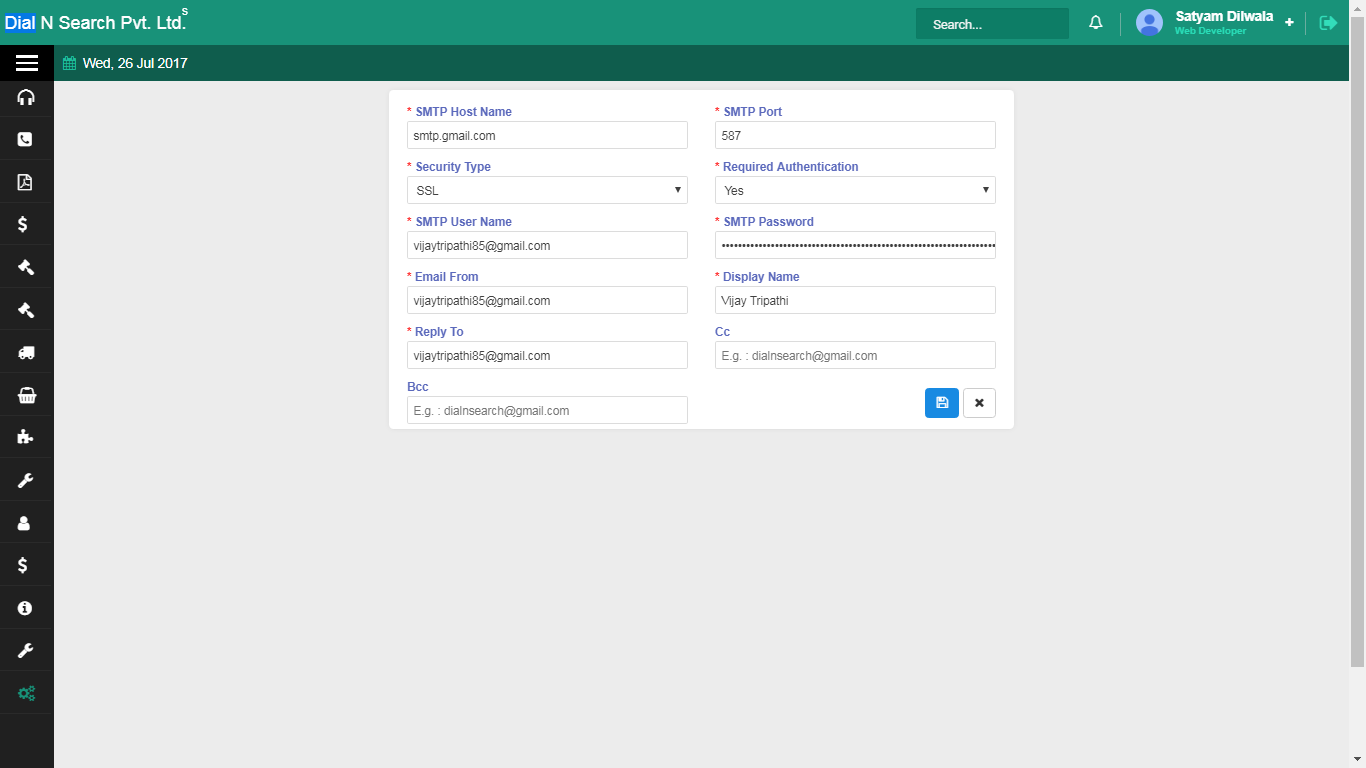
This is SMTP settings (one user), not Common SMTP (group). Fill the mandatory fields your email provider gave you, then Save. The screenshot is the SMTP form. If the whole team shares one From address, use Common SMTP instead.
On Masters:
- Click Master → SMTP settings.
- Fill all mandatory fields, then click Save.
SMTP settings: mail server for one user.
![Smtp]()
- How to change your password
-
Change the password you use to log in to Sales Funda®.
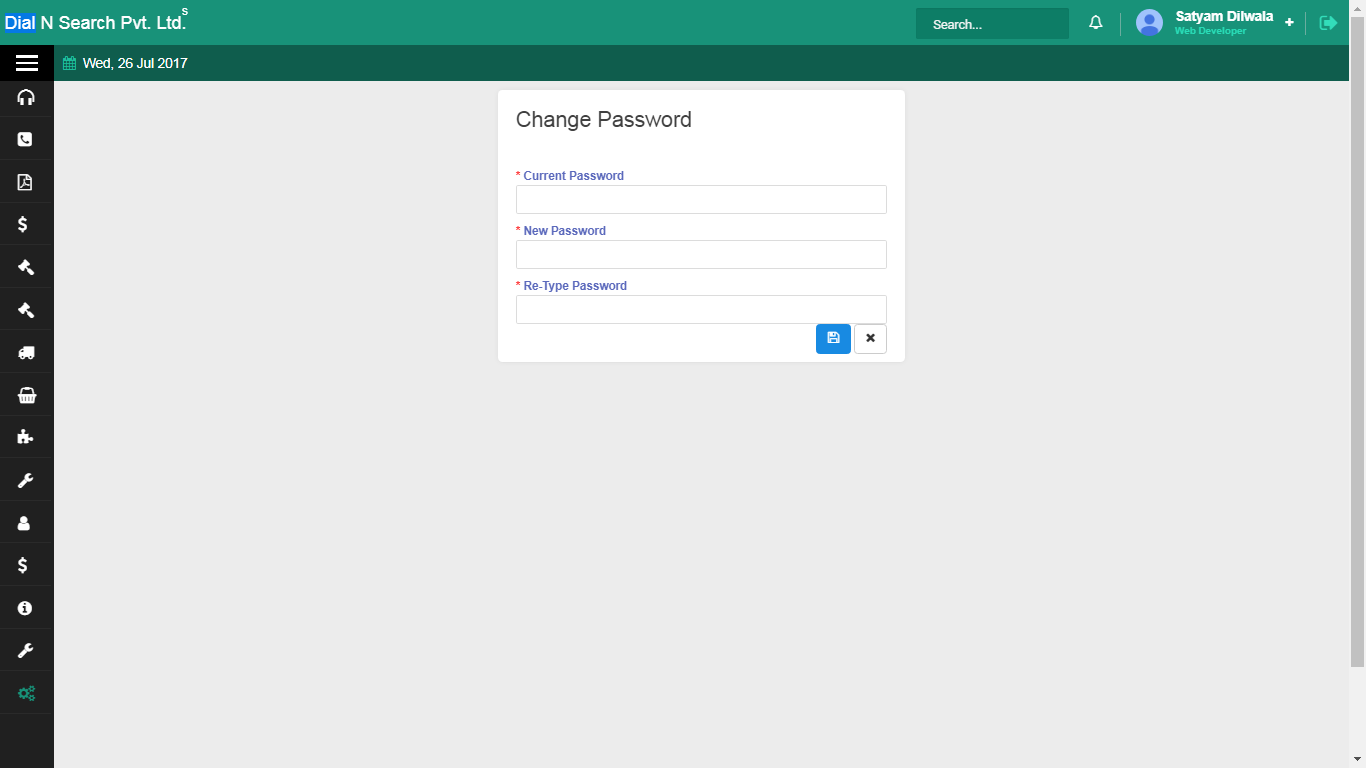
This is your login password, not SMTP. Enter the current password, the new one, and re-type the new one, then Save. Do it from Masters → change password on your own login.
On Masters:
- Click Master → change password.
- Enter current password, new password, and re-type new password, then click Save.
Change password: current, new, and re-type, then Save.
![Password]()
- How to create an email campaign
-
Save an email campaign (subject and body) so you can send it to selected organisations from View Active Only.
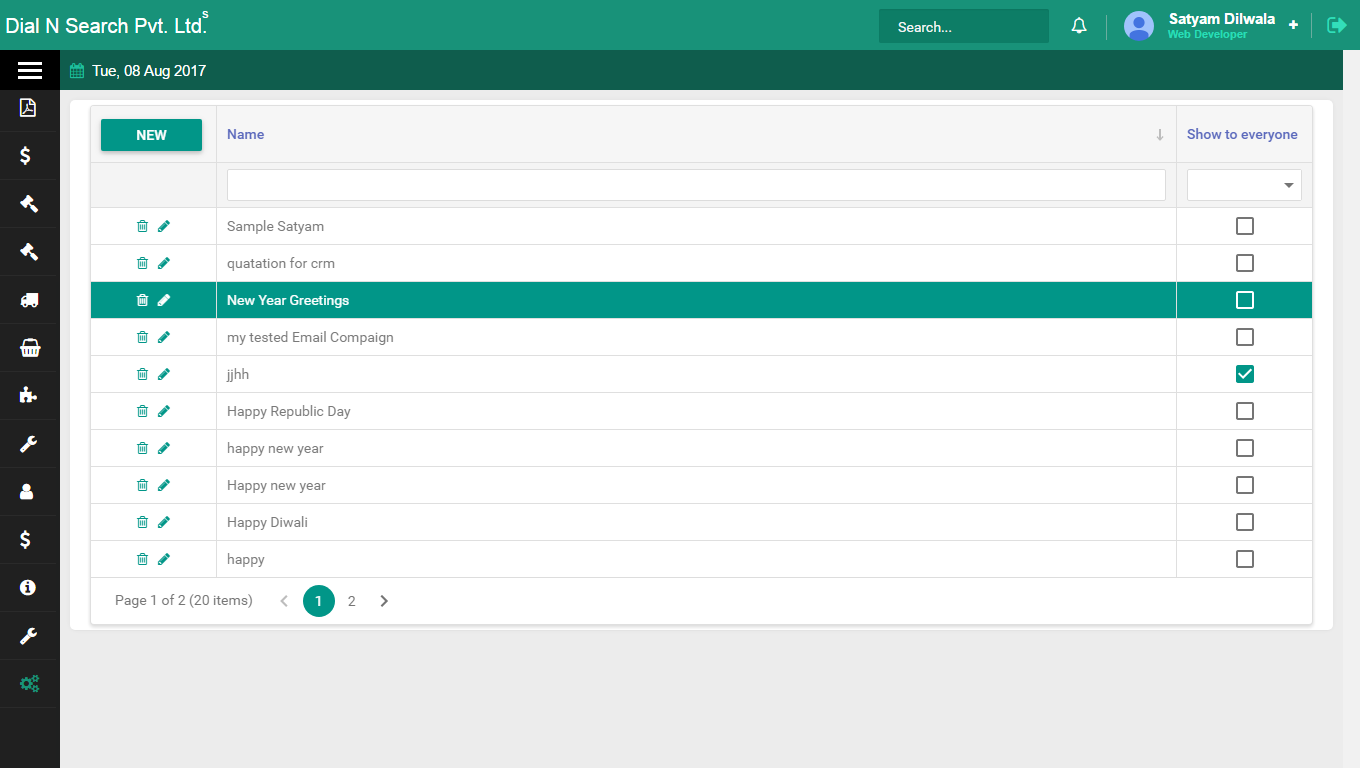
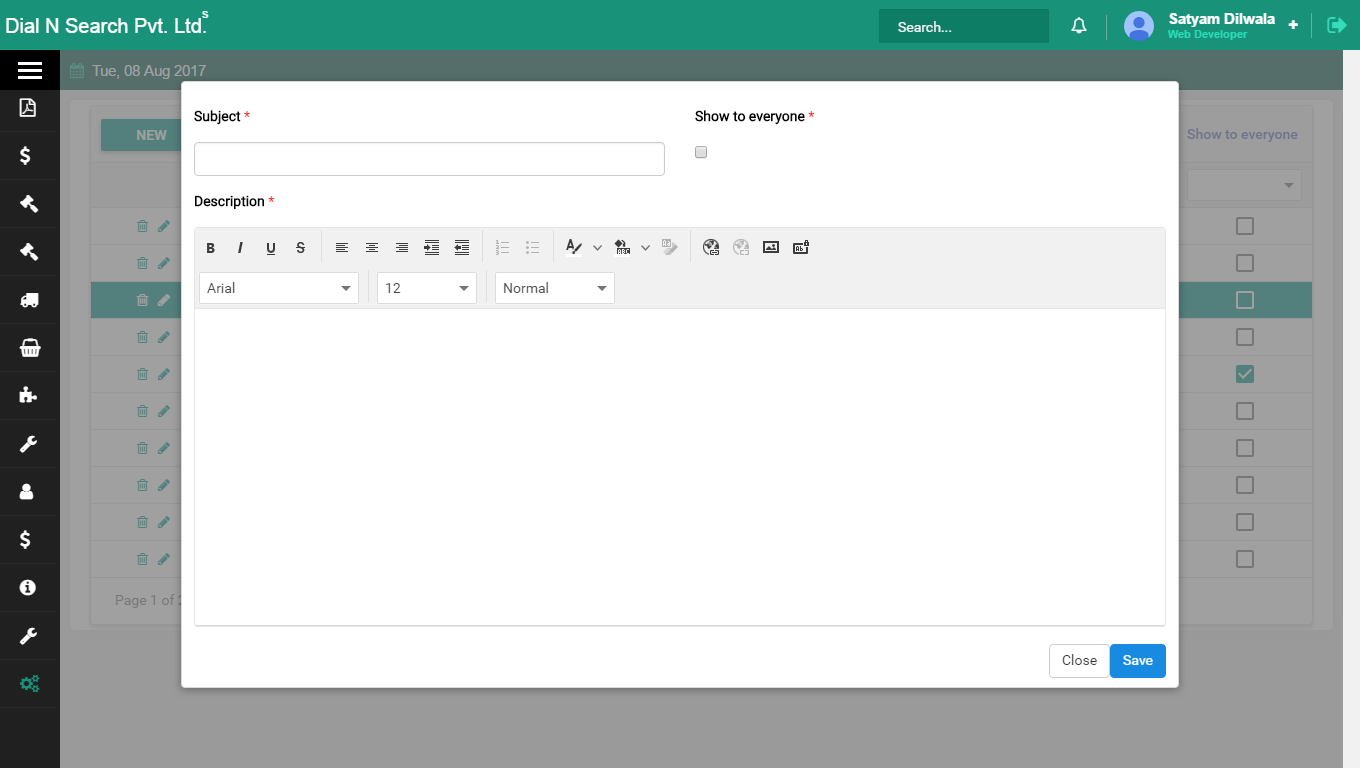
Send Email on selection asks you to pick a campaign. That campaign is created here: subject line and description, then Save. Without a campaign, the organisation list has nothing to send. This is not SMTP setup — SMTP is how mail leaves; the campaign is what you write.
On Masters:
- Click Master → Email Campaign.
- Enter subject line and description, then click Save.
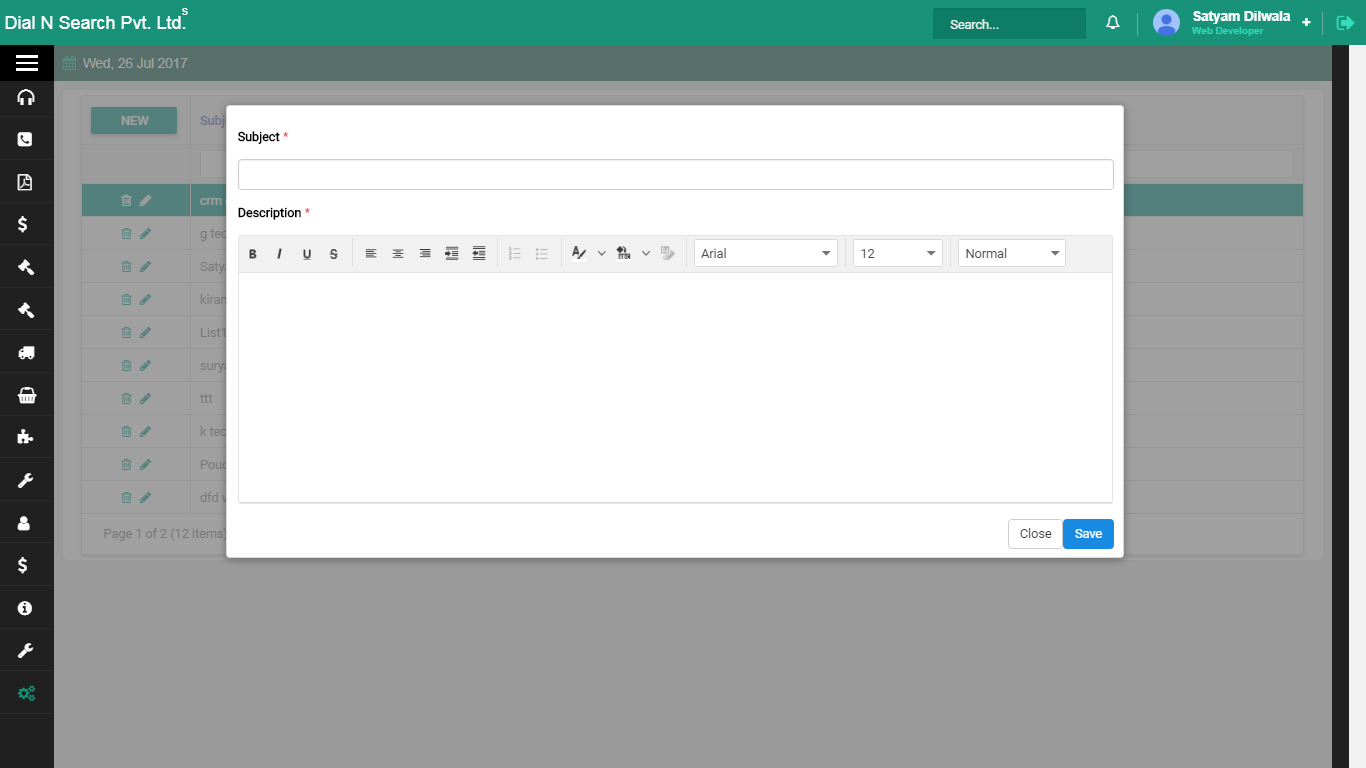
New email campaign: subject for bulk mail to organisations.
![New Email Campaign]()
Campaign description: the body of the mail you will send.
![Email Campaign Description]()
Employees
People who log in and do the work: new employee, list, group, shift and product request. Groups are also where user rights are set (see User rights). Tickets and installation assignment pick from this list.
Who uses it. The owner or HR-admin. Engineers appear here so they can be assigned.
Example. You hire Ramesh as a service engineer for the Pune belt. Add him as an employee, put him in the Service group, then you can assign Hotel Sagar’s ticket to him. If he is not in the list, assignment has nobody to pick.
- How to add an employee
-
Add the person who will log in and do the work, so tickets and installation can be assigned to them.
Tickets, installation assignment and user rights all pick from Employees. If the engineer is not in this list, assignment has nobody to choose. Put them in a group so rights match their role. Example: add Ramesh as a service engineer for the Pune belt, then assign Hotel Sagar’s ticket to him.
Short video: adding an employee.
On Employees:
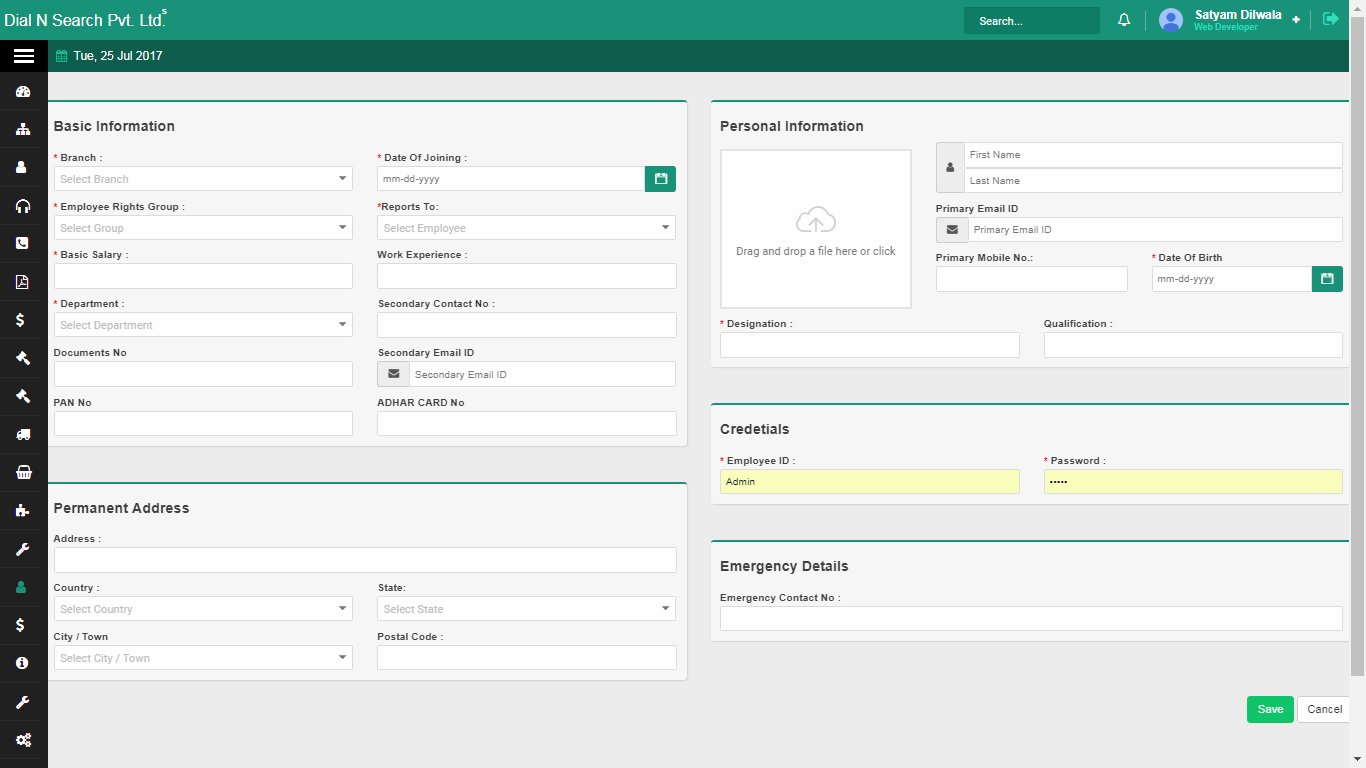
- Click Employee → New Employee.
- Fill the fields as shown, then click Save.
New employee form: name and details for the person who will be assigned work.
![Empl]()
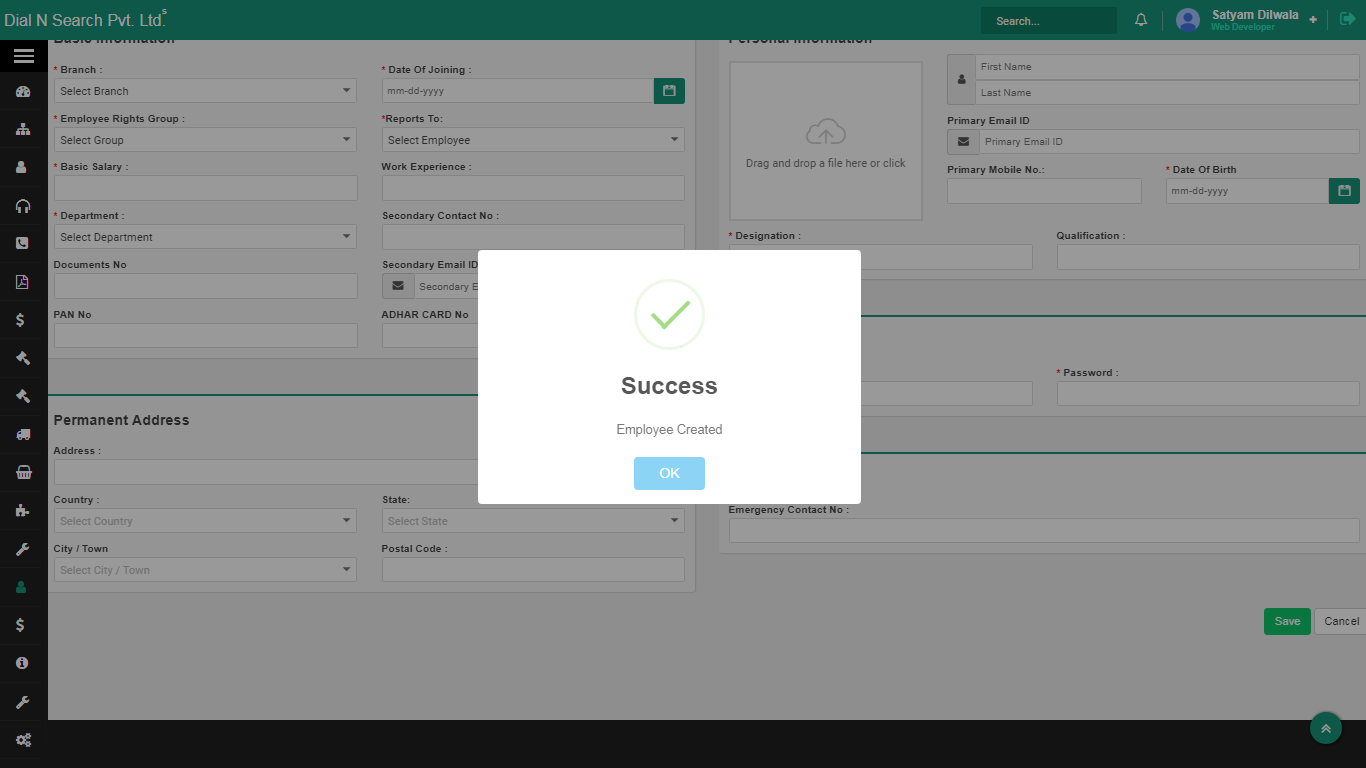
Saved employee: they now appear in assignment dropdowns.
![Empl2]()
Tip. After Save, add them to an employee group (see User rights) so they can log in with the right menus.
- How to view employees
-
See everyone already under this login, then open one person for their full record.
The employee list is who can be assigned a ticket, a visit or a project. Open a name when you need mobile, group or shift. If someone is missing here, they cannot appear in Assigned Engineer.
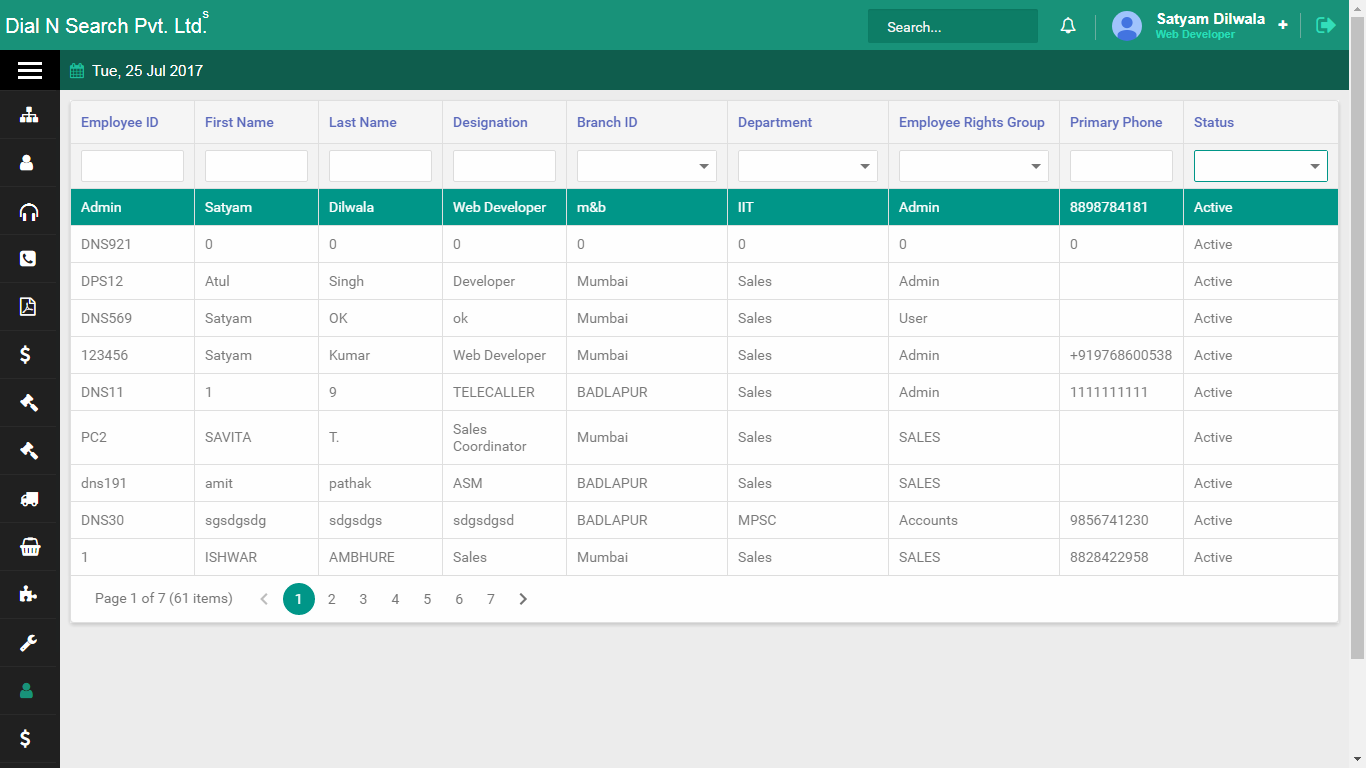
To open the list:
- Click Employee → Employee List.
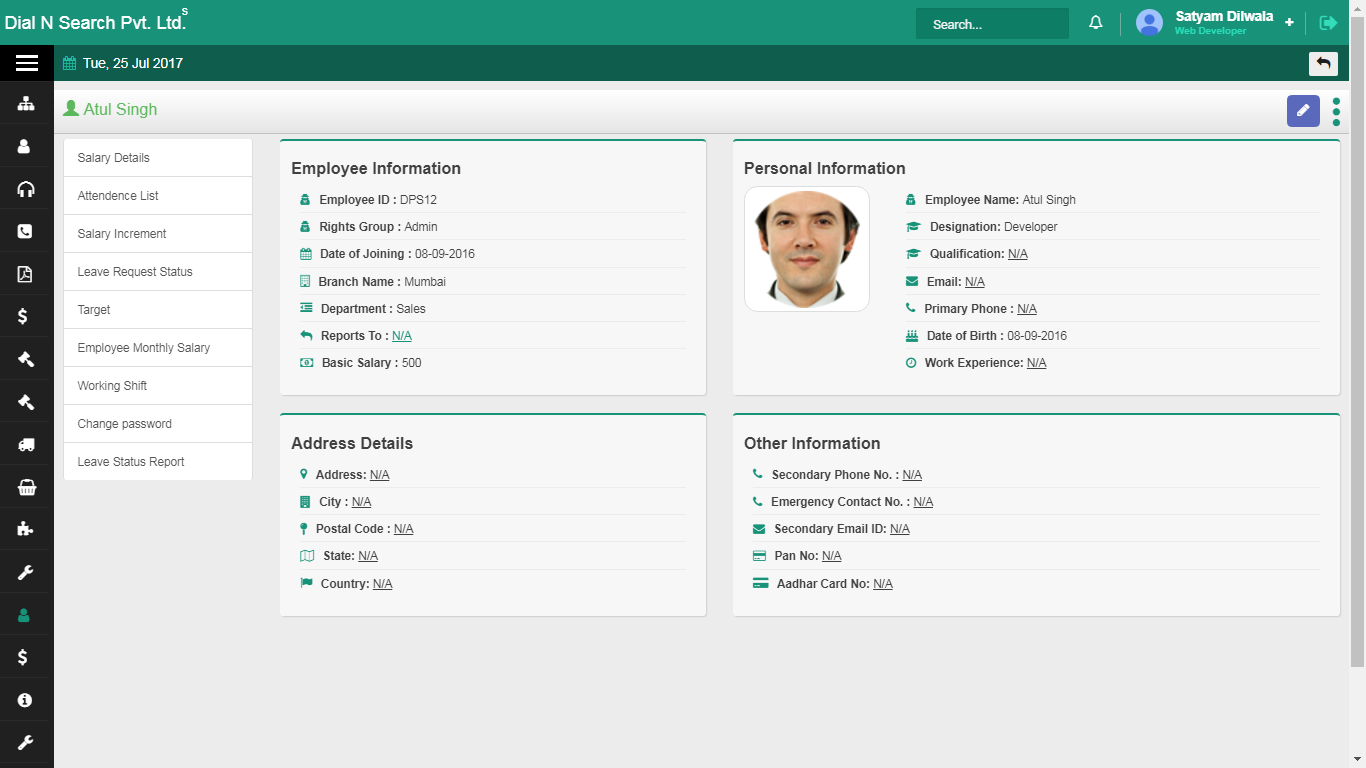
- Click the employee name for the detailed record.
Employee list: people who can be assigned work.
![Empl list]()
Employee detail: full record after you click the name.
![Emplist2]()
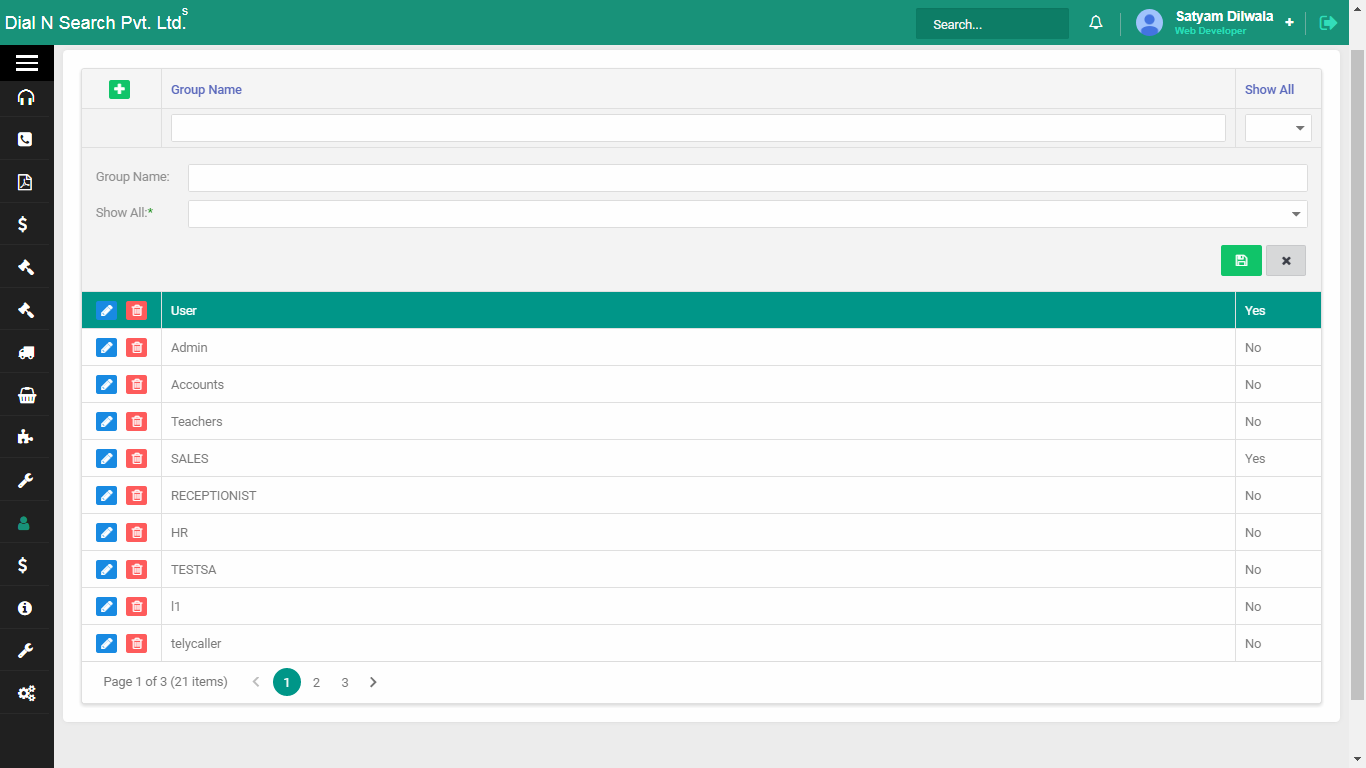
- How to add an employee group
-
Create a group (Sales, Service, Accounts) so several employees share the same menus and rights.
User rights are set on the group, not on each person one by one. Add “Service” as a group, put engineers in it, then tick what that group can see under User rights. Without a group, rights have nowhere to hang.
On Employees:
- Click Employee → Employee group.
- Click the + icon, enter the group name, then click Save.
Employee group: add a group name with +, then Save.
![Empl grp]()
Tip. After the group exists, set what it can do under User rights.
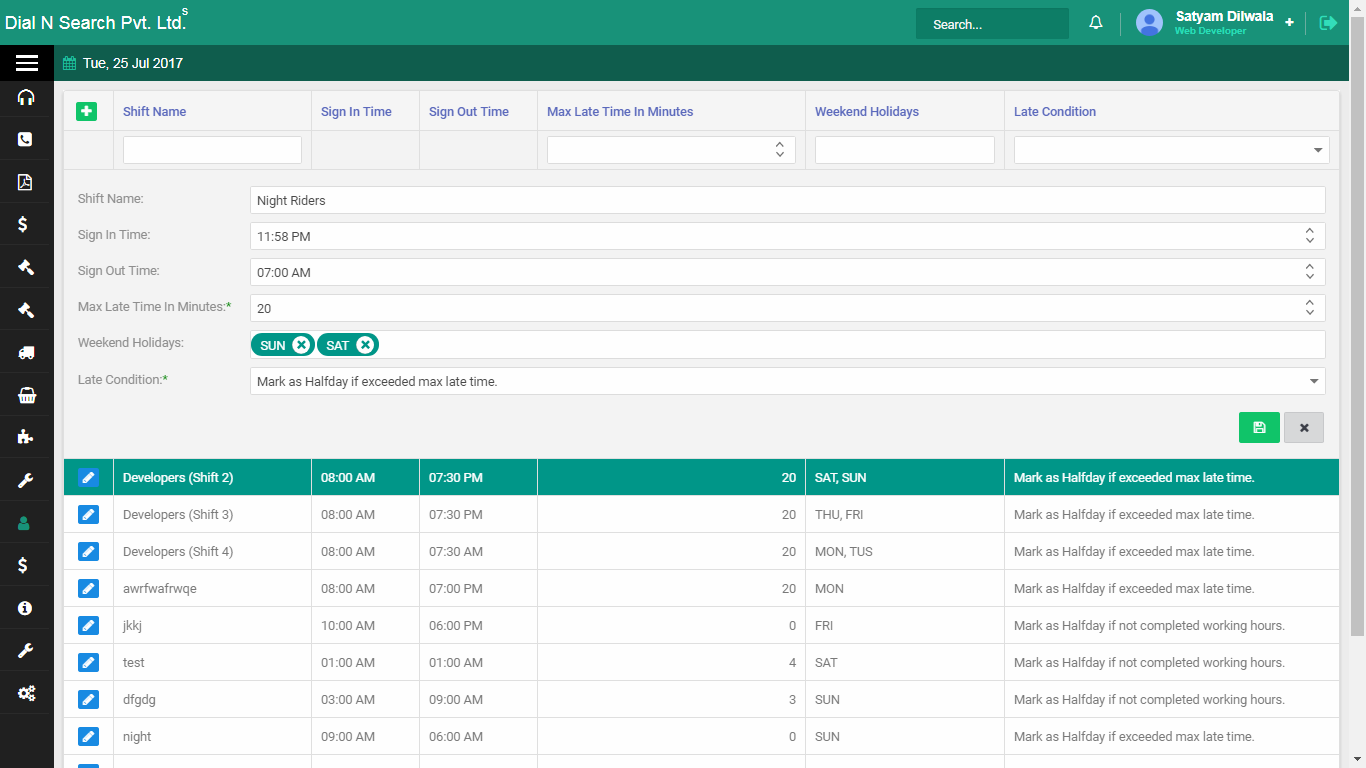
- How to set an employee shift
-
Set when an employee is expected to work, so shift is on their record.
Shifts are for attendance-style timing, not for assigning a ticket. Fill the shift screen for the person, then Save. Service still assigns jobs from Tickets or upcoming visits.
On Employees:
- Click Employee → Employee shift.
- Fill the fields as shown, then click Save.
Employee shift: timing fields, then Save.
![Emp shift]()
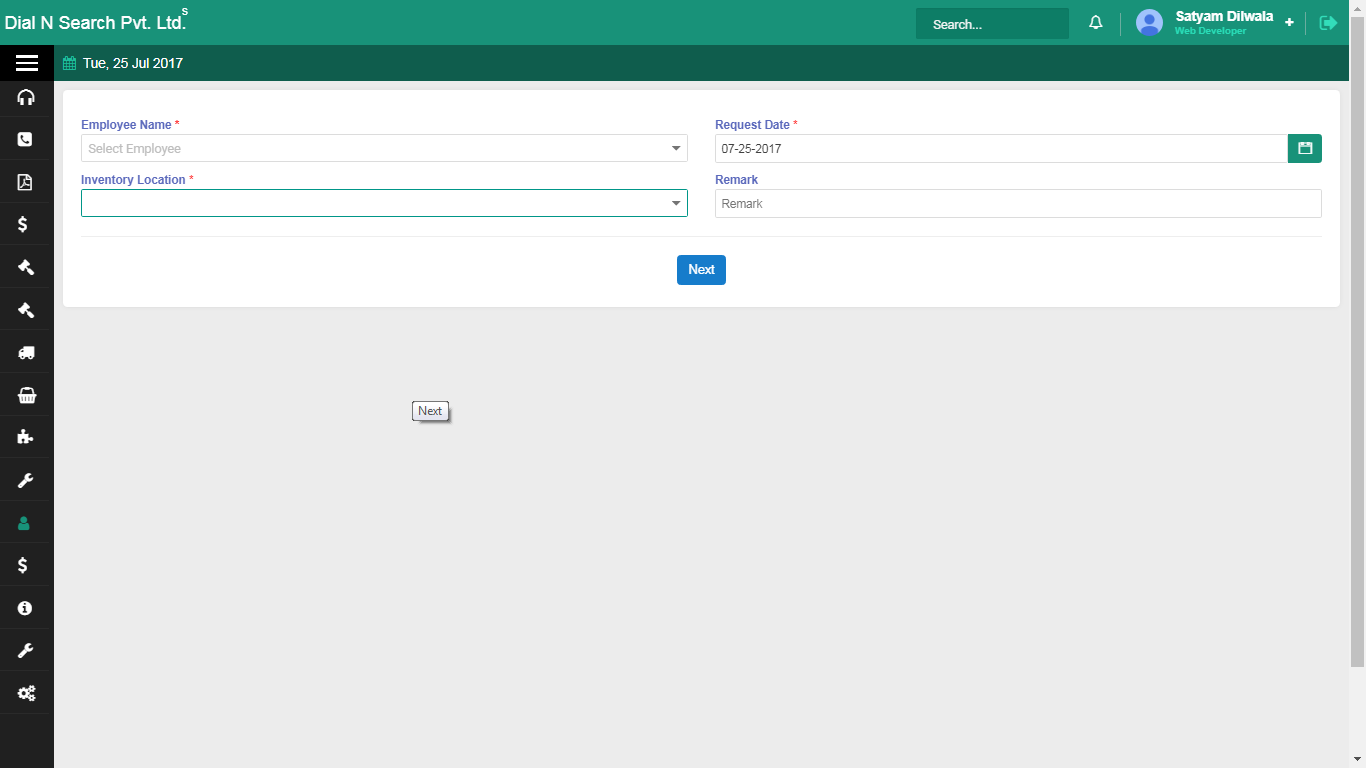
- How to add a product request
-
Ask for a product from stock as an employee, so the request is on record before stores issue it.
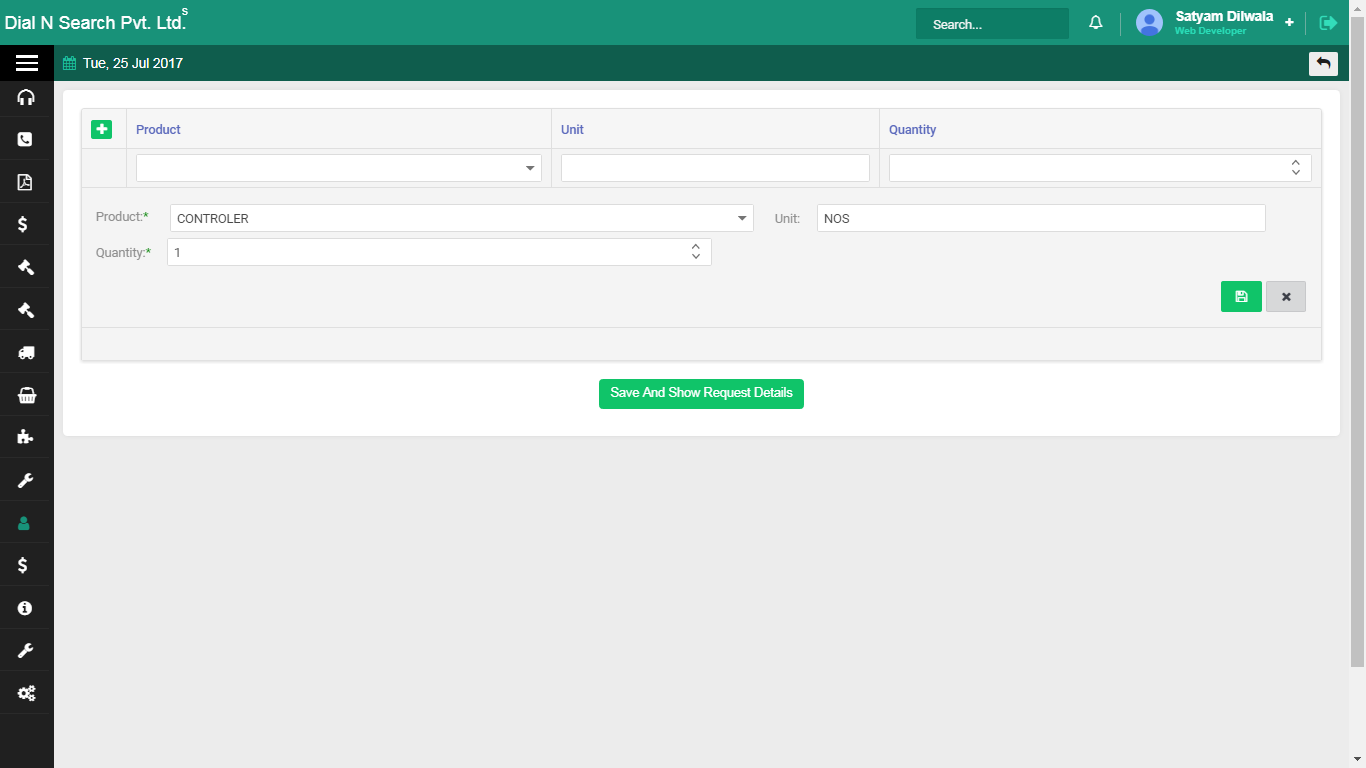
A product request is an employee asking for material, not a customer quotation and not a purchase order to a vendor. Field staff use it when they need an item for a job. Fill the header, click Next, then complete the lines and Save and show details.
On Employees:
- Click Employee → New Product Request.
- Fill the fields as shown, then click Next.
- Fill the line details as shown, then click Save and show details.
New product request header: fill fields, then Next.
![New prod req]()
Product request lines: complete details, then Save and show details.
![New prod req1]()
Saved product request: the ask is on the employee record.
![New prod req2]()
Expenses
Money spent on the job, recorded against the organisation: raise an expense request, then issue it. Open the company, go to Accounts, then Expense Request. This is not a purchase bill from a vendor.
Who uses it. Field staff claim. Accounts issues.
Example. Ramesh travelled to Aurangabad for the Hotel Sagar ticket. He adds an expense request on that organisation; accounts expands the row and issues the amount. The claim sits on the customer record, not in a private spreadsheet.
- How to add and issue an expense
-
Record money spent on a job against the customer’s organisation, then issue it when accounts approves.
An expense request is not a vendor purchase bill. Field staff claim travel or site cost on the company they visited. Accounts expands the row and issues the amount. Example: Ramesh travelled to Aurangabad for the Hotel Sagar ticket; the claim sits on that organisation, not in a private spreadsheet.
To add an expense:
- Open the company.
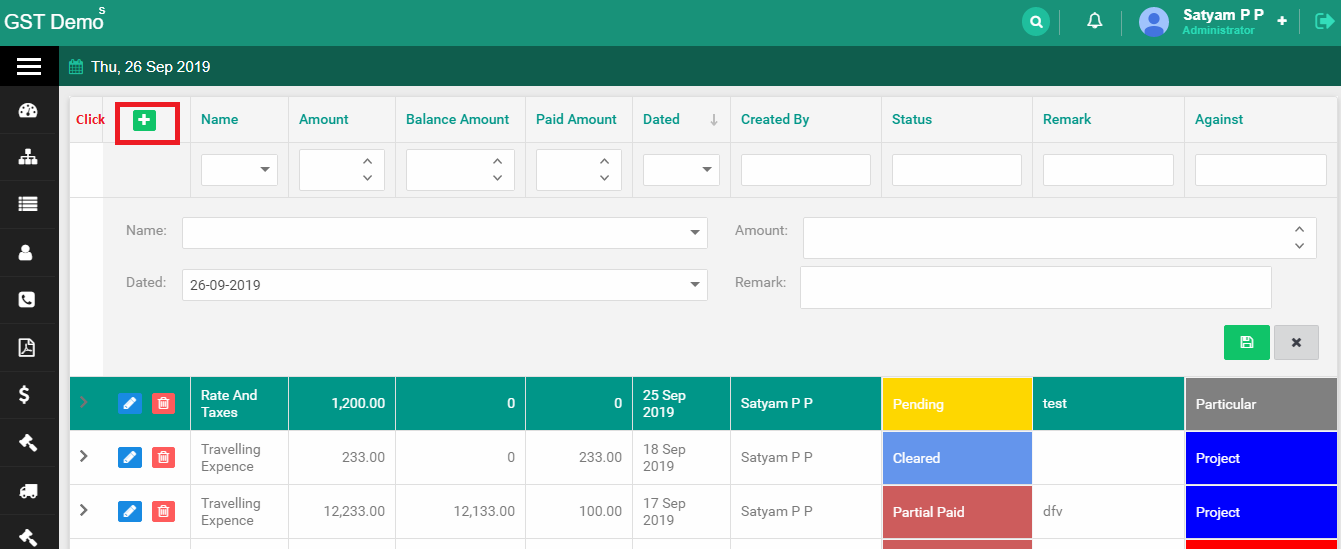
- Click Accounts → Expense Request.
- Click +, fill the fields, then click Save.
Expense request: add a claim on the organisation with +.
![AddExpanse]()
To issue expenses:
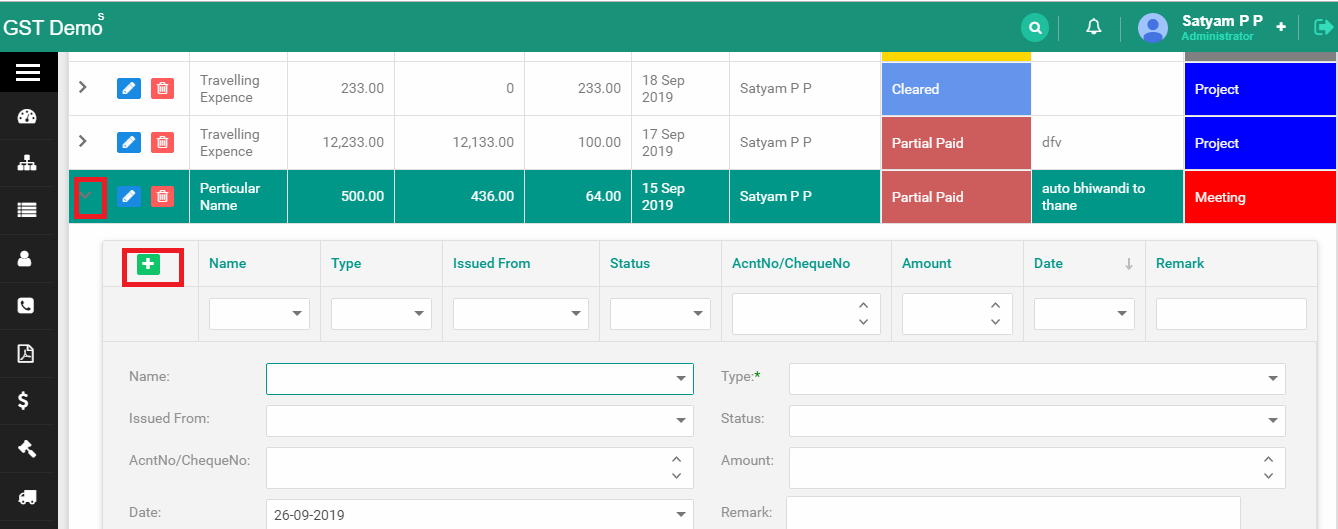
- Click the arrow to expand the row.
- Click +, fill the issue fields, then click Save.
Issue expense: expand the row, add the issued amount, Save.
![IssueExpanse]()
Reports
Operational lists you work from day to day: unassigned installations, warranty products, meetings, invoices, challans, tickets, stock and collections. These are working lists, not the printable MIS pack.
Who uses it. Service head (assign engineer), sales (meetings), accounts (overdue and collections).
Example. Monday morning the service head opens Assign Installation Engineer, ticks the hotel jobs with no engineer, picks Ramesh and the date, then Transfer. That is this tab. For a CA printout, use MIS instead.
- How to assign an installation engineer
-
Give an unassigned installation to an engineer, with a date, so someone owns commissioning.
This Reports list is the Monday-morning queue: sold products still waiting for an installer. Tick the hotel jobs with no engineer, pick Ramesh and the date, then Transfer. It is not the Pending Installations screen under Maintenance, and it is not an MIS printout.
On Reports:
- Open Reports and tick the checkbox on the row you want to assign.
- Click Assigned Engineer.
- Select the engineer name and the installation date, then click Transfer.
Assign installation engineer: tick the job, then Assigned Engineer.
![Assig engi1]()
Engineer assigned after Transfer.
![Assig engi3]()
- How to view products in warranty (Reports)
-
See products still in the warranty period from Reports, as a working list for service.
Warranty Period Product is the Reports view of what Maintenance also lists. Use it when the service head is scanning warranty, not converting to AMC (that convert lives under Maintenance). Click a row for the detailed view.
To open the list:
- Click Reports → Warranty Period Product.
- Click a row for the detailed view.
- How to view maintenance services
-
See maintenance services from Reports, so the service desk has a working list of contract work.
This is the Reports pile for maintenance services, not the printable MIS pack. Open a row when you need the detail. Planned visits also live under Maintenance and Contracts; this list is for scanning.
To open the list:
- Click Reports → Maintenance Services.
- Click a row for the detailed view.
- How to view service-engineer visits
-
See service-engineer visits and update travel, visited and remarks on the same list.
Services Engineers in Reports is where the coordinator records whether the engineer went. Click a field, update travel allowance, visited and remarks, then Save. This is a working list, not a new ticket.
On Reports:
- Click Reports → Services Engineers.
- The list of service-engineer visits appears.
- Click a field, update travel allowance, visited and remarks if any, then click Save.
Service-engineer visits: update travel, visited and remarks, then Save.
![Service eng]()
- How to view AMC products
-
See products already on AMC from Reports, so you know which machines are on paid maintenance.
AMC Product List is the Reports scan of products in AMC. Converting warranty to AMC is under Maintenance. Use this list when accounts or service asks “is this on AMC?”
To open the list:
- Click Reports → AMC Product List.
- How to view the enquiry list
-
See all enquiries from Reports — the same pipeline, as a working list rather than the Enquiry module.
Reports → Enquiry List is for scanning and follow-up across the company. Creating an enquiry still starts from the organisation. Use the Enquiry tab to add; use this list to review.
To open the list:
- Click Reports → Enquiry List.
- How to view service enquiries (Reports)
-
See service enquiries from Reports, so the service desk is not mixing hardware leads.
Same split as the Enquiry module: service vs product. This is the Reports working list. Open Enquiry → Service Enquiry to work a row in the module; open this to scan.
To open the list:
- Click Reports → Service Enquiry.
- How to view product enquiries
-
See product enquiries from Reports, so sales can scan hardware leads in one list.
Products Enquiry under Reports is the working list of “someone asked for goods”. Adding still happens from the organisation. Use this on Monday to see what is still open.
To open the list:
- Click Reports → Products Enquiry.
- How to view why an enquiry was lost
-
See why enquiries were lost, grouped by the reason you stored in Masters.
Enquiry by Lost Reason is for the owner: price, competitor, not interested. Reasons must exist in Masters first. This does not create a new enquiry; it shows ones already marked lost.
To open the list:
- Click Reports → Enquiry by Lost Reason.
- How to view meetings
-
See meetings logged on organisations, then double-click one to update it.
Meetings are scheduled from the organisation detail (icon next to the bell). This Reports list is every meeting in one place. Double-click a row to edit. It is not a ticket and not a quotation.
To open the list:
- Click Reports → Meetings.
- Double-click a meeting to update or edit it.
Meetings report: double-click a row to edit.
![Meetings]()
- How to view comments
-
See comments posted on records, so the last note is not buried inside one organisation.
Comments are typed on the organisation (and similar) detail, then Post. This Reports list is the cross-company view. Use it when you need “what did we last say?” without opening every company.
To open the list:
- Click Reports → Comments.
- How to view quotations (Reports)
-
See quotations from Reports as a working list, then open a row for the full offer.
This is not MIS Quotation List Report (print/export). Reports → Quotations is for sales to scan open offers. Create still from the organisation or enquiry.
To open the list:
- Click Reports → Quotations.
- Click a row for the detailed view.
- How to view invoices (Reports)
-
See invoices from Reports so accounts can scan billed documents without opening MIS.
Reports → Invoices is the working list. Overdue has its own report. For a CA Excel file, use MIS Invoice List Report instead.
To open the list:
- Click Reports → Invoices.
- How to view sales orders (Reports)
-
See sales orders from Reports: committed supply, not quotes and not bills.
Use this when operations asks what is committed. Creating a sales order is still from the organisation. Click a row for detail.
To open the list:
- Click Reports → Sales Order.
- Click a row for the detailed view.
- How to issue a work order
-
See issued work orders from Reports, so the floor can scan jobs without the Work Order module.
Issue Work Order under Reports is the working list of work slips already issued. Creating one is still from the organisation’s three-dot menu.
To open the list:
- Click Reports → Issue Work Order.
- Click a row for the detailed view.
- How to view overdue invoices
-
See invoices past due, so collections start from a list instead of memory.
Overdue Invoices is what the Dashboard overdue tile is counting. Open a row to follow up. This is a working list; MIS is the print/export pack.
To open the list:
- Click Reports → Overdue Invoices.
- Click a row for the detailed view.
- How to view stock requests
-
See stock requests from Reports, so stores can scan asks across jobs.
Request List under Reports is the working view of requested stock. Project → Request List is the project module. Approve still happens under Project → Request approve stock.
To open the list:
- Click Reports → Request List.
- Click a row for the detailed view.
- Purchase Order
-
See purchase orders from Reports: what you asked vendors to supply.
This is the working PO list, not a GRN. Creating a PO is from the vendor organisation. Click a row for detail, then convert to purchase bill from the PO screen when the vendor invoice arrives.
To open the list:
- Click Reports → Purchase Orders.
- Click a row for the detailed view.
- How to view challans (Reports)
-
See delivery challans from Reports, so dispatch can scan what left the store.
Reports → Challan is the working list of goods out. Creating a challan is from the organisation. Status (pending, out, delivered) is on the challan itself.
To open the list:
- Click Reports → Challan.
- Click a row for the detailed view.
- How to view purchase bills (Reports)
-
See purchase bills from Reports: vendor invoices already entered.
This is buying, not customer tax invoices. Create from Purchase or by converting a PO. Use this list to scan what vendors have billed.
To open the list:
- Click Reports → Purchase Bill.
- Click a row for the detailed view.
- How to view invoices against C form
-
See invoices tagged against C form, when that document type is in use.
Invoice against c form is a Reports filter for that paper trail. Open a row for detail. If you do not use C forms, this list may be empty — that is expected.
To open the list:
- Click Reports → Invoice against c form.
- Click a row for the detailed view.
- How to view invoice products
-
See product lines billed on invoices, so you can scan what was sold as goods.
Invoice Product is line-level, not the invoice header list. Use it when you need “which products went on bills”, then click a row for detail.
To open the list:
- Click Reports → Invoice Product.
- Click a row for the detailed view.
- How to view invoice services
-
See service lines billed on invoices, so installation and other work on bills is visible.
Invoice services is the service-line counterpart of Invoice Product. Header invoices are under Reports → Invoices.
To open the list:
- Click Reports → Invoice services.
- Click a row for the detailed view.
- How to view purchase-bill products
-
See product lines on purchase bills, so you know what you bought as goods.
Purchase Bill Product is vendor-side product lines. The header list is Reports → Purchase Bill. This is not a GRN.
To open the list:
- Click Reports → Purchase Bill Product.
- How to view purchase-bill services
-
See service lines on purchase bills, so bought services are not mixed with goods.
Purchase Bill services is the vendor service-line list. Use it next to Purchase Bill Product when accounts is reconciling a vendor invoice.
To open the list:
- Click Reports → Purchase Bill services.
- Project
-
See projects from Reports, then open one for the site job detail.
Reports → Project is the working list of site jobs. Creating a project is from the organisation. BOM and stock requests also have their own Project menus.
To open the list:
- Click Reports → Project.
- Click a row for the detailed view.
- How to view contracts (Reports)
-
See service contracts from Reports, so planned AMC work is in one scan list.
Reports → Contracts is not a breakdown ticket list. Creating a contract is from the company. Upcoming visits for assignment are under the Contracts tab.
To open the list:
- Click Reports → Contracts.
- Click a row for the detailed view.
- Ticket
-
See tickets from Reports: complaints already raised, as a working list.
Reports → Tickets is for the service head to scan. Raising a ticket is from the organisation. Assigning is Ticket → Assign Ticket visit (and also Reports assign lists below).
To open the list:
- Click Reports → Tickets.
- Click a row for the detailed view.
- Received Cheque
-
See cheques received, so collections can track incoming paper.
Received cheque is a Reports working list for money in as cheque. It is not the MIS Cheque & Cash Receipt printout. Use MIS when you need to export for the CA.
To open the list:
- Click Reports → Received cheque.
- Issued Cheque
-
See cheques you have issued, so outgoing paper is on a list.
Issued cheque is money out as cheque, not vendor purchase bills. Use it when accounts asks what cheques have gone. MIS is the printable pack.
To open the list:
- Click Reports → Issued cheque.
- Assign Ticket
-
See tickets already assigned, so you know which engineer owns which complaint.
Assign Ticket under Reports is the assigned pile. Doing the transfer is Ticket → Assign Ticket visit (tick, Assigned Engineer, Transfer). Open a row here to read the detail.
To open the list:
- Click Reports → Assign Ticket.
- Click a row for the detailed view.
- Assign Ticket visit
-
See visits on assigned tickets, so the service desk can track who went after assignment.
Assign Ticket visit under Reports is the visit side of assigned complaints. The same menu name is used when you assign from Tickets. Click a row for detail.
To open the list:
- Click Reports → Assign Ticket visit.
- Click a row for the detailed view.
- How to view ticket visits
-
See ticket visits, so complaint site visits are in one list.
Ticket visit is the Reports list of visits against tickets (breakdowns), not AMC planned visits under Maintenance. Click a row for detail.
To open the list:
- Click Reports → Ticket visit.
- Click a row for the detailed view.
- How to view stock
-
See stock from Reports, so stores can scan quantity without the Dashboard tile alone.
Reports → Stock is the working stock list. Dashboard also shows a stock summary. Project stock is under Projects. Click a row for detail.
To open the list:
- Click Reports → Stock.
- Click a row for the detailed view.
- How to view collection statements
-
See collection statements, so accounts can follow what was collected.
Collection statement is a Reports working list for collections. Overdue Invoices is who still owes. MIS is what you print for the CA.
To open the list:
- Click Reports → Collection statement.
- How to view statements
-
See statements from Reports, as the working statement list.
Statement under Reports is the operational list. Use it day to day. For a printable export, open the matching MIS report if you need Excel or PDF.
To open the list:
- Click Reports → Statement.
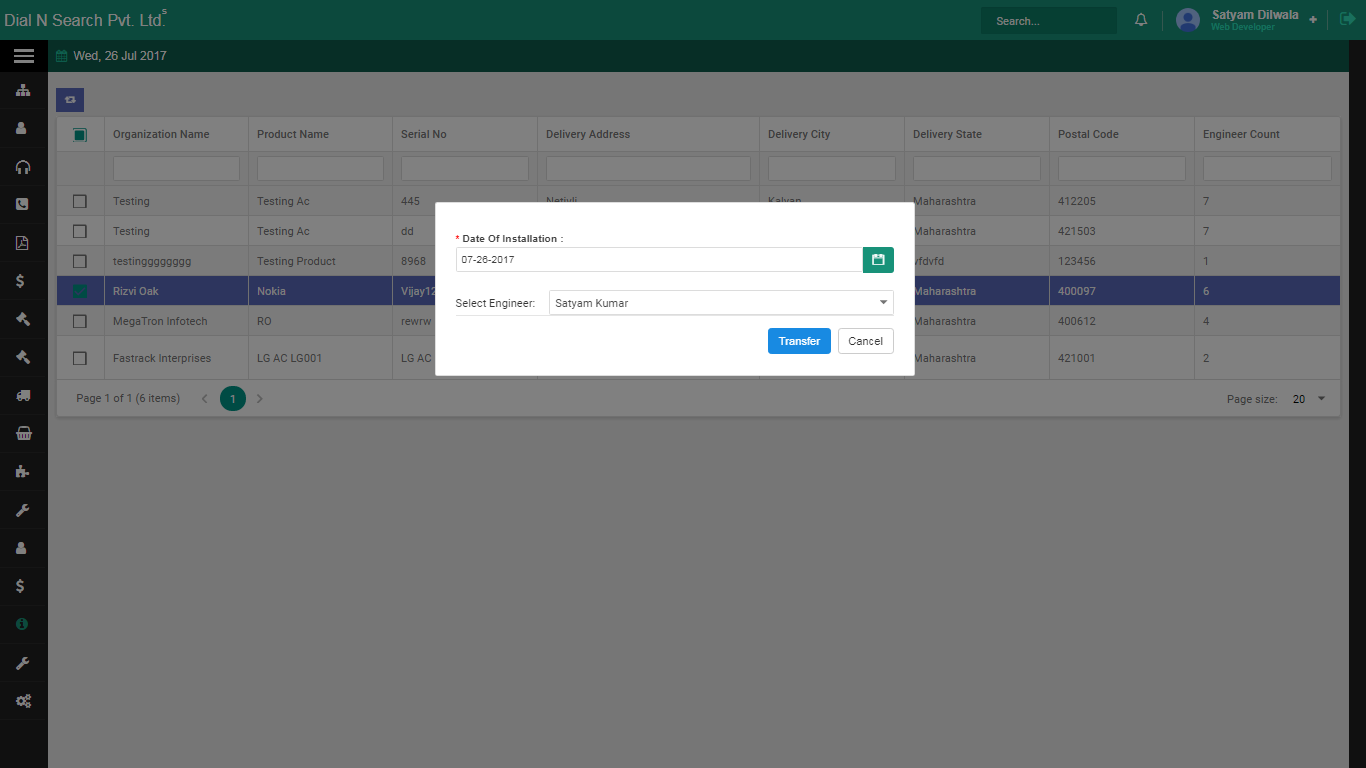
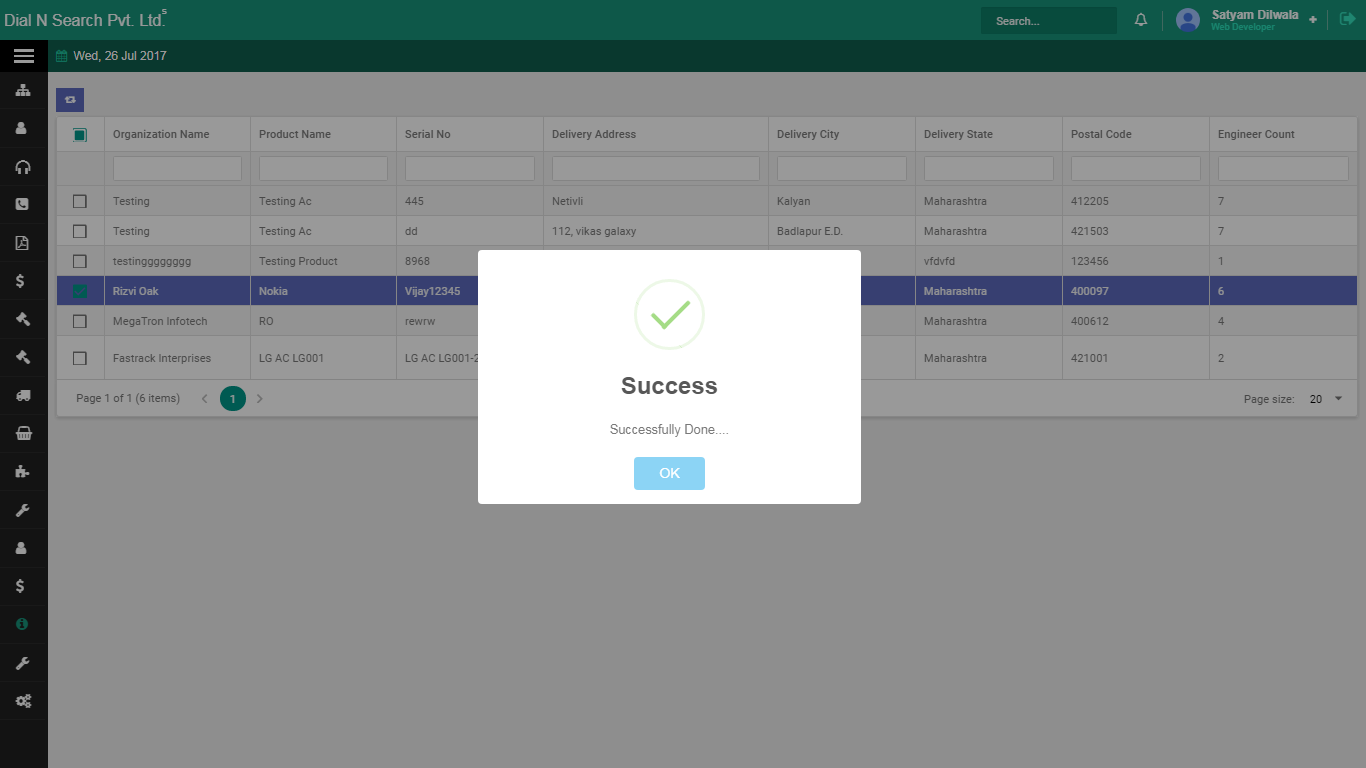
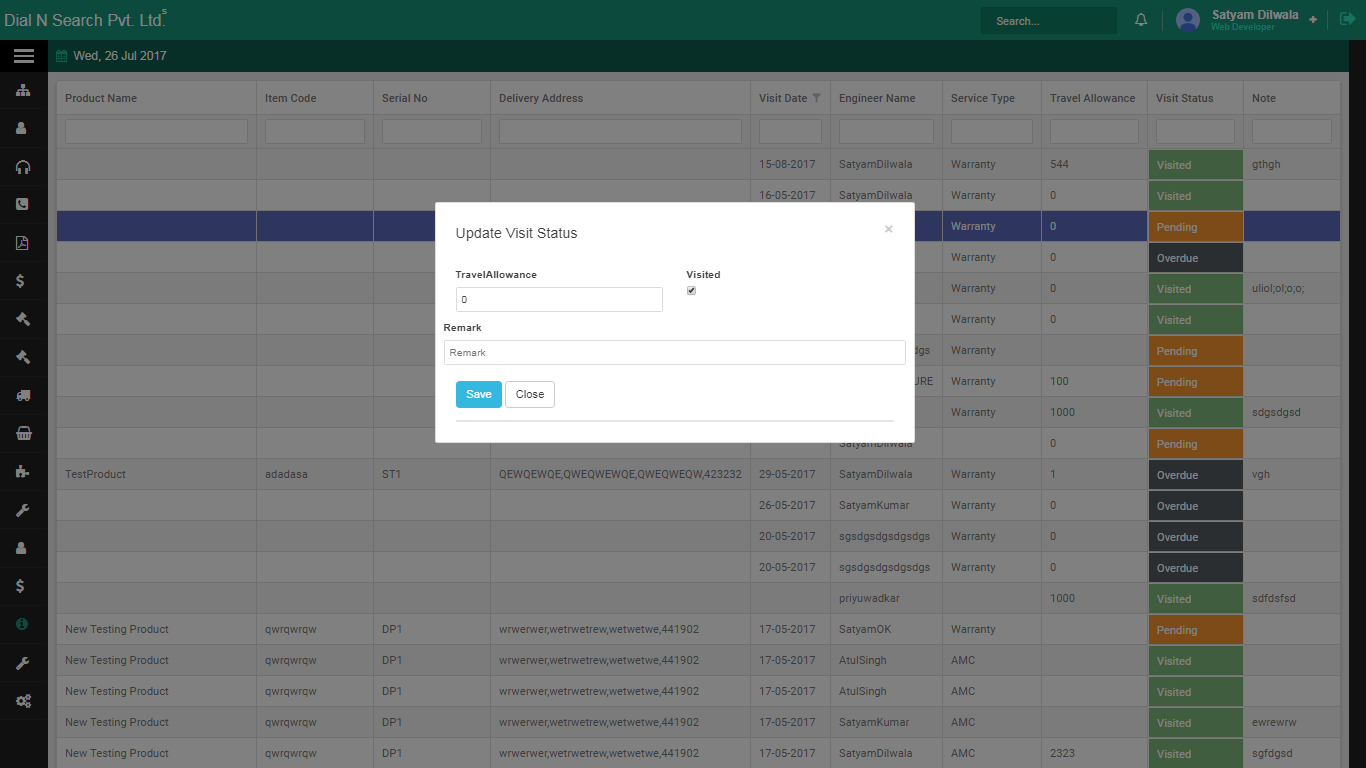
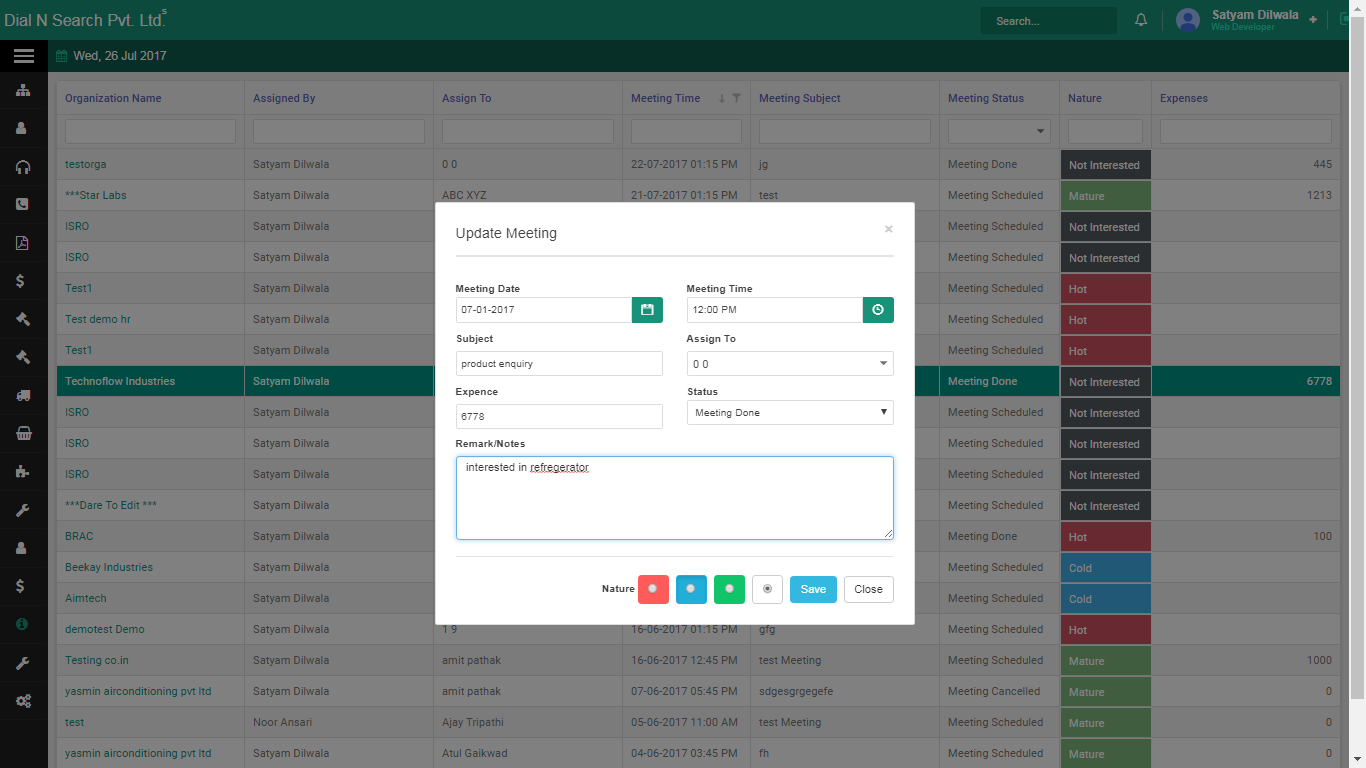
MIS
Printable and exportable reports: invoice list, quotation list, proforma, rental, complaints by model. The toolbar is search, print, print this page, and export (Excel, PDF and other formats). This is for the file you hand to a CA or a bank, not for assigning an engineer.
Who uses it. Accounts and the owner at month-end.
Example. Your CA asks for the month’s tax invoices. Open Invoice List Report, set the period, export. Complaints by model is a bar graph if you want to see which model is failing, not a ticket screen.
- How to open the invoice list report
-
Open the printable invoice list for a period, then search, print or export for the CA or bank.
MIS is the file you hand over, not the screen where you assign an engineer. Invoice List Report is tax invoices as a report. Set the period, then use the toolbar. Filename on disk is Inoice List report — the path is unchanged.
To open the report:
- Click MIS → Invoice List Report.
From the highlighted toolbar you can:
- Open search.
- Print the report.
- Print the current page.
- Export the report (Excel, PDF and other formats).
Invoice list report: search, print and export on the highlighted toolbar.
![Inoice List report]()
- How to open the quotation list report
-
Open the printable quotation list, then search, print or export offers for a period.
This is MIS, not Reports → Quotations. Use it at month-end when you need Excel or PDF of quotes. The toolbar is the same pattern as other MIS reports.
To open the report:
- Click MIS → Quotation List Report.
From the highlighted toolbar you can:
- Open search.
- Print the report.
- Print the current page.
- Export the report (Excel, PDF and other formats).
Quotation list report: search, print and export on the toolbar.
![Quotation list rep]()
- How to open the proforma invoice list report
-
Open the printable proforma list, then search, print or export advance documents.
Proforma Invoice list Report is MIS for proformas, not the Invoice module list. Filename on disk is Performa inoice list report — the path is unchanged. Use the toolbar to export.
To open the report:
- Click MIS → Proforma Invoice list Report.
From the highlighted toolbar you can:
- Open search.
- Print the report.
- Print the current page.
- Export the report (Excel, PDF and other formats).
Proforma invoice list report: search, print and export.
![Performa inoice list report]()
- How to open cheque and cash receipts
-
Open cheque and cash receipts in MIS when you need the receipt report, not the day-to-day Reports list.
Cheque & Cash Receipt is the printable/exportable view of receipts. Reports → Received cheque is the working list. Use MIS when the CA or bank asks for a file.
To open the report:
- Click MIS → Cheque & Cash Receipt.
- How to open rental details
-
Open rental details in MIS, then search, print or export that report.
Rental details is an MIS report for rental records in the system. Use the toolbar like other MIS reports. It is not a new quotation and not a ticket.
To open the report:
- Click MIS → Rental details.
From the highlighted toolbar you can:
- Open search.
- Print the report.
- Print the current page.
- Export the report (Excel, PDF and other formats).
Rental details report: search, print and export on the toolbar.
![Rental]()
- How to view complaints by model number
-
See complaints by product model as a bar graph, so you know which model is failing.
Complaint by Model no. is MIS, not the ticket screen. The graph answers “which model generates complaints?” — it does not assign an engineer. Use the toolbar to search, print or export.
To open the report:
- Click MIS → Complaint by Model no..
From the highlighted toolbar you can:
- Open search.
- Print the report.
- Print the current page.
- Export the report (Excel, PDF and other formats).
Complaints by model: bar graph, with search, print and export on the toolbar.
![Compl model no]()
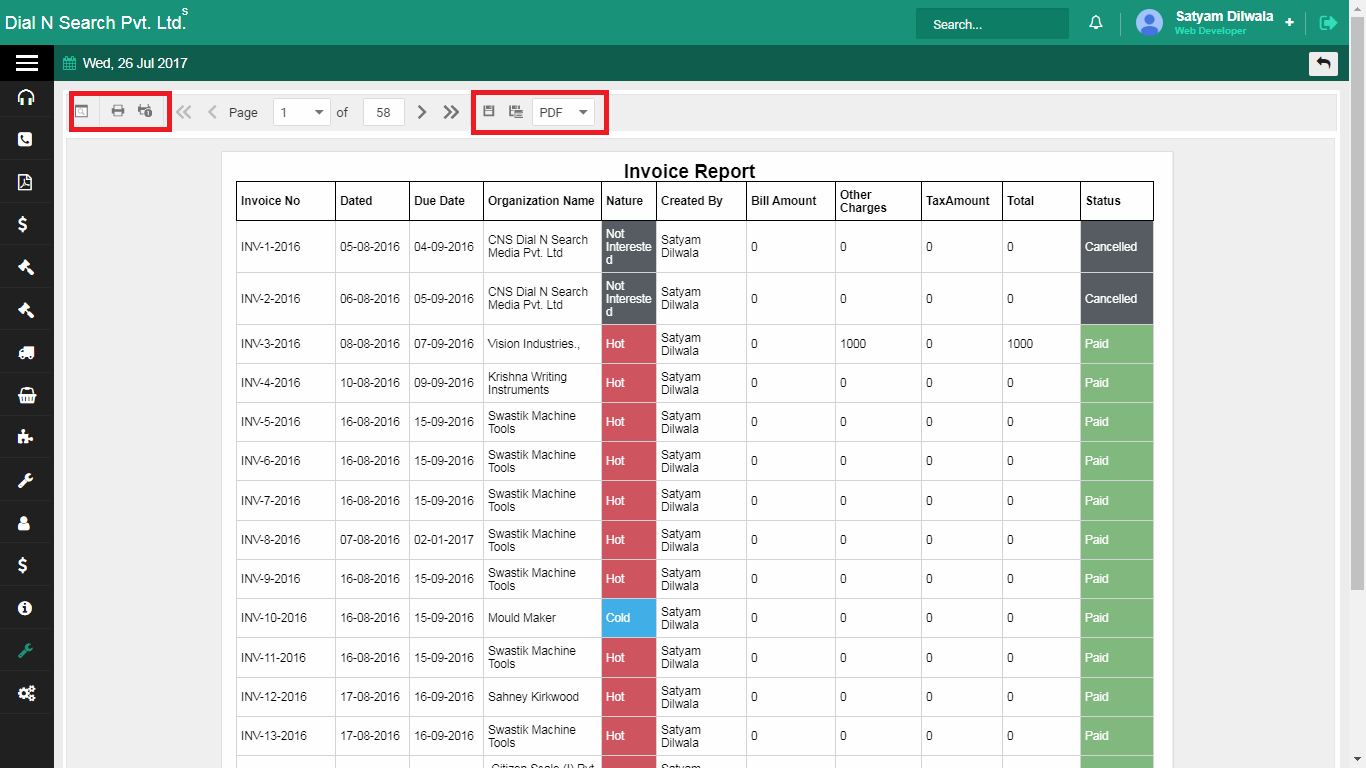
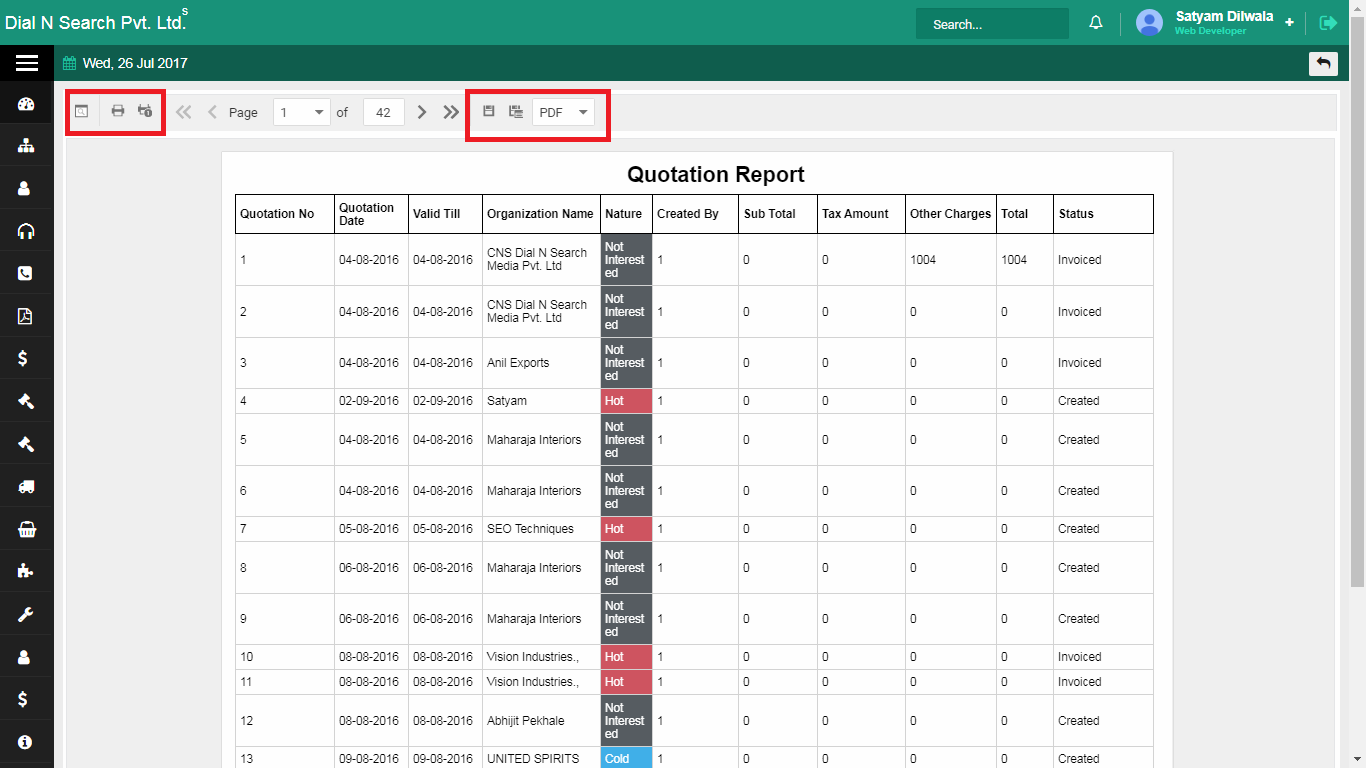
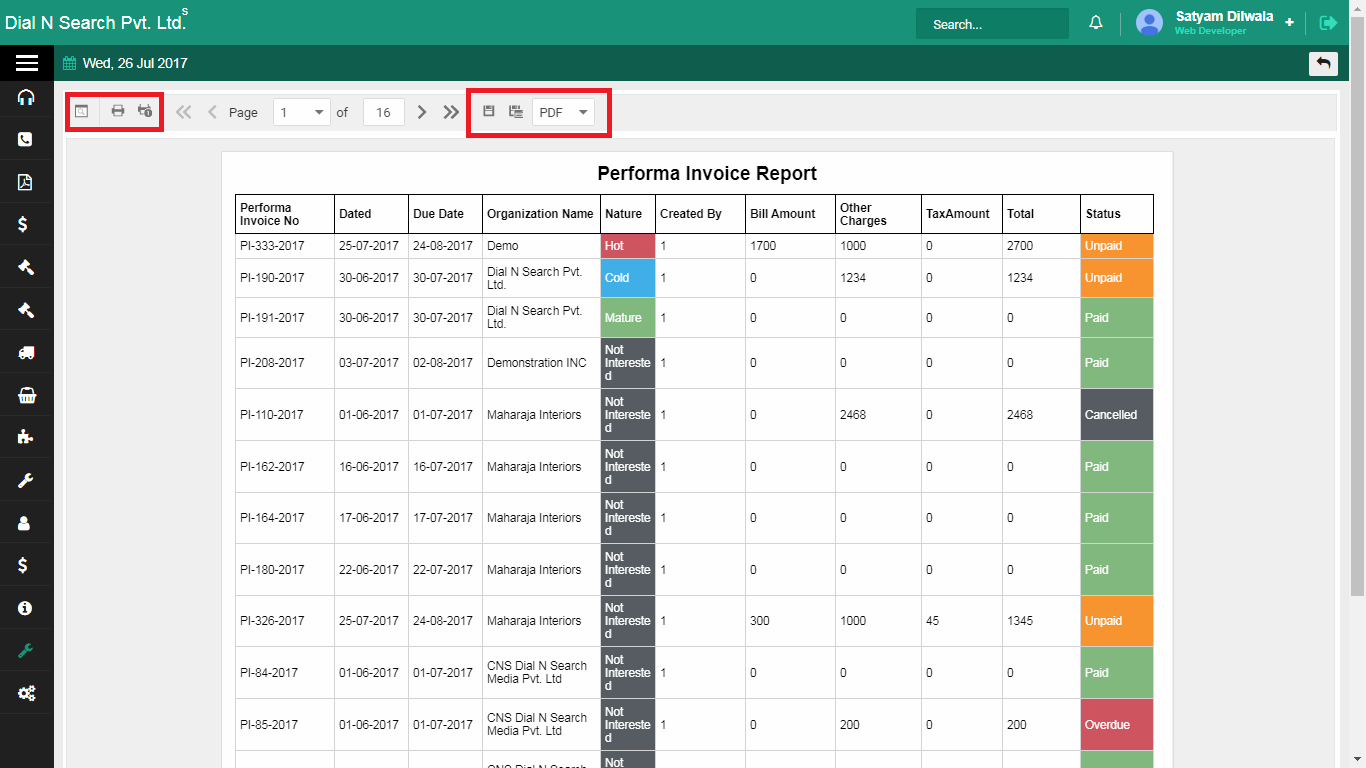
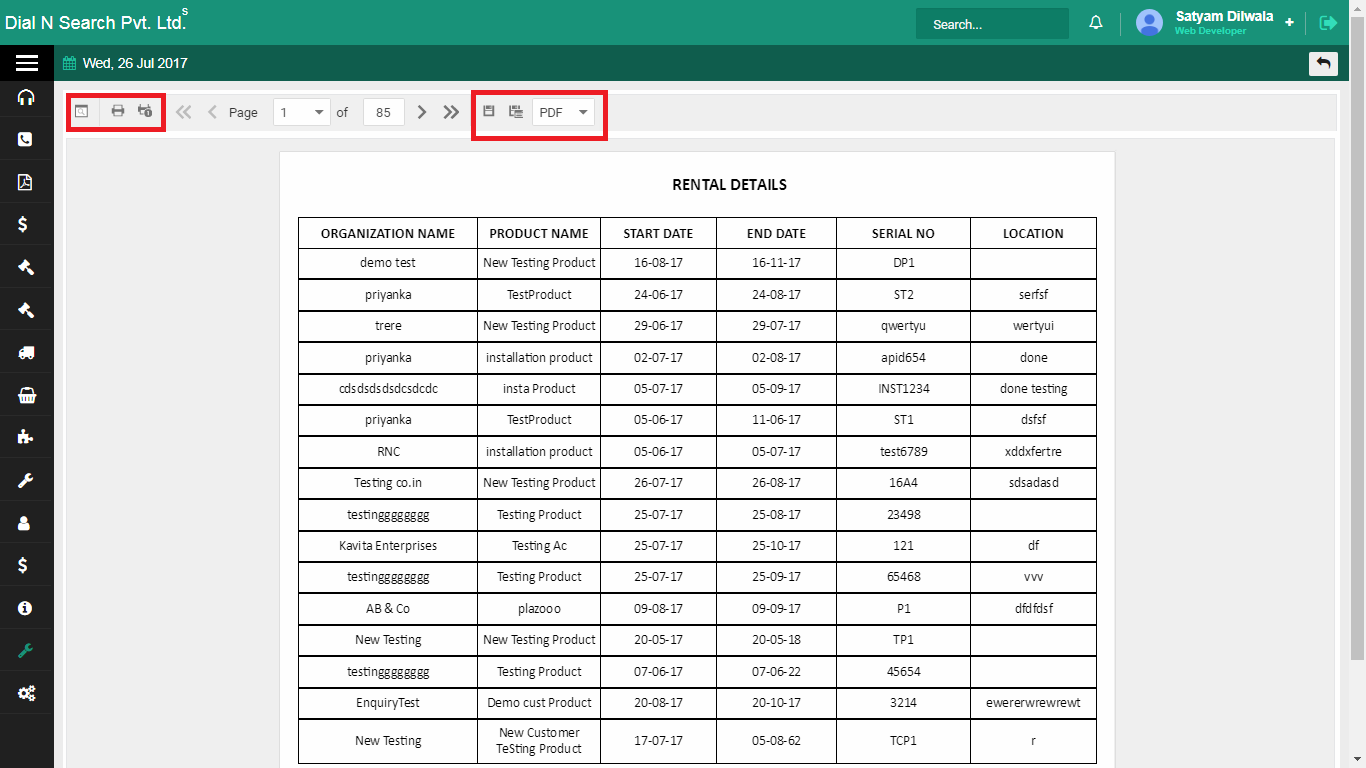
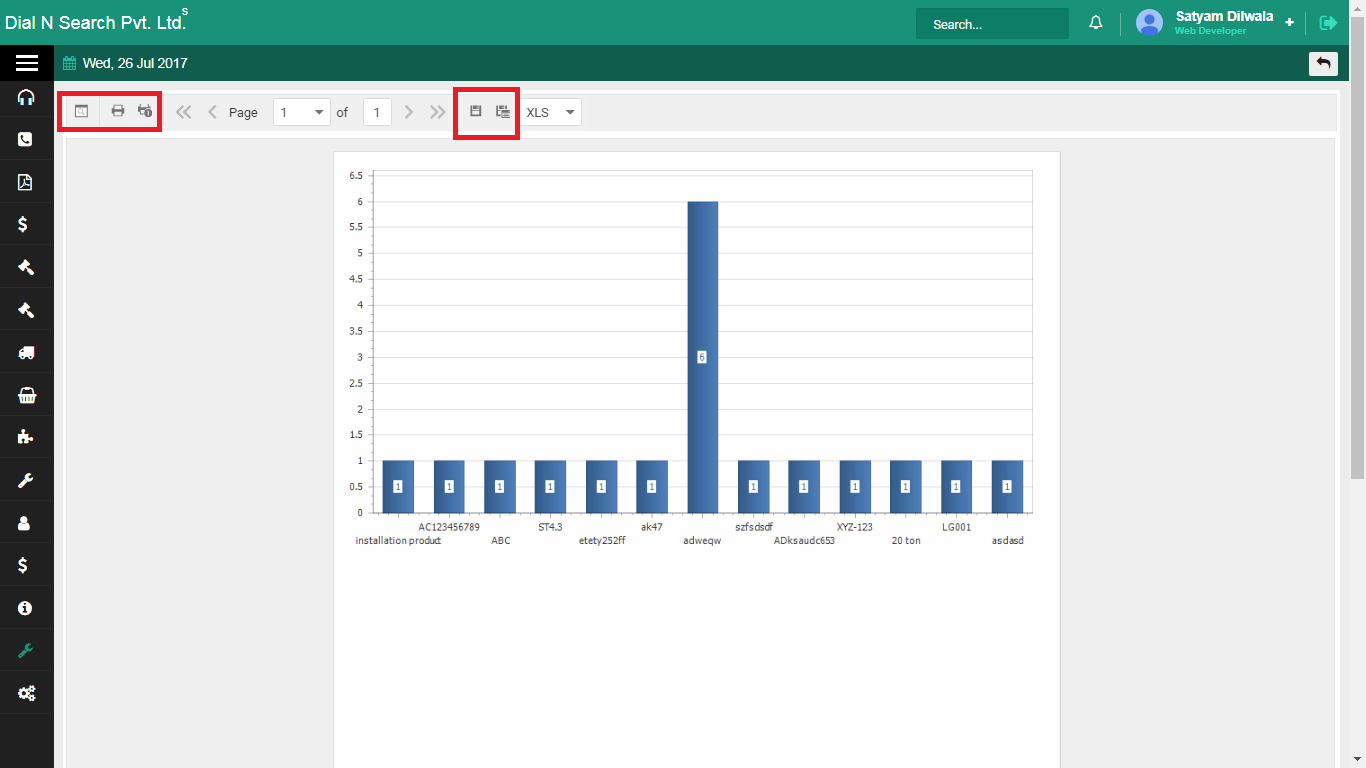
User rights
Who can see and do what. Rights are set on the employee group, not on each screen one by one. Open Employee Group, double-click the group, tick the features, Save, then Yes.
Who uses it. The owner or admin, once per role (Sales, Accounts, Service).
Example. Counter staff should raise enquiries and quotations, not purchase bills or user rights. Put them in a Sales group and tick only those features. If someone cannot see Purchase, check the group, not a broken menu.
- How to assign user rights
-
Tick what a group can see and do, so Sales cannot open Purchase and Service cannot change user rights.
Rights sit on the employee group, not on each person. Put counter staff in a Sales group and tick only enquiry and quotation. If someone cannot see Purchase, check the group. Open Employee Group, double-click the group, tick features, Save, then Yes.
On Employee Group:
- Click Employee → Employee Group.
- Click the group name (list in the first screenshot).
- Double-click the group you want to set rights for.
- Tick the features that group should have, click Save, then click Yes.
Employee groups: open the group you will set rights on.
![Admin rights 1]()
User rights: tick features for that group, then Save and Yes.
![Admin rights 2]()
![Admin rights 3]()
Tip. Add the group first (Employees → Employee group). Rights have nowhere to hang if the group does not exist.
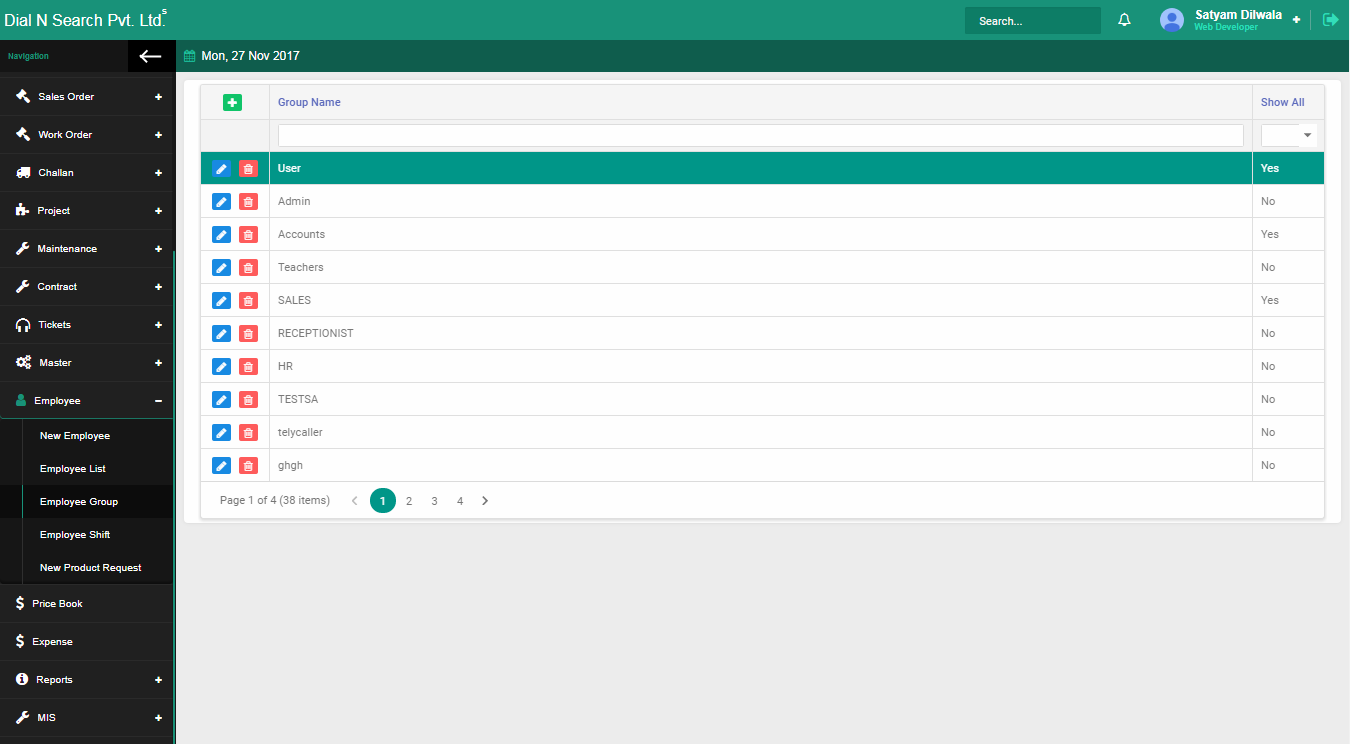
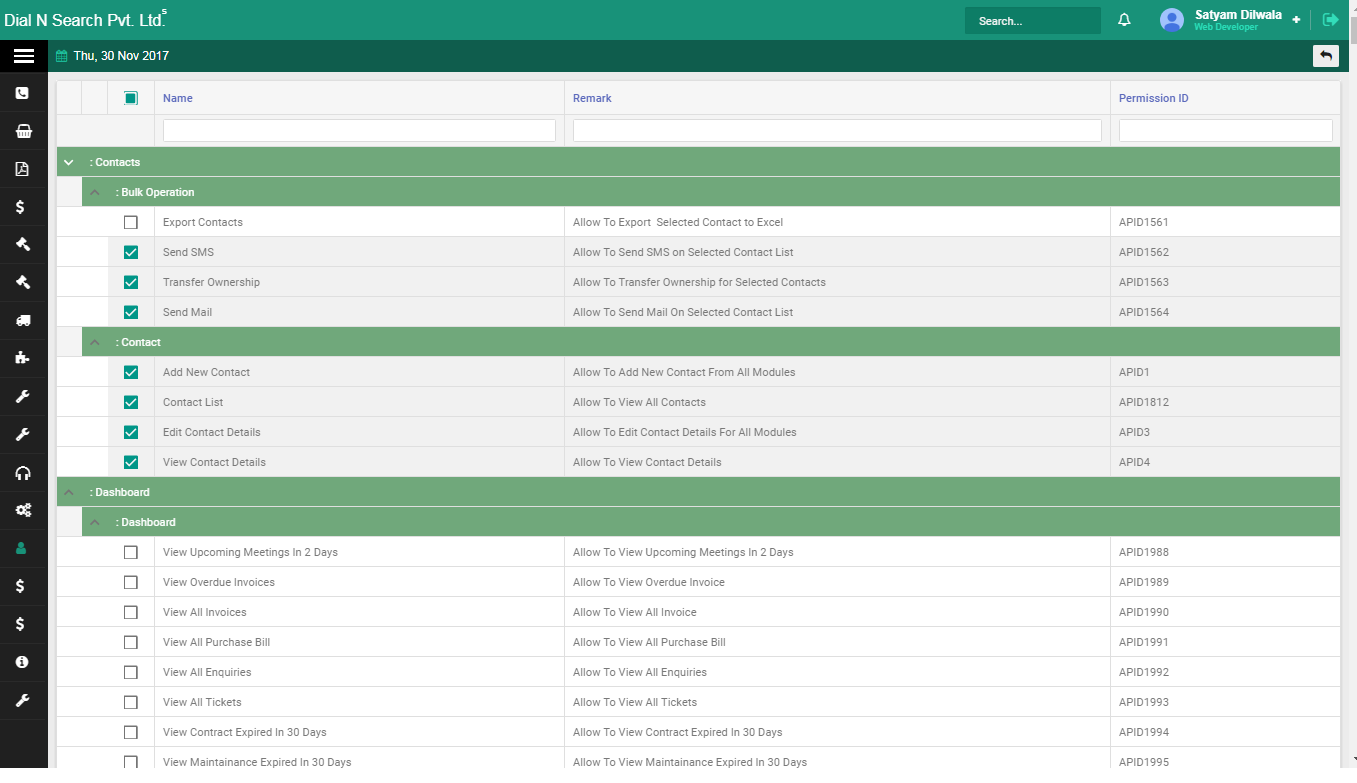
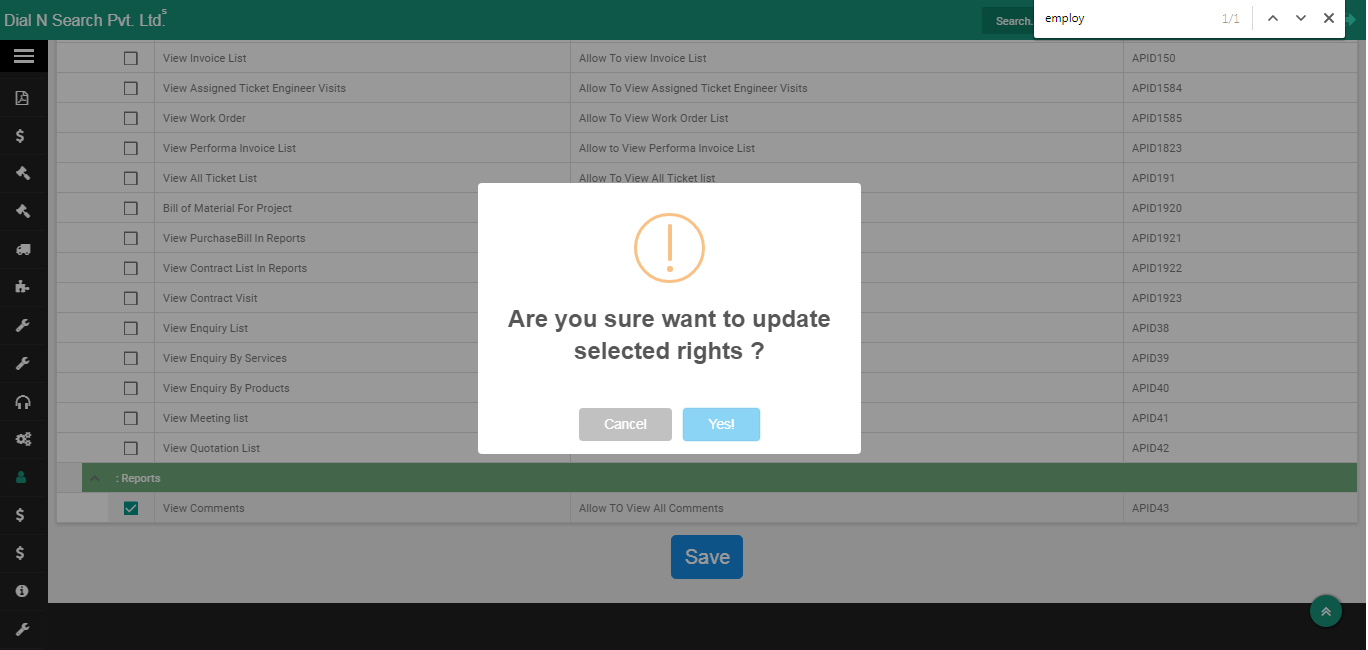
Want this walked through on your data?
Book a demo and we will show the same screens in this library, on a path that matches how you sell, deliver and service.